

1. Overview
The DELTA FAUCET RP3614 Repair Kit is designed to restore functionality and prevent leaks in single-handle Delta faucets that utilize a ball assembly, seats, and springs. This kit provides essential replacement components to address common wear and tear issues, ensuring your faucet operates smoothly and efficiently. It is important to note that this kit is not suitable for faucets controlled by a self-contained cartridge.
2. Setup & Installation
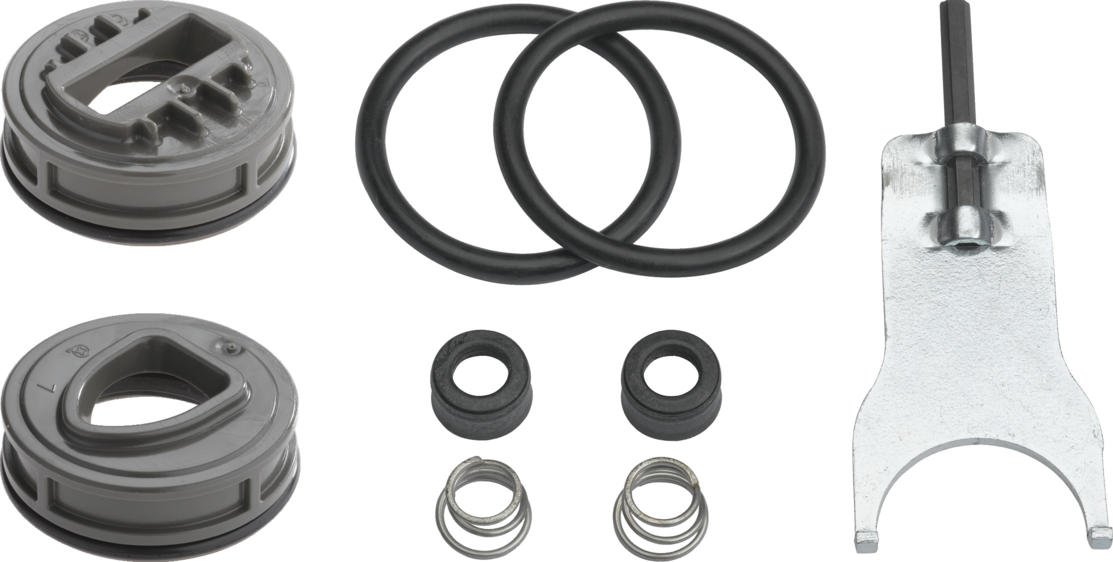
Before beginning installation, ensure the water supply to the faucet is turned off. This kit contains the necessary components for repairing single-handle Delta faucets. Familiarize yourself with the parts included:
- RP4993: Two (2) seats and two (2) springs. These are crucial for sealing the water flow.
- RP25: Two (2) valve body O-rings. These provide a seal around the valve body.
- RP61: Lever handle cam and packing. Used for faucets with a lever handle.
- RP181: Knob handle cam and packing. Used for faucets with a knob handle.
- RP1974: 1/8-inch hex key and adjusting ring spanner. These tools assist in disassembly and reassembly.

Installation Steps:
- Turn off Water Supply: Locate and turn off the hot and cold water supply valves leading to the faucet.
- Remove Handle: Use the included 1/8-inch hex key (or a larger one if needed for stubborn screws) to loosen the set screw on the faucet handle and remove the handle.
- Remove Cap and Dome: Unscrew the decorative cap and then the dome that covers the ball assembly. The RP1974 spanner may be used for the adjusting ring if present, though newer installations may omit this ring.
- Remove Ball Assembly: Carefully lift out the existing ball assembly.
- Replace Seats and Springs: Remove the old seats and springs from the valve body. Insert the new RP4993 springs into the holes, followed by the new seats on top of the springs.
- Replace O-rings: If applicable, replace the valve body O-rings (RP25). Apply a small amount of plumber's silicone grease to the new O-rings for a better seal and easier installation.
- Install New Cam and Packing: Select the appropriate cam and packing (RP61 for lever, RP181 for knob) and place it over the ball assembly.
- Reassemble Faucet: Reinsert the ball assembly with the new cam and packing into the valve body. Replace the dome and decorative cap, tightening securely but without overtightening. Reattach the handle.
- Restore Water Supply: Slowly turn the hot and cold water supply valves back on.
Note: Some older Delta faucets may benefit from replacing the ball assembly itself, even if not included in this kit, especially if corrosion is present. Consider inspecting the ball for wear during this process.
3. Operation Verification
After installation, perform the following checks to ensure proper operation:
- Check for Leaks: Observe the faucet for any drips or leaks around the handle, spout, or base. Allow water to run for a few minutes to ensure all air is purged from the lines.
- Test Handle Movement: Operate the faucet handle through its full range of motion (hot, cold, on, off). The movement should be smooth and consistent.
- Verify Water Flow: Confirm that both hot and cold water flow correctly and mix as expected.
If any issues are observed, refer to the Troubleshooting section.
4. Maintenance
To ensure the longevity and optimal performance of your Delta faucet after using the RP3614 repair kit, consider the following maintenance tips:
- Periodic Inspection: Periodically check the faucet for any signs of dripping or reduced water flow, which may indicate wear on the internal components.
- Lubrication: If the handle movement becomes stiff over time, a small amount of plumber's silicone grease can be applied to the cam and O-rings during a re-inspection.
- Mineral Deposit Cleaning: In areas with hard water, mineral deposits can accumulate. Regular cleaning of the faucet exterior and occasional disassembly to clean internal components with vinegar can prevent buildup that affects performance.
5. Troubleshooting
If you encounter issues after installing the RP3614 repair kit, refer to the following common problems and solutions:
| Problem | Possible Cause | Solution |
|---|---|---|
| Faucet still drips after repair. |
|
|
| Handle is stiff or difficult to move. |
|
|
| Water flow is weak or inconsistent. |
|
|
6. Specifications
- Model Number: RP3614
- Brand: DELTA
- Recommended Uses: Bathroom faucets (single-handle with ball assembly)
- Material: Plastic (components), Alloy steel (handle material for some faucets)
- Number of Handles: 1 (for compatible faucets)
- Included Components: 2 O-rings, 1 No. 61 Cam assembly, 2 No. RP4993 Seats, 2 No. 1974 Wrench (hex key and spanner), Cam O-rings, Seats and springs, Heart Shaped Cam, Rectangle Cam.
- Item Weight: Approximately 1.44 ounces
- Installation Type: Single Hole (for compatible faucets)
7. Warranty Information
The DELTA FAUCET RP3614 Repair Kit is covered by a Limited Lifetime Warranty from Delta Faucet. This warranty typically covers defects in material and manufacturing. For specific details regarding coverage, terms, and conditions, please refer to the official Delta Faucet warranty documentation or contact Delta customer support.
8. Customer Support
For further assistance, technical questions, or to inquire about additional parts not included in this kit, please contact Delta Faucet customer support directly. You can typically find contact information on the official Delta Faucet website or within the original product packaging of your faucet.
Online Resources: Visit the official Delta Faucet website for product information, FAQs, and support resources.


