1. Introduction
The Phoenix DEI 508D Proximity Radar Motion Sensor is designed to enhance the security of your vehicle by detecting motion both inside and outside the vehicle. This dual-zone sensor provides an early warning system, triggering your car alarm upon detecting unauthorized proximity or intrusion. This manual provides detailed instructions for installation, operation, and maintenance to ensure optimal performance and longevity of your sensor.
2. Safety Information
- Always disconnect the vehicle's battery before beginning any electrical installation to prevent short circuits or electrical shock.
- Ensure all wiring connections are secure and properly insulated to prevent fire hazards or system malfunctions.
- Do not attempt to modify the sensor's internal components. Unauthorized modifications can void the warranty and pose safety risks.
- Consult a professional automotive technician if you are unsure about any installation steps.
- Keep the sensor away from excessive moisture, heat, and direct sunlight to prevent damage.
3. Package Contents
Upon opening the package, verify that all components are present and undamaged:
- DEI 508D Proximity Radar Motion Sensor Unit
- Wiring Harness
- Installation Guide (this manual)
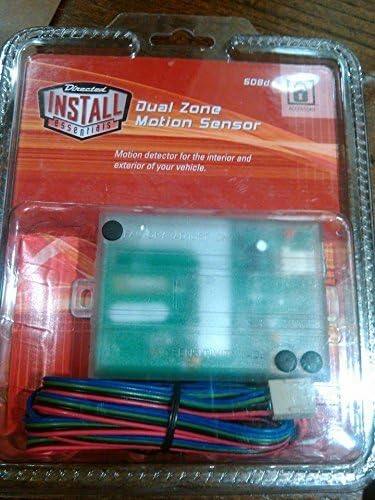
Figure 3.1: The Phoenix DEI 508D Proximity Radar Motion Sensor shown in its clear retail packaging, displaying the main sensor unit with its green circuit board visible, and a bundled wiring harness with multiple colored wires (red, black, blue, green, purple) connected to a white connector. The packaging also features the 'Directed INSTALL essentials' logo and text indicating 'Dual Zone Motion Sensor' and 'Motion detector for the interior and exterior of your vehicle.'
4. Setup and Installation
4.1 Pre-Installation Checklist
- Ensure the vehicle's battery is disconnected.
- Gather necessary tools: wire strippers, crimpers, electrical tape, zip ties, multimeter.
- Identify a suitable mounting location for the sensor.
4.2 Wiring Diagram and Connections
The DEI 508D sensor typically connects to your existing car alarm system. Refer to your car alarm's manual for specific input requirements. Common connections are:
- Red Wire: +12V Constant Power. Connect to a fused constant 12V source.
- Black Wire: Ground. Connect to a solid chassis ground point.
- Blue Wire: Zone 1 Output (Warn-Away). Connect to the alarm's warn-away or pre-warn input. This output is typically a negative pulse.
- Green Wire: Zone 2 Output (Full Trigger). Connect to the alarm's full trigger input. This output is typically a negative pulse.
- Purple Wire: Ignition Input. Connect to a switched 12V source that is active when the ignition is ON. This wire is used to disable the sensor when the vehicle is running.
4.3 Mounting the Sensor
Choose a central location within the vehicle's cabin, such as under the dashboard, center console, or behind the glove compartment. The sensor should be mounted securely and away from direct metal obstructions that could interfere with its radar field. Ensure the sensor is level and not obstructed by large metal objects or wiring harnesses.
- Use zip ties or double-sided automotive tape to secure the sensor firmly.
- Avoid mounting near large speakers or other devices that emit strong electromagnetic fields.
- Test the sensor's coverage after mounting to ensure optimal detection zones.
5. Operating Instructions
The DEI 508D sensor operates automatically once properly installed and connected to your car alarm system. It creates two distinct detection zones: an outer
Ask a question about this manual
Ask about setup, troubleshooting, compatibility, parts, safety, or missing instructions. Manuals+ will review the question and use this page’s manual context to help answer it.