Possini Euro Design 43060
Possini Euro Design Art Deco Modern Ceiling Light Instruction Manual
Model: 43060
1. Product Overview
This manual provides essential information for the safe installation, operation, and maintenance of your Possini Euro Design Art Deco Modern Ceiling Light. This slim, low-profile flushmount fixture is designed to enhance various indoor spaces such as bedrooms, hallways, kitchens, bathrooms, living rooms, and dining areas. It features an oil-rubbed bronze finish and a marbleized glass bowl shade, providing both functional illumination and a contemporary aesthetic.

Figure 1.1: The Possini Euro Design Art Deco Modern Ceiling Light, showcasing its oil-rubbed bronze finish and marbleized glass shade, installed flush against a ceiling.

Figure 1.2: A direct view of the ceiling light from below, highlighting the intricate marbleized pattern of the glass bowl shade.
2. Safety Information
WARNING: Risk of Electric Shock. Disconnect power at the fuse box or circuit breaker before installation or servicing.
- Always ensure the power supply is turned off before installing, cleaning, or performing any maintenance on the fixture.
- Installation should be performed by a qualified electrician or a knowledgeable individual familiar with electrical wiring.
- Handle the glass shade with care to prevent breakage. The glass may feature minor pinprick bubbles, which are normal and not defects.
- Use only bulbs of the specified type and wattage (maximum 100 watts per bulb, standard-medium base).
- This fixture is designed for indoor use only and is not water resistant.
- Ensure the installation location is well-ventilated, especially if used in a bathroom.
3. What's in the Box
Carefully unpack all components and inspect for any damage. Keep all packaging materials until you are certain all parts are present and in good condition.
- Ceiling Light Fixture (Oil-Rubbed Bronze finish with Marbleized Glass Bowl Shade)
- Mounting Hardware
- Instruction Manual
Note: Bulbs are not included. This fixture requires two standard-medium base bulbs (E26 base).
4. Setup and Installation
Follow these steps for proper installation. If you are unsure about any part of the installation process, consult a qualified electrician.
- Prepare for Installation: Turn off the electricity at the main fuse box or circuit breaker. Ensure the power is completely disconnected before proceeding.
- Mounting the Canopy: Secure the mounting hardware (included) to the electrical junction box in your ceiling. The canopy is 9 1/2 inches wide and 3/4 inches high.
- Wiring: Connect the fixture's wires to the corresponding household wires according to local electrical codes. Typically, black to black (live), white to white (neutral), and green or bare copper to green or bare copper (ground). Ensure all connections are secure with wire nuts.
- Attaching the Fixture: Carefully attach the fixture body to the mounted canopy, ensuring all wires are tucked safely inside the junction box.
- Installing Bulbs: Insert two standard-medium base (E26) bulbs, up to 100 watts each (not included), into the sockets.
- Securing the Glass Shade: Carefully place the marbleized glass bowl shade onto the fixture and secure it using the provided fasteners. Ensure it is seated properly to prevent accidental falls.
- Restore Power: Once installation is complete and all components are securely in place, restore power at the fuse box or circuit breaker.
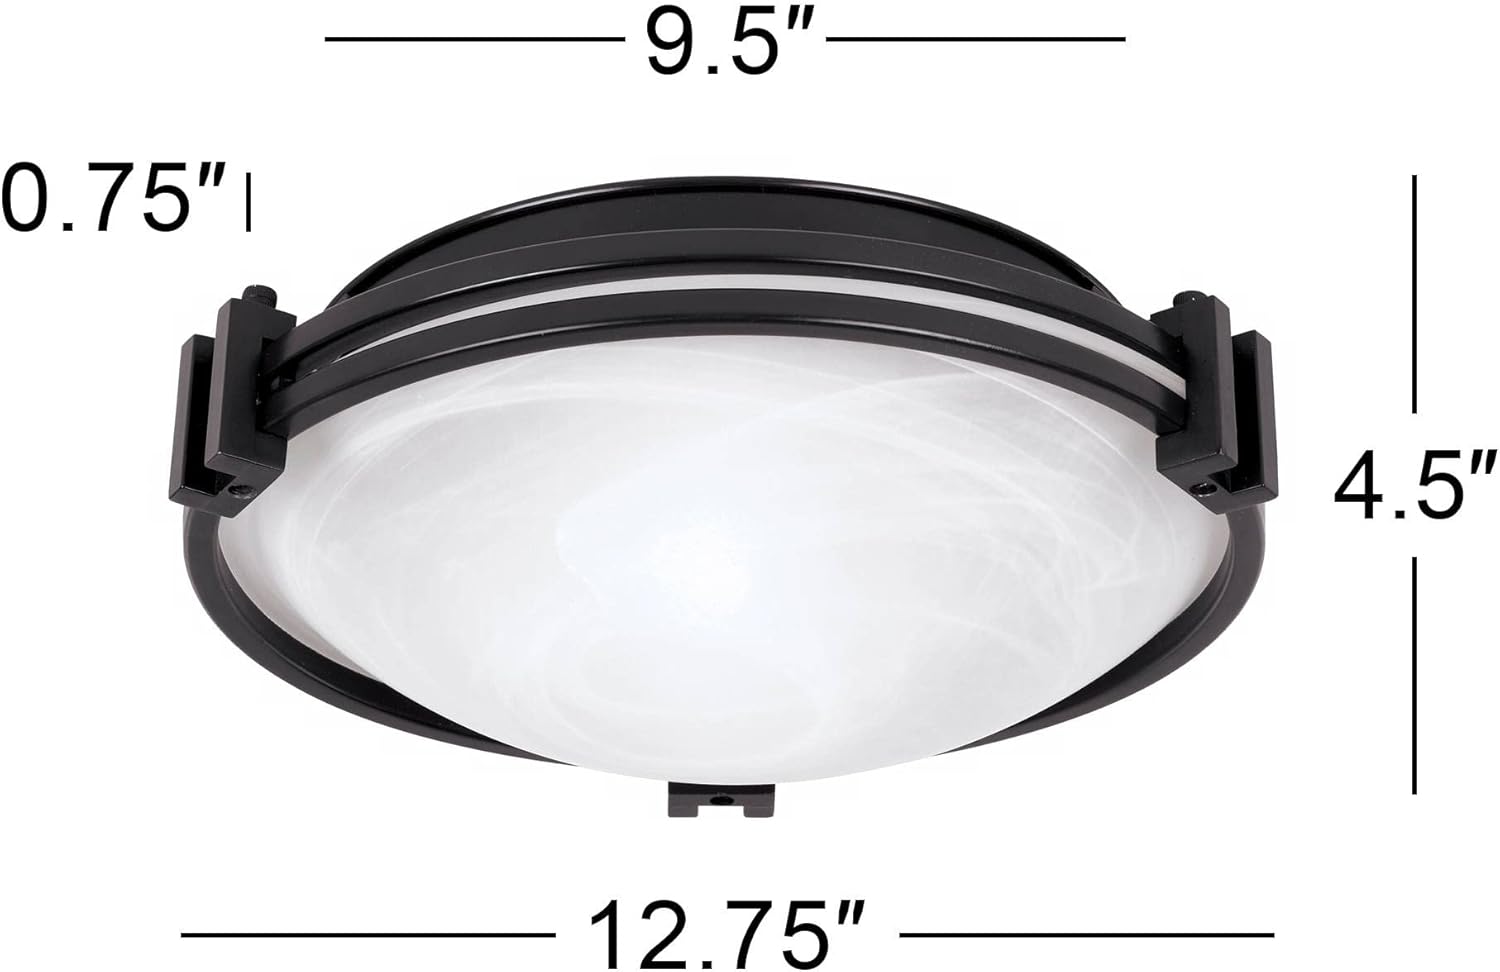
Figure 4.1: Dimensional diagram of the fixture, showing its 12 3/4" width and 4 1/2" height, with a 9 1/2" wide canopy.
Video 4.1: A "Ceiling Light Buying Guide" from LampsPlus, offering general advice on selecting and understanding ceiling light types, including flushmounts and semi-flushmounts. This video provides helpful context for installation and placement considerations.
5. Operating Instructions
This fixture operates like a standard ceiling light. Once installed and wired correctly, it can be controlled by a wall switch (not included). The fixture is compatible with dimmer switches, allowing you to adjust the light output to set the desired mood. Ensure any dimmer switch used is compatible with the type of bulbs installed (e.g., LED compatible dimmers for LED bulbs).
The fixture uses two standard-medium base bulbs, each up to 100 watts, for a total maximum wattage of 200 watts. For energy efficiency, consider using LED bulbs.
6. Maintenance
Regular maintenance will help preserve the appearance and functionality of your ceiling light.
- Cleaning: Disconnect power before cleaning. Use a soft, dry cloth to wipe the metal finish. For the glass shade, a mild glass cleaner can be used, applied to the cloth first, not directly to the shade. Avoid abrasive cleaners or solvents that may damage the finish or glass.
- Bulb Replacement: Ensure power is off before replacing bulbs. Allow old bulbs to cool before removal. Replace with new standard-medium base (E26) bulbs, up to 100 watts each.
- Inspection: Periodically check all connections and mounting hardware to ensure they remain secure.
7. Troubleshooting
If you encounter issues with your ceiling light, refer to the following common problems and solutions:
| Problem | Possible Cause | Solution |
|---|---|---|
| Light does not turn on. |
|
|
| Light flickers. |
|
|
| Glass shade cracks. |
|
|
8. Specifications
| Brand | Possini Euro Design |
| Model Number | 43060 |
| Product Dimensions | 12.75"L x 12.75"W x 4.5"H |
| Canopy Dimensions | 9.5"W x 0.75"H |
| Item Weight | 4.53 Pounds |
| Material | Metal (Oil-Rubbed Bronze Finish), Glass (Marbleized Shade) |
| Light Source Type | Standard-medium base bulb (E26) |
| Number of Light Sources | 2 |
| Maximum Wattage | 100 watts per bulb (200 watts total) |
| Voltage | 120 Volts |
| Installation Type | Flush Mount |
| Indoor/Outdoor Usage | Indoor Only |
| Assembly Required | No (minor assembly for shade attachment) |
| Country of Origin | China |
| UPC | 736101057338 |
9. Warranty and Support
This Possini Euro Design product is backed by the manufacturer's standard warranty. For specific warranty details, claims, or technical support, please contact Possini Euro Design customer service or the retailer from whom the product was purchased. Please have your model number (43060) and proof of purchase ready when contacting support.
Video 9.1: A brand video from Possini Euro Design, showcasing various modern and contemporary lighting styles. This video highlights the aesthetic and design philosophy of the brand.
Ask a question about this manual
Ask about setup, troubleshooting, compatibility, parts, safety, or missing instructions. Manuals+ will review the question and use this page’s manual context to help answer it.