Introduction
The Starrett 440Z-3RL Micrometer Depth Gage is a precision instrument designed for accurate measurement of depths in holes, slots, shoulders, and projections. This manual provides essential information for the proper setup, operation, maintenance, and care of your depth gage to ensure reliable performance and longevity.
Key features of this depth gage include:
- Durable construction with quality materials for heavy use.
- Ring-type knurled lock nut for secure locking of measurements.
- Combination ratchet and speeder for uniform pressure during measurement.
- Designed for user-friendly operation.
Components Overview
Familiarize yourself with the main components of your Starrett Micrometer Depth Gage.
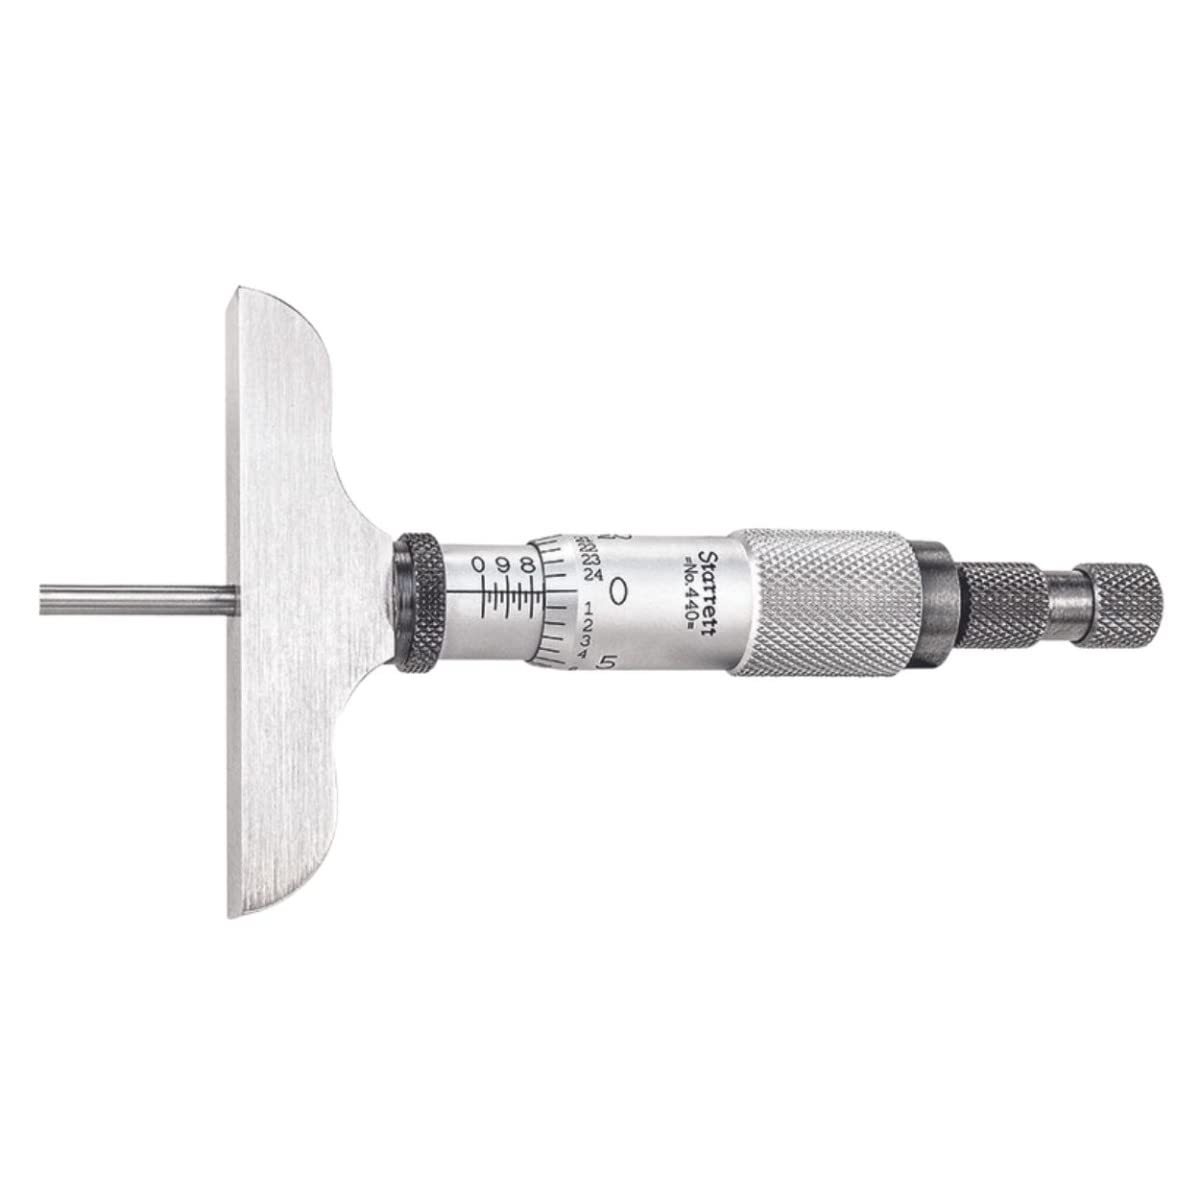
Image: The Starrett 440Z-3RL Micrometer Depth Gage, showing the base, measuring rod, thimble, and ratchet/speeder mechanism.
The depth gage consists of a base, a micrometer head with a thimble and sleeve, and interchangeable measuring rods. The ratchet/speeder mechanism ensures consistent measuring pressure.
Setup
Before taking measurements, ensure the depth gage is properly set up.
- Unpacking: Carefully remove the depth gage and its accessories (measuring rods, wrench) from the case. Inspect for any shipping damage.
- Cleaning: Wipe all surfaces with a clean, lint-free cloth. If necessary, use a mild cleaning solution suitable for precision instruments, then dry thoroughly.
- Rod Installation: Select the appropriate measuring rod for your desired depth range. Insert the rod into the micrometer head until it seats firmly. Ensure the rod is clean and free of debris before insertion.
- Zero Adjustment: Place the base of the depth gage on a flat, known reference surface. Bring the end of the measuring rod into contact with the surface by rotating the thimble. Use the ratchet/speeder until it clicks, indicating proper measuring pressure. The zero line on the thimble should align with the zero line on the sleeve. If not, refer to the "Adjustment" section for calibration.

Image: The Starrett Micrometer Depth Gage kit, showing the micrometer head, various measuring rods, and a wrench, all neatly arranged in a protective case.
Operating Instructions
Follow these steps for accurate depth measurements:
- Prepare the Surface: Ensure the surface from which the depth measurement is taken is clean and flat.
- Position the Gage: Place the base of the depth gage firmly on the reference surface, ensuring it is stable and perpendicular to the feature being measured.
- Lower the Rod: Rotate the thimble to lower the measuring rod until its end contacts the bottom of the hole, slot, or projection. Use the ratchet/speeder mechanism to apply consistent, light pressure until it clicks. This prevents overtightening and ensures repeatable measurements.
- Lock the Measurement: Once contact is made and pressure is applied, gently tighten the ring-type knurled lock nut to secure the thimble and prevent accidental movement.
- Read the Measurement: Carefully lift the depth gage from the workpiece. Read the measurement from the sleeve and thimble scales.

Image: A close-up of the Starrett Micrometer Depth Gage, showing the measuring rod extended and the base resting on a surface, ready for a depth measurement.
Video: An official Starrett video demonstrating the features and operation of the 440 & 445 Series Depth Micrometers. This video illustrates how to use the depth gage for accurate measurements.
Adjustment
Adjustments to Starrett Micrometers are rarely needed. However, if play develops in the spindle screw threads or if the zero setting is off, follow these steps:
- Eliminating Spindle Play: If play is present in the spindle screw threads due to wear, first back off the thimble. Insert the spanner wrench (provided) into the slot of the adjusting nut. Tighten the adjusting nut just enough to eliminate play without binding the spindle.
- Zero Setting: After cleaning any dirt or grit from the measuring faces of the base and rod, bring them together on a flat reference surface. Insert the spanner wrench into the small slot of the sleeve. Turn the sleeve until the zero line on the thimble coincides with the zero line on the sleeve.

Image: Illustration showing the use of a spanner wrench to adjust the sleeve of a micrometer for zero setting.
Maintenance and Care
Proper maintenance ensures the accuracy and longevity of your depth gage.
- Cleaning: Keep the instrument clean and free from dust, dirt, and oil. Wipe all surfaces with a clean, soft cloth after each use.
- Lubrication: Periodically apply a thin film of light machine oil to the spindle and other moving parts to prevent corrosion and ensure smooth operation. Avoid excessive oil.
- Storage: Store the depth gage in its protective case when not in use. Keep it in a dry environment with stable temperature to prevent rust and dimensional changes.
- Handling: Handle the instrument with care. Avoid dropping it or subjecting it to impact, which can affect its accuracy.
- Calibration: For critical applications, periodic calibration by a qualified technician is recommended to verify accuracy.
Troubleshooting
| Problem | Possible Cause | Solution |
|---|---|---|
| Inaccurate readings | Dirt or debris on measuring faces; improper zero setting; worn measuring rod; excessive measuring pressure. | Clean measuring faces thoroughly. Perform zero adjustment. Inspect and replace worn rods. Use the ratchet/speeder for consistent pressure. |
| Spindle feels loose or has play | Loose adjusting nut; wear in spindle threads. | Tighten the adjusting nut as described in the "Adjustment" section. If wear is significant, professional service may be required. |
| Spindle is stiff or binds | Lack of lubrication; dirt or corrosion; adjusting nut too tight. | Clean and lightly lubricate the spindle. Loosen the adjusting nut slightly if it was overtightened. |
| Difficulty reading scales | Poor lighting; dirty scales; glare. | Ensure adequate lighting. Clean scales. Adjust viewing angle to minimize glare. |
Specifications
| Feature | Detail |
|---|---|
| Model Number | 440Z-3RL |
| Brand | Starrett |
| Material | Stainless Steel |
| Range | 0-3 inches |
| Graduation | 0.001 inches |
| Measurement Accuracy | +/- 0.0001 inches |
| Base Size | 2-1/2 inches (63.5mm) |
| Number of Rods | 3 Rods |
| Rod Diameter | 1/8 inches (3.2mm) |
| Item Weight | 1 pound |
| Product Dimensions | 10.3 x 4.3 x 1.4 inches |
Warranty and Support
Starrett products are manufactured to high standards of quality and workmanship. For specific warranty information, please refer to the documentation included with your product or visit the official Starrett website. For technical support, service, or replacement parts, please contact Starrett customer service.
Contact Information: Please refer to the official Starrett website or product packaging for the most current contact details.