Introduction
This manual provides comprehensive instructions for the installation, operation, and maintenance of your Fluidmaster 400AKRP10 Universal All-in-One Toilet Tank Repair Kit. This kit is designed to restore and improve the performance of 2-inch flush valve toilets, addressing common issues such as running toilets, weak flushes, and leaks. Please read all instructions carefully before beginning installation.
What's in the Box
Your Fluidmaster 400AKRP10 kit includes the following components:
- Fluidmaster 400A Toilet Fill Valve
- PerforMAX 2-inch Water-Saving Flapper
- Toilet Flush Valve
- Toilet Handle
- Tank-to-Bowl Gasket
- Hardware for installation (bolts, washers, nuts)

Image: The Fluidmaster 400AKRP10 Universal All-in-One Toilet Tank Repair Kit in its retail packaging, showing all included components.
Key Features
- Restores Overall Toilet Performance: Replaces inefficient fill and flush valves, leaky flappers, and broken toilet handles.
- Universal Design: The 400A toilet fill valve adjusts from 9 to 14 inches, fitting most 2-inch flush valve toilets. Ideal for 1.6 to 3.5 gallons per flush (GPF) toilets or larger.
- High Performance Flapper: PerforMAX 2-inch adjustable water-saving toilet flapper optimizes water usage with each flush.
- Easy Installation: Designed for quick and straightforward installation, typically in 10 minutes or less.
Setup and Installation
Follow these steps to install your Fluidmaster 400AKRP10 kit. It is recommended to have basic tools such as a wrench and a bucket available.
1. Prepare the Toilet Tank
- Turn off the water supply to the toilet at the shut-off valve located near the base of the toilet.
- Flush the toilet to empty the tank completely. Hold the handle down until all water has drained.
- Use a sponge or towel to remove any remaining water from the tank.
- Disconnect the water supply line from the bottom of the old fill valve.
- Remove the old fill valve, flush valve, flapper, and toilet handle. Clean the inside of the tank thoroughly, especially around the bolt holes and flush valve opening.
2. Install New Flush Valve and Tank-to-Bowl Gasket
- Place the new flush valve into the large opening at the bottom of the tank. Ensure the rubber gasket is properly seated.
- From underneath the tank, secure the flush valve with the provided large nut. Hand-tighten, then use a wrench for a final quarter turn. Do not overtighten.
- Install the new tank-to-bowl gasket over the flush valve nut.
- Position the tank onto the toilet bowl, aligning the bolt holes. Insert the tank bolts with washers from inside the tank.
- From underneath the bowl, secure the tank with the remaining washers and nuts. Tighten evenly to prevent cracking the tank or bowl.
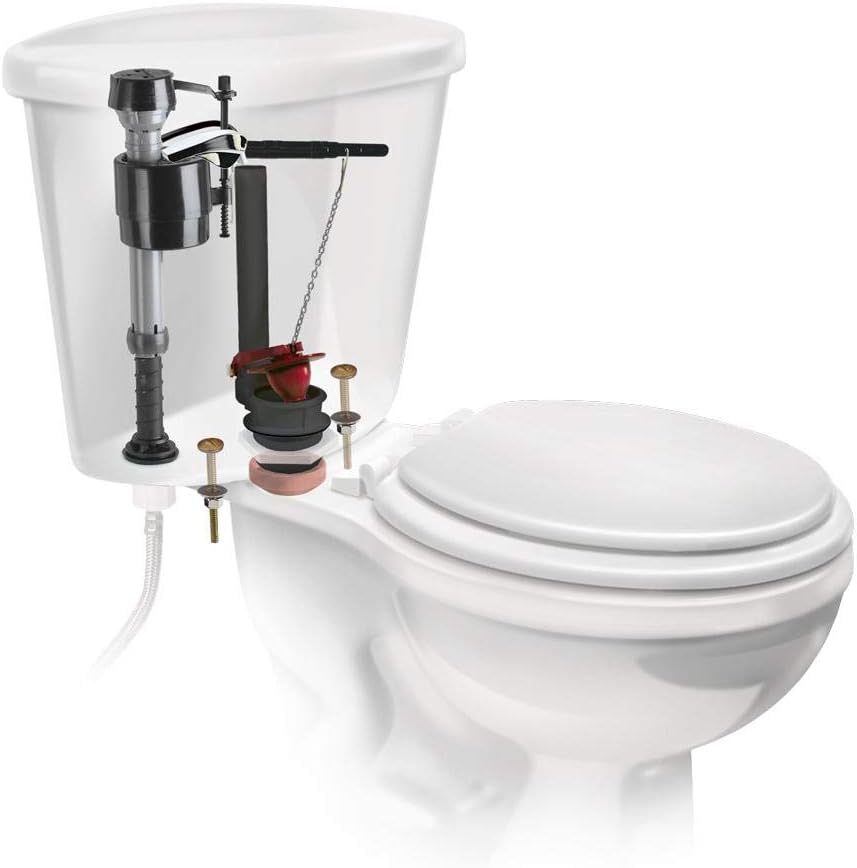
Image: An illustrative diagram showing the Fluidmaster fill valve, flush valve, and flapper correctly installed within a toilet tank.
3. Install New Fill Valve and Flapper
- Insert the new Fluidmaster 400A fill valve into the smaller hole at the bottom of the tank.
- From underneath the tank, secure the fill valve with the provided lock nut. Hand-tighten, then use a wrench for a final quarter turn.
- Attach the refill tube from the fill valve to the overflow pipe of the flush valve.
- Clip the new PerforMAX flapper onto the flush valve ears and connect its chain to the toilet handle arm. Ensure there is slight slack in the chain.

Image: Close-up of the Fluidmaster 400A fill valve, showing the top cap and water level adjustment mechanism.

Image: The Fluidmaster PerforMAX 2-inch flapper, designed for optimal flush performance, shown with its attached chain.
4. Install New Toilet Handle
- Insert the new toilet handle through the hole in the front of the tank.
- Secure the handle with the provided nut from inside the tank.

Image: The chrome-finished toilet handle included in the kit, ready for installation.
5. Final Steps
- Reconnect the water supply line to the bottom of the new fill valve.
- Slowly turn on the water supply valve. Allow the tank to fill.
- Check for any leaks around the connections and the base of the toilet. Tighten connections if necessary.
Video: An official Fluidmaster video demonstrating the installation process for the 400AKRP10 Universal All-in-One Toilet Tank Repair Kit. This video provides a visual guide to the steps outlined above, including component identification and assembly.
Operating Instructions
Adjusting Water Level
The Fluidmaster 400A fill valve allows for easy adjustment of the tank's water level to optimize flush performance and water usage. The top of the fill valve cap should be set approximately 3 inches above the overflow pipe. The top of the overflow pipe should be a minimum of 1 inch below the tank lever hole.
- To raise the water level: Turn the lower shank of the fill valve clockwise.
- To lower the water level: Turn the lower shank of the fill valve counter-clockwise.
After adjustment, flush the toilet to verify the new water level and ensure proper operation without leaks.
Maintenance
Regular maintenance helps ensure the longevity and efficiency of your toilet repair kit components:
- Inspect Annually: Periodically check the fill valve, flapper, and seals for signs of wear, cracking, or deterioration.
- Clean Components: If mineral deposits or debris accumulate, gently clean the fill valve and flapper with a soft brush and mild cleaner. Avoid harsh chemicals that can damage rubber or plastic.
- Check for Leaks: Listen for running water when the toilet is not in use. A running toilet often indicates a worn flapper or an improperly adjusted fill valve.
- Flapper Chain: Ensure the flapper chain has a small amount of slack. Too much tension can prevent the flapper from sealing properly, leading to leaks.
Troubleshooting
Here are solutions to common issues you might encounter:
| Problem | Possible Cause | Solution |
|---|---|---|
| Toilet runs continuously | Flapper not sealing, fill valve set too high, or refill tube too long. | Check flapper for proper seating and wear. Adjust fill valve water level. Ensure refill tube is not inserted too far into the overflow pipe. |
| Weak or incomplete flush | Water level too low. | Adjust fill valve to raise the water level in the tank. |
| Slow tank fill | Partially closed water supply valve or debris in fill valve. | Ensure water supply valve is fully open. Inspect fill valve for debris and clean if necessary. |
| Water leaks from tank base | Loose tank bolts or damaged tank-to-bowl gasket. | Tighten tank bolts evenly. If leak persists, the tank-to-bowl gasket may need replacement. |
Specifications
- Model Number: 400AKRP10
- Brand: Fluidmaster
- Material: Plastic, Rubber
- Item Weight: 8 ounces
- Installation Type: Standard
- Fill Valve Adjustment: 9 – 14 inches
- Flapper Size: 2-inch
- Compatibility: Most 2-inch flush valve toilets, 1.6 to 3.5 GPF or larger.
Warranty and Support
The Fluidmaster 400AKRP10 Universal All-in-One Toilet Tank Repair Kit comes with a 5-year warranty. For detailed warranty information, troubleshooting assistance, or to contact customer support, please refer to the documentation included with your product or visit the official Fluidmaster website: www.fluidmaster.com.