1. Introduction
This manual provides essential instructions for the proper setup, operation, and maintenance of your Daewoo DV-6T844B DVD/VCR Combo unit. This device integrates a DVD player and a VCR recorder into a single unit. The DVD component functions as a player only, while the VCR component supports both recording and playback of VHS tapes.
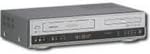
Figure 1: Front view of the Daewoo DV-6T844B DVD/VCR Combo unit. This image displays the combined DVD and VCR sections, including the disc tray, tape slot, and front panel controls.
2. Setup
2.1 Unpacking and Inspection
Carefully remove the unit from its packaging. Verify that all included components are present. The package typically includes the DVD/VCR Combo unit and a power cord. Inspect the unit for any signs of damage incurred during shipping. If any damage is found, contact your retailer.
2.2 Connecting to a Television
To connect the DV-6T844B to your television, use the appropriate audio/video cables. The unit supports RCA and Composite connections.
- RCA/Composite Connection: Connect the yellow video cable from the unit's "VIDEO OUT" jack to the yellow "VIDEO IN" jack on your television. Connect the red and white audio cables from the unit's "AUDIO OUT" jacks (R for right, L for left) to the corresponding red and white "AUDIO IN" jacks on your television.
After connecting the cables, select the correct input source (e.g., Video 1, AV1) on your television using its remote control or input/source button.
2.3 Power Connection
Once all audio/video connections are secure, plug the power cord into the unit's power input, then plug the other end into a standard AC power outlet. The unit is now ready for operation.
3. Operating Instructions
3.1 Powering On/Off
Press the POWER button on the front panel of the unit or on the remote control to turn the unit on or off.
3.2 Selecting Input Source (DVD/VCR)
To switch between DVD and VCR functions, press the DVD/VCR button on the front panel or remote control. Ensure your television is set to the correct input source.
3.3 DVD Playback
- Ensure the unit is powered on and the input source is set to DVD.
- Press the OPEN/CLOSE button to open the DVD disc tray.
- Place a DVD disc onto the tray with the label side facing up.
- Press the OPEN/CLOSE button again to close the tray.
- The disc will load, and playback should begin automatically. If not, press the PLAY button.
- Use the PAUSE, STOP, FAST FORWARD, and REWIND buttons for playback control.
Note: The DVD component of this unit is a player only and does not support recording.
3.4 VCR Playback
- Ensure the unit is powered on and the input source is set to VCR.
- Insert a VHS tape into the VCR slot. The unit will typically load the tape automatically.
- Press the PLAY button to begin playback.
- Use the PAUSE, STOP, FAST FORWARD, and REWIND buttons for playback control.
- To eject the tape, press the EJECT button.
3.5 VCR Recording
The VCR component allows recording from an external source (e.g., TV tuner, cable box) connected to the unit's input jacks. Specific recording setup may vary based on your external source.
- Ensure the unit is powered on and the input source is set to VCR.
- Insert a recordable VHS tape into the VCR slot.
- Select the appropriate input channel on the VCR (e.g., Line 1, L1) that corresponds to your external source connection.
- Begin playback on your external source (if applicable).
- Press the RECORD button on the unit or remote control to start recording. The recording indicator will illuminate.
- To stop recording, press the STOP button.
4. Maintenance
4.1 Cleaning the Unit
- Exterior: Wipe the exterior surfaces of the unit with a soft, dry cloth. For stubborn dirt, slightly dampen the cloth with water and a mild detergent, then wipe dry. Avoid abrasive cleaners or solvents.
- Disc Tray/Tape Slot: Keep the disc tray and tape slot free of dust and debris. Do not insert foreign objects into these openings.
4.2 General Care
- Avoid exposing the unit to direct sunlight, extreme temperatures, or high humidity.
- Ensure adequate ventilation around the unit to prevent overheating.
- Do not place heavy objects on top of the unit.
5. Troubleshooting
This section addresses common issues you might encounter with your Daewoo DV-6T844B. If the problem persists after attempting these solutions, contact customer support.
| Problem | Possible Cause | Solution |
|---|---|---|
| No power | Power cord not connected; power outlet not active. | Ensure power cord is securely plugged in. Test the outlet with another device. |
| No picture or sound | Incorrect TV input selected; A/V cables loose or incorrectly connected. | Select the correct input source on your TV (e.g., AV1, Video 1). Check all A/V cable connections. |
| DVD disc does not play | Disc is dirty, scratched, or inserted incorrectly; incompatible disc format. | Clean the disc with a soft cloth. Ensure the disc is inserted label-side up. Verify disc compatibility. |
| VHS tape does not play or record | Tape is damaged; VCR heads are dirty; incorrect input selected for recording. | Try a different tape. Consider using a VCR head cleaner tape. Ensure correct VCR input is selected for recording. |
| Remote control not working | Batteries are dead or inserted incorrectly; obstruction between remote and unit. | Replace batteries. Ensure correct polarity. Remove any obstructions. Point remote directly at the unit. |
6. Specifications
| Feature | Detail |
|---|---|
| Brand | Daewoo |
| Model Name | DV-6T844B |
| Media Type | DVD (Player), VHS (Recorder/Player) |
| Resolution | 720 x 576 pixels |
| Connector Type | RCA, Composite |
| Connectivity Technology | RCA, Composite |
| Audio Output Mode | Surround |
| Color | Grey |
| Item Weight | 10.5 pounds |
| Package Dimensions | 19.88 x 12.36 x 5.24 inches |
| Included Components | DVD Player, VCR Recorder |
7. Warranty and Support
For warranty information and customer support, please refer to the documentation included with your purchase or visit the official Daewoo support website. Keep your purchase receipt as proof of purchase for warranty claims.
For further assistance, you may contact Daewoo customer service. Specific contact details are typically provided in the product packaging or on the manufacturer's website.


