
Introduction
The Penn-Plax Cascade 700 Canister Filter is designed to provide crystal clear water for aquariums up to 65 gallons, cycling water at 185 Gallons per Hour (GPH). This filter is suitable for both freshwater and saltwater fish tanks, as well as turtle habitats. It features a push-button primer, 360° rotating valve taps for easy maneuvering, and stackable media baskets for customizable filtration.
Components Included
Before beginning assembly, ensure all components are present and undamaged.
- Canister Filter Unit
- Adjustable Flow 360° Turning Valves (2 Independent Valve Taps)
- Push Button Primer
- Flow Rate Control Cut-Off Valves
- Swimming-Pool Style Hose Clamps
- 4 Easy Lift Alignment Clamps
- Sturdy Tip-Proof Base
- Large Capacity Media Baskets (2)
- Poly Fiber Floss Pads (2)
- Coarse Bio-Sponge (1)
- Bag of Activated Carbon (1)
- Hoses
- Input/Output Assembly and Suction Cups
- Intake Strainer
- Output Nozzle and Spray Bar
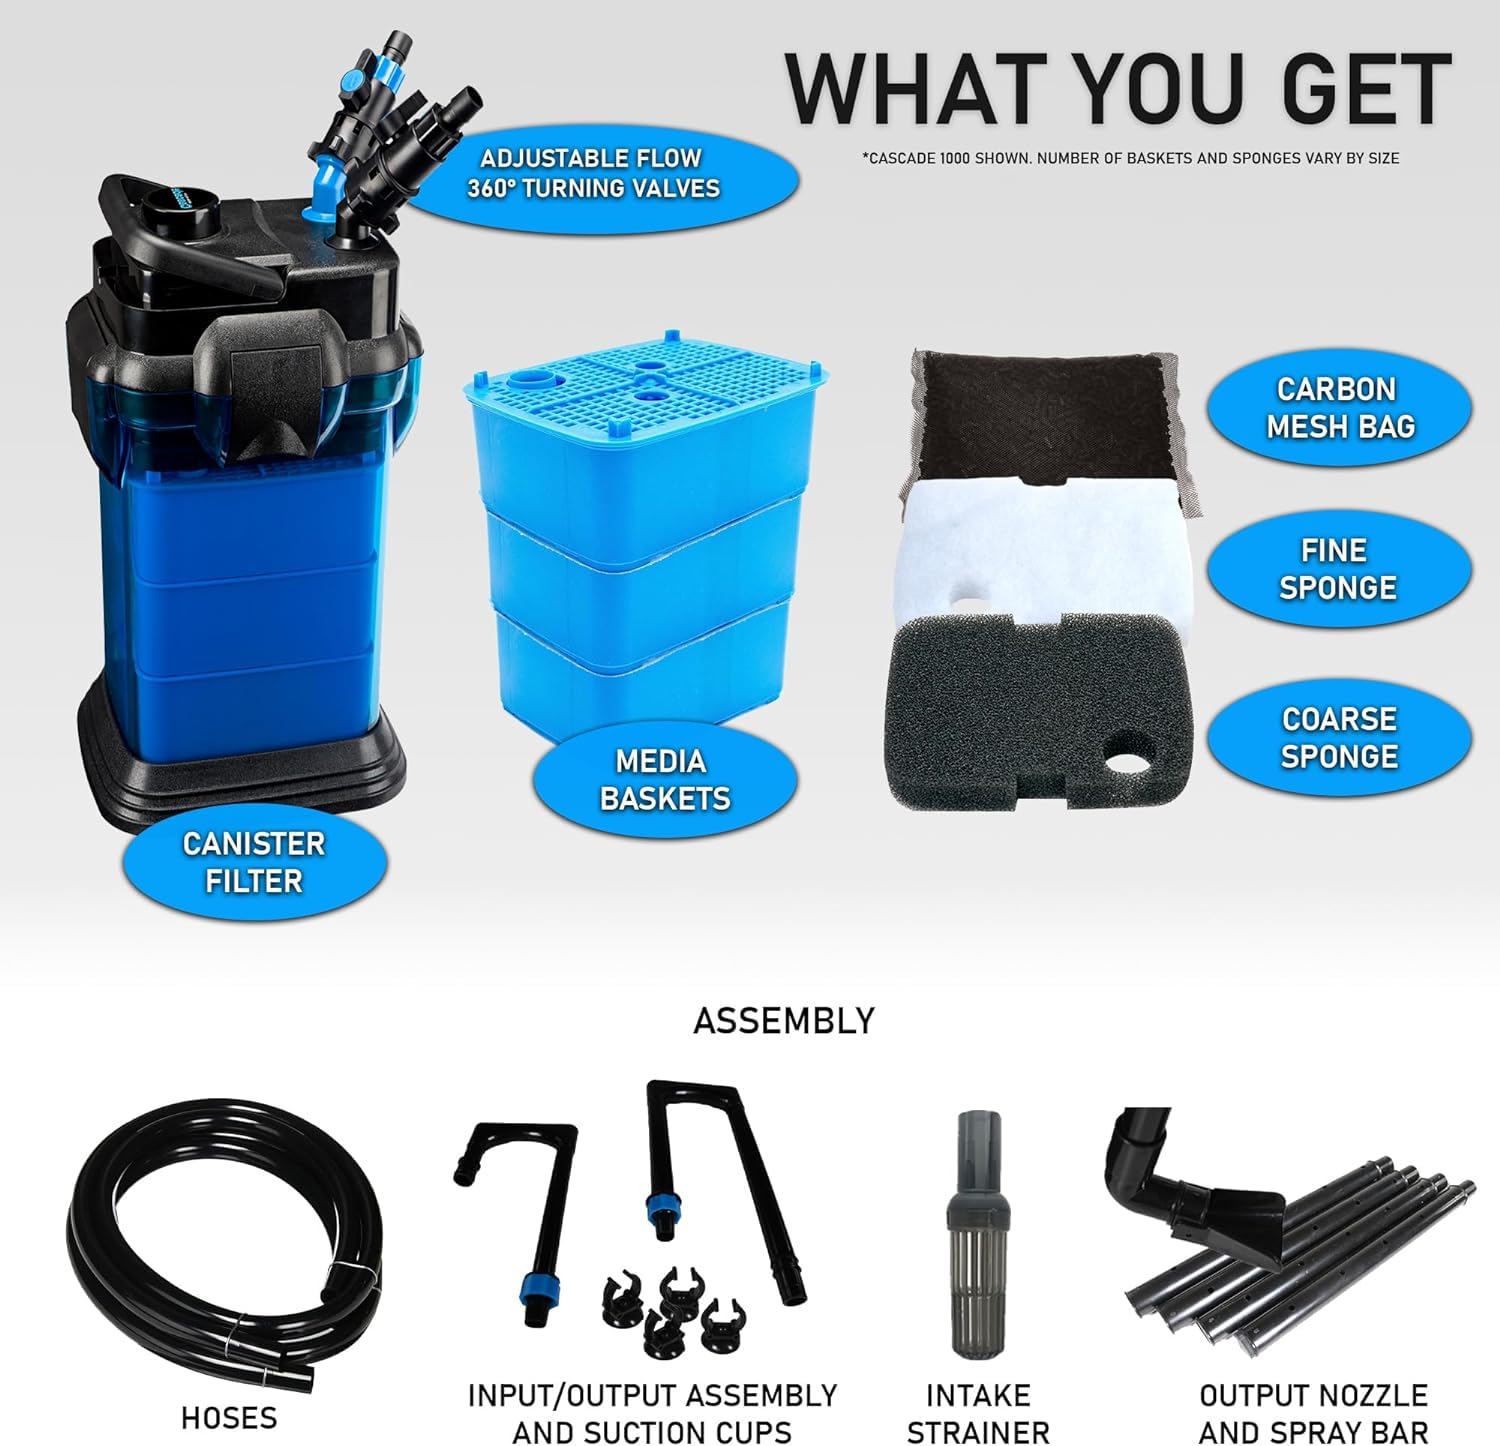
Figure 1: All components included with the Cascade 700 filter.
Setup
1. Assemble Water Inlet & Outlet Pipes
Connect the various pipe sections, including the intake strainer and spray bar, to form the complete water inlet and outlet assemblies. Ensure all connections are secure.
Video 1: Visual guide for assembling water inlet and outlet pipes.
2. Connect Silicone Tubing
Connect the silicone tubing to the assembled inlet and outlet valves. Ensure the connections are tight to prevent leaks. Use swimming-pool style hose clamps for extra security.

Figure 2: Securely connect the silicone tubing to the filter valves.
3. Place Filter Media
Arrange the filter media in the baskets. The Cascade 700 comes standard with 2 Poly Fiber Floss Pads, 1 Coarse Bio-Sponge, and 1 Bag of Activated Carbon. The multi-stage filtration system is designed to trap particulate matter, remove chemicals, and reduce odors.

Figure 3: Multi-stage filtration layers: Carbon, Fine Sponge, Coarse Sponge.
4. Secure the Lid
Place the motor unit (lid) onto the canister body. Ensure the lid is properly aligned and all 4 easy-lift alignment clamps are securely fastened to create a watertight seal.
5. Position the Filter
Place the filter unit on a sturdy, level surface next to your aquarium. The filter's sturdy tip-proof base ensures stability.

Figure 4: The filter features a sturdy tip-proof base for stability.
6. Connect to Aquarium
Attach the inlet and outlet pipe assemblies to your aquarium using the provided suction cups. Ensure the intake strainer is submerged and the spray bar is positioned to evenly distribute filtered water.
Video 2: Demonstration of canister filter installation.
Operating Instructions
1. Priming the Filter
The Cascade 700 features a push-button primer for simple and quick priming. Alternatively, you can fill the canister with water until it's about 90% full (not over the top of the basket), then install the pump head and turn the filter on. Once the filter is on, the siphon will begin.

Figure 5: Detailed instructions for priming the filter.
2. Adjusting Water Flow
The independent valve taps rotate 360° and allow for flow rate control. Adjust the intake and output flow levels to suit your aquarium's needs.

Figure 6: The 360° valves allow for precise flow control.
3. Turning On/Off
Plug the filter into a 110 Volt / 60 Hz / 25 W power outlet. The filter will begin to run. To turn off, unplug the unit and close the valve taps.
Maintenance
1. Cleaning Frequency
It is recommended to clean your canister filter every 1 to 2 months. Chemical filtration media like activated carbon typically lasts around 30 days and should be replaced regularly.
2. Disassembly for Cleaning
- Unplug the filter from the power source.
- Close the independent valve taps on both the intake and outtake lines to prevent water flow.
- Release the easy-lift alignment clamps and carefully remove the motor unit (lid) from the canister body.
- Place the filter unit in a bucket or container to catch any residual water.
- Remove the media baskets from the canister.
3. Cleaning Filter Media
- Sponges (Poly Fiber Floss Pads, Coarse Bio-Sponge): Gently rinse these in old aquarium water (from a water change) to preserve beneficial bacteria. Avoid using tap water as chlorine can harm the bacterial colonies. Do not bleach or use harsh chemicals.
- Activated Carbon: Replace the activated carbon bag every 30 days or as needed.
- Bio-media (Ceramic Rings): These typically do not require frequent cleaning. If they appear dirty, gently rinse them in old aquarium water. They usually need replacement only every 2-3 years.
4. Cleaning Impeller
If you notice reduced flow or unusual noise, inspect the impeller. Unscrew the impeller lid in the motor unit, remove the impeller, and clean any slime or debris buildup. Use a small brush (like a bottle brush) if necessary. Ensure the impeller shaft is intact as it is ceramic and can break.
5. Reassembly
Reassemble the filter in reverse order of disassembly. Ensure all media baskets are correctly stacked, the lid is securely clamped, and all valve taps are open before plugging in the unit.
Troubleshooting
1. Excess Noise
- Trapped Air: A gurgling or

