1. Introduction
Thank you for choosing the Grundig RRCD 4305 Freaxx 50 CD/MP3 Cassette Radio. This manual provides essential information for the safe and efficient operation of your device. Please read it thoroughly before use and retain it for future reference.
2. Safety Instructions
- Power Source: Ensure the power supply voltage matches the rating indicated on the unit.
- Ventilation: Do not block ventilation openings. Allow adequate space around the unit for proper airflow.
- Water and Moisture: Do not expose the unit to rain, moisture, or dripping/splashing liquids. Keep away from water sources.
- Heat: Avoid placing the unit near heat sources such as radiators, heat registers, stoves, or other heat-producing appliances.
- Cleaning: Disconnect the unit from the power source before cleaning. Use a soft, dry cloth.
- Servicing: Do not attempt to service the unit yourself. Refer all servicing to qualified service personnel.
- Batteries: Follow proper polarity when inserting batteries. Do not mix old and new batteries or different types of batteries. Remove batteries if the unit is not used for extended periods.
3. Product Overview
Familiarize yourself with the main components and controls of your Grundig RRCD 4305 Freaxx 50.
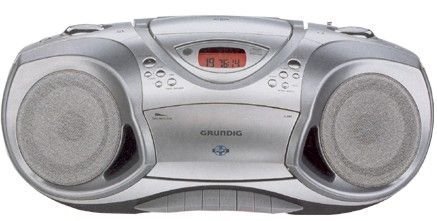
Figure 1: Front view of the Grundig RRCD 4305 Freaxx 50, showing the CD compartment, cassette deck, and control buttons.
Controls and Indicators:
- Power Button: Turns the unit on or off.
- Volume Control: Adjusts the audio output level.
- Function Selector: Switches between CD, Radio, Cassette, and AUX modes.
- Tuning Knob (Radio): Adjusts radio frequency.
- Band Selector (Radio): Selects AM/FM radio bands.
- CD/MP3 Controls: Play/Pause, Stop, Skip Forward/Backward, Folder Up/Down.
- Cassette Controls: Play, Stop/Eject, Fast Forward, Rewind, Record.
- Display: Shows current mode, track number, or radio frequency.
4. Setup
4.1 Unpacking
- Carefully remove the unit from its packaging.
- Check for any damage that may have occurred during transit. If damaged, do not operate the unit and contact your dealer.
- Retain the packaging materials for future transport or storage.
4.2 Power Connection
The unit can be powered by AC mains or batteries.
AC Power:
- Connect the supplied AC power cord to the AC IN socket on the rear of the unit.
- Plug the other end of the power cord into a standard wall outlet.
Battery Power:
- Open the battery compartment cover on the bottom of the unit.
- Insert the required number of 'C' size batteries (not supplied), ensuring correct polarity (+/-).
- Close the battery compartment cover securely.
4.3 Antenna
- For FM reception, extend the telescopic antenna fully. Adjust its position for optimal signal reception.
- For AM reception, the unit uses a built-in ferrite bar antenna. Rotate the entire unit for best AM reception.
5. Operating Instructions
5.1 Basic Operation
- Press the POWER button to turn the unit on.
- Adjust the VOLUME control to your desired listening level.
- Press the POWER button again to turn the unit off.
5.2 Radio Operation
- Set the FUNCTION SELECTOR to 'RADIO'.
- Select the desired band (AM or FM) using the BAND SELECTOR switch.
- Rotate the TUNING knob to find your desired radio station.
- Adjust the antenna for optimal reception.
5.3 CD/MP3 Playback
- Set the FUNCTION SELECTOR to 'CD'.
- Open the CD compartment cover by pressing the 'OPEN' button.
- Place a CD or MP3 disc onto the spindle with the label side facing up.
- Close the CD compartment cover. The unit will read the disc.
- Press the PLAY/PAUSE button to start playback.
- Use the SKIP FORWARD/BACKWARD buttons to navigate between tracks.
- For MP3 discs, use the FOLDER UP/DOWN buttons to navigate between folders.
- Press the STOP button to stop playback.
5.4 Cassette Playback and Recording
Playback:
- Set the FUNCTION SELECTOR to 'TAPE'.
- Press the STOP/EJECT button to open the cassette compartment.
- Insert a cassette tape with the open edge facing upwards.
- Close the cassette compartment.
- Press the PLAY button to start playback.
- Use FAST FORWARD or REWIND buttons to quickly move through the tape.
- Press STOP/EJECT to stop playback and open the compartment.
Recording (from Radio/CD/AUX):
- Insert a blank cassette tape into the compartment.
- Select the desired source (RADIO, CD, or AUX) using the FUNCTION SELECTOR.
- Start playback on the source (e.g., play a CD, tune a radio station).
- Press the RECORD button (usually red) and the PLAY button simultaneously on the cassette deck. Recording will begin.
- Press the STOP/EJECT button to end recording.
5.5 Auxiliary Input (AUX)
- Connect an external audio device (e.g., smartphone, MP3 player) to the AUX IN jack using a 3.5mm audio cable (not supplied).
- Set the FUNCTION SELECTOR to 'AUX'.
- Control playback from your external device. The unit will output the audio.
6. Maintenance
6.1 Cleaning the Unit
- Always unplug the unit from the power outlet before cleaning.
- Use a soft, dry cloth to wipe the exterior surfaces.
- Do not use abrasive cleaners, waxes, or solvents as they may damage the finish.
6.2 CD Lens Care
- Do not touch the CD lens.
- If the lens is dirty, use a commercially available CD lens cleaner.
6.3 Cassette Deck Care
- Periodically clean the tape heads, capstan, and pinch roller using a cotton swab lightly moistened with isopropyl alcohol.
- Demagnetize the tape heads regularly with a tape head demagnetizer to prevent sound degradation.
6.4 Battery Replacement
- When battery power is low, the unit's performance may degrade. Replace all batteries with new ones.
- Refer to section 4.2 for battery insertion instructions.
- Dispose of used batteries responsibly according to local regulations.
7. Troubleshooting
| Problem | Possible Cause | Solution |
|---|---|---|
| No power | AC cord not connected; Batteries depleted or incorrectly inserted. | Check AC cord connection; Replace batteries, ensuring correct polarity. |
| No sound | Volume too low; Incorrect function selected; Headphones connected. | Increase volume; Select correct function (CD/Radio/Tape/AUX); Disconnect headphones. |
| CD/MP3 disc skips or does not play | Disc dirty or scratched; Disc inserted incorrectly; Lens dirty. | Clean or replace disc; Reinsert disc correctly; Clean CD lens. |
| Poor radio reception | Antenna not extended/adjusted; Weak signal. | Extend and adjust FM antenna; Rotate unit for AM reception; Try moving the unit to a different location. |
| Cassette playback distorted | Tape heads dirty or demagnetized; Worn tape. | Clean and demagnetize tape heads; Try a different tape. |
8. Specifications
- Power Supply: AC 230V ~ 50Hz or DC 9V (6 x 'C' size batteries)
- Radio Frequency:
- FM: 87.5 - 108 MHz
- AM: 522 - 1620 kHz
- CD Player: Supports CD-R/RW, MP3 playback
- Cassette Deck: Stereo playback and recording
- Audio Input: 3.5mm AUX-IN jack
- Output Power: [Specific wattage, if known, otherwise omit or state 'Typical']
- Dimensions (W x H x D): [Specific dimensions, if known, otherwise omit]
- Weight: [Specific weight, if known, otherwise omit]
Specifications are subject to change without notice for continuous product improvement.
9. Warranty and Support
Grundig products are manufactured to high quality standards and are warranted against manufacturing defects. For detailed warranty information, please refer to the warranty card included with your purchase or visit the official Grundig website. For technical support or service inquiries, please contact your local Grundig service center or authorized dealer.
You can find more information and support at the Grundig Brand Store.


