1. Introduction
This manual provides comprehensive instructions for the assembly, operation, and maintenance of your Konus 114 x 900mm Motor Electronic EQ Reflector Telescope. This advanced instrument is designed for astronomical observation, offering enhanced light gathering capabilities and an electronic motor for precise object tracking. Please read this manual thoroughly before using your telescope to ensure proper setup and optimal performance.
2. Safety Information
- Never look directly at the sun through the telescope or its finderscope without a professionally manufactured solar filter. Permanent eye damage or blindness can result.
- Do not leave the telescope unsupervised, especially when children are present.
- Handle optical components with care to avoid scratches or damage.
- Ensure the telescope is securely mounted on a stable surface to prevent tipping.
- Keep batteries for the motor drive out of reach of children and dispose of them properly.
3. Package Contents
Upon unpacking, verify that all components are present and undamaged. If any items are missing or damaged, contact Konus customer support immediately.
- Telescope Optical Tube (114mm Reflector)
- Equatorial Mount with Tripod
- Electronic Motor Drive
- Counterweights
- Plossl Eyepieces (typically 2-3, e.g., 10mm, 25mm)
- Reflex Finderscope
- Accessory Tray
- User Manual (this document)
4. Setup and Assembly
4.1. Tripod and Mount Assembly
- Extend the tripod legs to a stable height and secure them.
- Attach the equatorial mount head to the tripod. Ensure it is firmly tightened.
- Install the accessory tray onto the tripod spreader bars.
- Attach the counterweight shaft to the mount and slide the counterweights onto the shaft. Secure them in place.
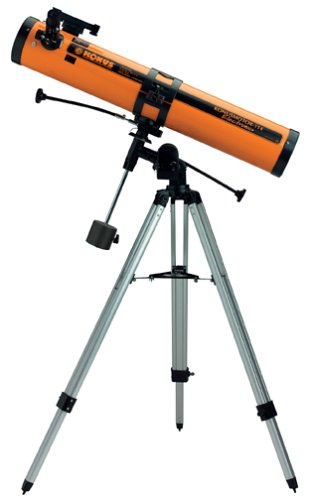
Image 1: Fully assembled Konus 114x900mm Reflector Telescope. This image shows the main telescope tube, equatorial mount, tripod, and counterweights.
4.2. Attaching the Optical Tube
- Carefully place the telescope optical tube into the mounting rings on the equatorial mount.
- Tighten the mounting rings securely, ensuring the telescope is balanced. Adjust counterweights as needed for proper balance.
4.3. Finderscope Alignment
The reflex finderscope is crucial for locating objects. It must be aligned with the main telescope.
- Mount the finderscope onto its bracket on the main telescope tube.
- During daylight hours, point the main telescope at a distant, stationary object (e.g., a telephone pole or chimney).
- Look through a low-power eyepiece in the main telescope and center the object.
- Adjust the alignment screws on the finderscope bracket until the red dot (or crosshairs) in the finderscope is also centered on the same object. This process can be challenging and may require patience.
4.4. Eyepiece Installation
- Loosen the thumbscrew on the focuser.
- Insert the desired eyepiece (e.g., 25mm for wide views, 10mm for higher magnification) into the focuser.
- Tighten the thumbscrew to secure the eyepiece.
4.5. Electronic Motor Drive Installation
The electronic motor drive allows the telescope to track celestial objects as they move across the sky due to Earth's rotation.
- Locate the motor drive attachment point on the equatorial mount (typically on the Right Ascension axis).
- Attach the motor drive unit and secure it according to the specific instructions provided with the motor drive.
- Insert the required batteries into the motor drive. Ensure correct polarity.
- Connect the motor drive to the mount's gear system.
5. Operating the Telescope
5.1. Basic Operation and Focusing
- Point the telescope towards your desired celestial object using the finderscope.
- Look through the eyepiece. The image may appear inverted, which is normal for reflector telescopes.
- Turn the focuser knobs slowly until the image is sharp and clear.
5.2. Using the Equatorial Mount
The equatorial mount allows for easy tracking of objects. Once aligned with the celestial pole, you can track objects by rotating only one axis (Right Ascension).
- Polar Alignment: For accurate tracking, the mount's Right Ascension axis should be aligned with the celestial pole (near Polaris in the Northern Hemisphere). This is a more advanced step and detailed instructions are typically found in dedicated equatorial mount guides.
- Manual Tracking: Use the slow-motion controls on the Right Ascension and Declination axes to make fine adjustments and keep objects centered in the eyepiece.
5.3. Motor Drive Operation
Once the equatorial mount is polar-aligned and the motor drive is installed and powered, it can automatically compensate for Earth's rotation.
- Ensure the motor drive is properly engaged with the mount's gears.
- Turn on the motor drive. It will begin to rotate the telescope at sidereal rate, keeping celestial objects stationary in your field of view.
- Note: The motor drive requires calibration for optimal performance. Refer to the motor drive's specific instructions for calibration procedures.
5.4. Observing Celestial Objects
- Moon: The lunar surface offers spectacular detail. Use a low-power eyepiece first, then switch to higher magnification.
- Planets: Planets like Saturn and Jupiter can be observed. Details such as Saturn's rings or Jupiter's major moons are visible. For more detail, consider using a Barlow lens in conjunction with your eyepieces.
- Deep-Sky Objects (DSOs): This telescope is suitable for observing nebulae and galaxies, which appear as faint smudges of light. Dark skies away from light pollution are essential for viewing DSOs.
6. Maintenance
6.1. Cleaning Optics
- Dust on the primary mirror or eyepieces should be removed with a soft camel hair brush or a can of compressed air (use short bursts, hold can upright).
- For stubborn smudges, use a specialized optical cleaning solution and a clean, soft microfiber cloth. Apply solution to the cloth, not directly to the lens/mirror.
- Avoid touching optical surfaces with your fingers.
6.2. Storage
- When not in use, cover the telescope with dust caps.
- Store the telescope in a cool, dry place, away from direct sunlight and extreme temperature fluctuations.
- If storing for extended periods, remove batteries from the motor drive to prevent leakage.
6.3. Battery Replacement
The electronic motor drive requires batteries for operation. When the motor drive performance degrades or ceases, replace the batteries with new ones of the specified type and voltage. Refer to the motor drive's specific manual for battery type and replacement procedure.
7. Troubleshooting
7.1. Common Issues and Solutions
- Image is blurry:
- Adjust the focuser knobs slowly until the image is sharp.
- Ensure the eyepiece is fully inserted and secured.
- Allow the telescope to equalize to the ambient outdoor temperature.
- Cannot find objects:
- Verify that the finderscope is properly aligned with the main telescope. This is a common issue for new users.
- Start with a low-power (higher focal length) eyepiece for a wider field of view.
- Use a star chart or astronomy app to help locate objects.
- Motor drive not working:
- Check if batteries are installed correctly and are not depleted. Replace if necessary.
- Ensure the motor drive is properly connected and engaged with the mount's gears.
- Verify the motor drive is switched on.
- Image appears upside down or reversed:
- This is normal for reflector telescopes. They produce an inverted image. This does not affect astronomical observation.
8. Specifications
| Feature | Detail |
|---|---|
| Brand | Konus |
| Model Number | 1784 |
| Optical Design | Reflector |
| Objective Lens Diameter | 114 Millimeters |
| Focal Length | 900 millimeters |
| Telescope Mount | Equatorial Mount |
| Eyepiece Lens Description | Plossl |
| Focus Type | Manual Focus |
| Finderscope | Reflex |
| Item Weight | 39 Pounds |
| Electronic Motor Drive | Included |
9. Warranty and Support
This Konus telescope is covered by a 1-Year Warranty from the date of purchase. This warranty covers manufacturing defects and workmanship. It does not cover damage caused by misuse, accident, unauthorized modification, or normal wear and tear.
For warranty claims, technical assistance, or replacement parts, please contact Konus customer support. Refer to the contact information provided on the Konus official website or in your product packaging.