Milwaukee 6190-20
Milwaukee 6190-20 14-Inch 15-Amp Metal Cut-Off Machine
Model: 6190-20 | Brand: Milwaukee
Introduction
This manual provides essential information for the safe and efficient operation, maintenance, and troubleshooting of your Milwaukee 6190-20 14-Inch 15-Amp Metal Cut-Off Machine. The 6190-20 utilizes dry (a.k.a. "cold") cut technology, designed to cut significantly faster than abrasive machines while producing minimal sparks and a virtually burr-free finish. Its powerful 15-amp, 4.8 max H.P. motor, heavy-duty cast aluminum base reinforced with a 1/4 inch steel plate, tool-free vise, and horizontal D-handle ensure optimal performance and user comfort. Please read this manual thoroughly before operating the machine to ensure proper use and to prevent injury or damage.
Important Safety Instructions
Always follow basic safety precautions to reduce the risk of fire, electric shock, and personal injury when operating power tools.
- Work Area Safety: Keep the work area clean and well-lit. Cluttered or dark areas invite accidents. Do not operate power tools in explosive atmospheres, such as in the presence of flammable liquids, gases, or dust.
- Electrical Safety: Power tool plugs must match the outlet. Never modify the plug in any way. Avoid body contact with earthed or grounded surfaces. Do not expose power tools to rain or wet conditions.
- Personal Safety: Always wear eye protection. Use hearing protection when operating the machine. Wear appropriate clothing; avoid loose clothing or jewelry that can get caught in moving parts. Secure long hair.
- Tool Use and Care: Do not force the power tool. Use the correct power tool for your application. Disconnect the plug from the power source before making any adjustments, changing accessories, or storing power tools.
- Specific Cut-Off Machine Safety:
- Ensure the workpiece is securely clamped before cutting.
- Keep hands clear of the cutting blade.
- Allow the blade to reach full speed before beginning a cut.
- Do not attempt to cut materials beyond the machine's specified capacity.
- Regularly inspect the blade for damage or wear. Replace damaged blades immediately.
Product Overview
Familiarize yourself with the main components of your Milwaukee 6190-20 Metal Cut-Off Machine.

Figure 1: Front view of the Milwaukee 6190-20 Metal Cut-Off Machine. This image shows the overall design, including the motor housing, blade guard, cutting blade, and the base with the clamping vise mechanism.
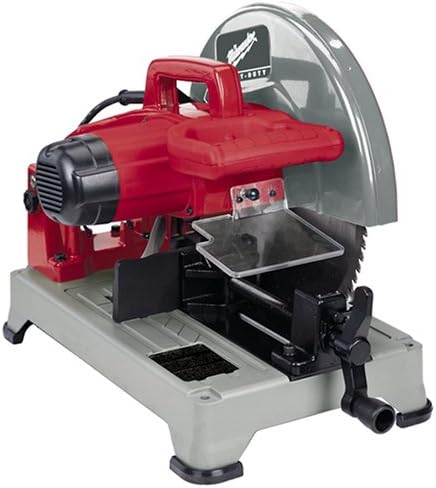
Figure 2: Side view of the Milwaukee 6190-20. This perspective highlights the robust D-handle for comfortable operation and the sturdy base construction.

Figure 3: The Milwaukee 6190-20 in operation, demonstrating its capability to cut metal pipes. Note the secure clamping of the workpiece and the position of the blade during a cut.
Key Components:
- Motor Housing: Contains the powerful 15-amp, 4.8 max H.P. motor.
- Blade Guard: Provides protection from the rotating blade.
- Cutting Blade: 14-inch dry-cut blade for efficient metal cutting.
- Base: Heavy-duty cast aluminum base with 1/4 inch steel plate reinforcement for stability.
- Vise and Back Fence: Tool-free adjustable system for securing workpieces.
- D-Handle: Ergonomically designed for comfortable and controlled operation.
- Power Cord: Connects the machine to the power supply.
Setup and Assembly
Before operating your cut-off machine, ensure it is properly set up and all components are securely assembled.
- Unpacking: Carefully remove the machine and all accessories from the packaging. Inspect for any shipping damage.
- Mounting (Optional): For increased stability, the machine can be bolted to a workbench. Use appropriate fasteners through the mounting holes in the base.
- Blade Installation/Check:
- Ensure the machine is unplugged.
- If the blade is not pre-installed, follow the instructions in the maintenance section for blade replacement. Ensure the blade is clean, sharp, and correctly oriented.
- Verify that the blade guard operates freely and returns to its closed position.
- Vise and Fence Adjustment:
- The vise and back fence are tool-free for quick adjustments.
- Adjust the back fence to accommodate the size of your workpiece.
- Ensure the vise jaws are parallel and can securely clamp the material.
- Power Connection: Connect the power cord to a grounded 120 Volt AC outlet. Ensure the circuit can handle the 15-amp load.
Operating Instructions
Follow these steps for safe and effective operation of your cut-off machine.
- Prepare Workpiece:
- Measure and mark the desired cut line on your metal workpiece.
- Place the workpiece firmly against the back fence.
- Securely clamp the workpiece in the vise. Ensure it is stable and will not shift during the cut.
- Adjust Cutting Angle (if necessary):
- If making an angled cut, adjust the vise and/or fence to the desired angle (up to 45 degrees). Refer to the machine's markings for common angles.
- Double-check the angle with a protractor or angle gauge for precision.
- Start the Machine:
- Ensure your hands are clear of the blade and the workpiece is secure.
- Press the power switch or trigger to start the motor. Allow the blade to reach its full operating speed (1500 RPM) before beginning the cut.
- Perform the Cut:
- Slowly and steadily lower the cutting arm, allowing the blade to cut through the material. Do not force the blade; let the tool do the work.
- Maintain a firm grip on the D-handle.
- As the cut completes, continue to hold the arm down until the blade has fully passed through the material.
- After the Cut:
- Release the power switch/trigger and allow the blade to come to a complete stop before raising the cutting arm.
- Unclamp the workpiece and remove it from the machine.
- Clear any metal chips or debris from the work area using a brush or shop vacuum. Do not use bare hands.
Note: This dry-cut technology produces minimal sparks and a cooler cut compared to abrasive saws, resulting in a cleaner, virtually burr-free finish.
Maintenance
Regular maintenance ensures the longevity and optimal performance of your Milwaukee cut-off machine. Always unplug the tool before performing any maintenance.
- Cleaning:
- After each use, clean metal chips and dust from the machine, especially around the blade guard, motor vents, and vise mechanism. Use a brush, compressed air, or a vacuum.
- Do not use solvents or harsh chemicals that could damage plastic parts.
- Blade Inspection and Replacement:
- Regularly inspect the blade for dullness, cracks, or missing teeth. A dull blade can cause overheating and poor cuts.
- To replace the blade:
- Unplug the machine.
- Use the provided wrench to loosen the arbor nut while holding the blade stationary.
- Remove the old blade and clean the arbor flanges.
- Install the new 14-inch metal cutting blade, ensuring the rotation arrow on the blade matches the direction of rotation indicated on the machine.
- Tighten the arbor nut securely.
- Carbon Brushes: Periodically check the carbon brushes for wear. Replace them when they are worn down to approximately 1/4 inch or if the motor performance decreases. Refer to a qualified service technician for brush replacement if unsure.
- Cord Inspection: Inspect the power cord for any cuts, fraying, or damage. Do not use the machine with a damaged cord.
Troubleshooting
This section addresses common issues you might encounter with your cut-off machine.
| Problem | Possible Cause | Solution |
|---|---|---|
| Machine does not start. | No power supply; tripped circuit breaker; faulty switch; worn carbon brushes. | Check power connection and outlet; reset circuit breaker; contact service for switch/brush replacement. |
| Blade cuts slowly or overheats. | Dull or damaged blade; forcing the cut; incorrect blade for material. | Replace blade; reduce cutting pressure; ensure correct blade type is used. |
| Excessive vibration. | Loose blade; damaged blade; unstable workpiece; loose mounting. | Tighten blade arbor nut; replace damaged blade; secure workpiece firmly; check machine mounting. |
| Inaccurate cuts. | Workpiece not clamped securely; fence/vise not properly adjusted; worn blade. | Ensure workpiece is tight; verify fence/vise settings; replace blade if dull. |
If you encounter problems not listed here or if solutions do not resolve the issue, contact Milwaukee customer support or an authorized service center.
Specifications
| Feature | Detail |
|---|---|
| Model Number | 6190-20 |
| Power Source | Electric |
| Voltage | 120 Volts |
| Amperage | 15 Amps |
| Wattage | 1800 Watts |
| Blade Diameter | 14 Inches |
| No-Load Speed | 1500 RPM |
| Max Horsepower | 4.8 HP |
| Cutting Angle | Up to 45 Degrees |
| Base Material | Cast Aluminum with 1/4 inch Steel Plate |
| Dimensions (L x W x H) | 16.5 x 18.9 x 25.2 inches |
Warranty and Support
Milwaukee power tools are designed for durability and performance. For specific warranty information, please refer to the warranty card included with your product or visit the official Milwaukee website. Keep your purchase receipt as proof of purchase for warranty claims.
For technical assistance, service, or to locate an authorized service center, please contact Milwaukee customer support. Contact information can typically be found on the Milwaukee website or on the product packaging.
Note: Unauthorized repairs or modifications may void the product warranty.