
1. Introduction
This manual provides detailed instructions for the safe and efficient operation of your Panasonic RX-D29 CD/Radio/Cassette Boombox. Please read this manual thoroughly before using the unit and retain it for future reference. The RX-D29 is a versatile audio system featuring a CD player with MP3 playback capability, an AM/FM radio tuner, and a cassette recorder/player.
2. Safety Information
- Do not expose this unit to rain or moisture.
- Do not remove the cover. Refer servicing to qualified personnel only.
- Avoid placing the unit in direct sunlight, near heat sources, or in dusty/humid environments.
- Ensure proper ventilation around the unit.
- Use only the specified power source.
- Keep batteries out of reach of children.
3. Package Contents
Verify that all items listed below are included in your package:
- Panasonic RX-D29 Boombox Unit
- Remote Control
- AC Power Cord
- User's Manual (this document)
4. Product Overview
The Panasonic RX-D29 boombox features a compact design with integrated speakers and a clear display. The included remote control provides convenient access to various functions.
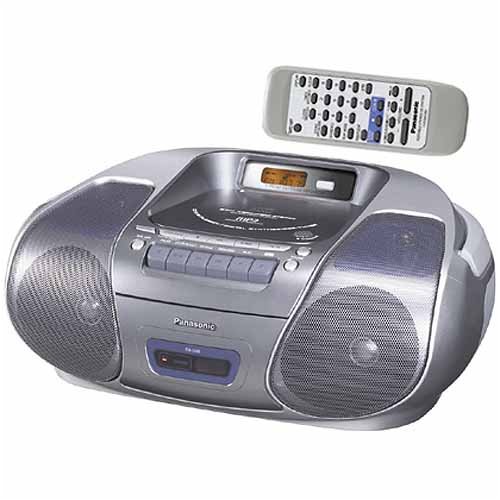
An image showing the silver Panasonic RX-D29 boombox with its top-loading CD compartment, front-facing speakers, cassette deck controls, and a separate remote control unit positioned above it.
4.1 Main Unit Controls and Components
- CD Compartment: Top-loading for audio CDs and MP3 CDs.
- Cassette Deck: Front-loading for cassette tapes.
- Speakers: Integrated 2-way speakers for stereo sound.
- Display Panel: Shows track information, radio frequency, and time.
- Function Buttons: Play, Stop, Pause, Fast Forward, Rewind for CD and Cassette.
- Tuner Controls: For AM/FM radio selection and tuning.
- Volume Control: Adjusts audio output level.
- Antenna: Telescopic FM antenna.
4.2 Remote Control
The remote control provides access to all primary functions, including power, volume, track selection, radio presets, and sound adjustments. Ensure 2 AA batteries (not included) are installed correctly in the remote control.
5. Setup
5.1 Power Supply
The RX-D29 can be powered by AC current or batteries.
- AC Power: Connect the supplied AC power cord to the AC IN jack on the unit and then to a standard wall outlet.
- Battery Power: For portable use, insert 6 C-cell batteries (not included) into the battery compartment on the bottom of the unit. Ensure correct polarity.
- Memory Backup: To retain time, timer settings, and radio presets when the unit is disconnected from AC power or main batteries are depleted, install 3 AA batteries (not included) in the memory backup compartment.
5.2 Initial Setup
- Setting the Clock: Refer to the remote control section for instructions on setting the internal clock.
- Auto Scan Tuning: Upon first power-up, the unit may automatically scan and store radio presets.
6. Operating the CD Player
- Loading a CD: Open the top-loading CD compartment cover and place a CD (audio CD, CD-R/RW, or MP3 CD) with the label side facing up. Close the cover securely.
- Playback: Press the PLAY button. The unit will begin playing the first track.
- Track Selection: Use the SKIP buttons (<< / >>) to navigate between tracks.
- Pause/Stop: Press PAUSE to temporarily stop playback, and STOP to end playback.
- Playback Modes:
- Normal Play: Plays tracks in sequential order.
- Repeat Play: Repeats the current track or the entire disc.
- Random Play: Plays tracks in a random order.
- Program Play: Allows you to program a specific sequence of tracks.
- MP3 CD Playback:
- The unit supports multi-session MP3 discs.
- Albums and tracks will play in alphanumeric order. Number your files and folders for desired playback sequence.
- The boombox does not support MP3 song and album title display.
- If a CD-ROM contains both MP3 and non-MP3 files, only the MP3 files will be playable.
7. Operating the Radio
- Selecting a Band: Press the BAND button to switch between FM and AM.
- Manual Tuning: Use the TUNING buttons to manually adjust the frequency.
- Auto Tuning: Press and hold the TUNING buttons to automatically scan for the next available station.
- Preset Stations: The digital synthesizer tuner allows storage of up to 32 stations (20 FM, 12 AM). Use the PRESET buttons to recall stored stations.
- Antenna Adjustment: Extend and adjust the telescopic FM antenna for optimal FM reception. For AM reception, rotate the unit itself.
8. Operating the Cassette Player
- Loading a Cassette: Open the cassette compartment door and insert a cassette tape. Close the door.
- Playback: Press the PLAY button.
- Recording:
- CD Synchro Start: To record from a CD, ensure the CD is loaded and the cassette is ready to record. Press the RECORD button on the cassette deck. The CD will automatically start playing and recording.
- Radio Recording: Tune to the desired radio station. Press the RECORD button.
- Only normal-type cassette tapes are supported for recording and playback.
- Fast Forward/Rewind: Use the FF/REW buttons.
- Auto Stop: The unit features full auto stop, which automatically stops the tape mechanism at the end of playback or rewind to conserve battery life and tape wear.
- CD Cue and Review: For CDs, these controls help locate specific sections.
9. Sound Adjustments
- XBS (Extra Bass System): Activates a bass boost function for enhanced low-frequency sound. This can typically be toggled via a button on the unit or remote.
- Preset Equalizer Settings: Choose from four preset equalizer settings to tailor the sound to your preference:
- Vocal
- Clear
- Soft
- (Default/Off)
- Sound Virtualizer Circuit: Simulates surround sound from the unit's two speakers, creating a wider soundstage. This function is typically controlled via the remote.
- Re-Master Circuit (for MP3): This feature reproduces treble frequencies that may be lost during MP3 compression, aiming to restore sound quality closer to the original source.
10. Maintenance
- Cleaning the Unit: Wipe the exterior with a soft, dry cloth. For stubborn stains, use a cloth lightly dampened with water and a mild detergent, then wipe dry. Do not use abrasive cleaners or solvents.
- CD Lens Cleaning: Use a commercially available CD lens cleaner if playback issues occur due to a dirty lens.
- Cassette Head Cleaning: Periodically clean the cassette heads, pinch rollers, and capstans with a cotton swab lightly moistened with isopropyl alcohol to ensure optimal sound quality and prevent tape damage.
- Battery Replacement: Replace all batteries with new ones when they are depleted. Do not mix old and new batteries or different types of batteries.
11. Troubleshooting
| Problem | Possible Cause | Solution |
|---|---|---|
| No power | AC cord not connected; batteries depleted or incorrectly inserted. | Ensure AC cord is securely plugged in. Replace or correctly insert batteries. |
| CD does not play | CD inserted incorrectly; CD dirty or scratched; lens dirty; unit in wrong function mode. | Insert CD with label side up. Clean or replace CD. Clean CD lens. Select CD function. |
| Poor radio reception | Antenna not extended/adjusted; unit location. | Extend and adjust FM antenna. Rotate the unit for AM reception. Relocate the unit for better signal. |
| Cassette tape not playing/recording | Tape inserted incorrectly; tape damaged; cassette heads dirty. | Insert tape correctly. Use a different tape. Clean cassette heads. |
| Remote control not working | Batteries depleted or incorrectly inserted; obstruction between remote and unit. | Replace remote batteries. Ensure clear line of sight to the unit's sensor. |
12. Specifications
- Model: RX-D29
- Brand: Panasonic
- Power Source: AC 120V, 60Hz or 6 x C-cell batteries (DC 9V)
- Memory Backup: 3 x AA batteries (DC 4.5V)
- Dimensions (W x H x D): Approximately 17 x 7 x 12 inches (43.2 x 17.8 x 30.5 cm)
- Weight: Approximately 3 pounds (1.36 kg) without batteries
- CD Player: Top-loading, CD-R/RW, MP3 playback compatible
- Radio Tuner: Digital Synthesizer AM/FM, 32 presets (20 FM, 12 AM)
- Cassette Deck: Front-loading, recording function, auto stop, normal tape type only
- Speakers: 2-way stereo
- Included Accessories: Remote control, AC power cord
13. Warranty and Support
For warranty information or technical support, please refer to the warranty card included with your product or visit the official Panasonic website. Keep your purchase receipt as proof of purchase for warranty claims.
Panasonic Customer Support: For further assistance, please contact Panasonic customer service through their official channels.


