1. Product Overview
Thank you for choosing the Cloer 144 Brussels Waffle Maker Gourmet Line. This appliance is designed to prepare delicious Brussels waffles with ease. It features a durable stainless steel casing, non-stick baking plates, and an adjustable browning control for customized results.
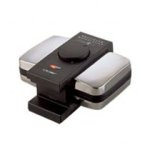
Image Description: A top-down view of the Cloer 144 Brussels Waffle Maker. The appliance features a sleek stainless steel exterior with a black handle and control knob. The deep, rectangular non-stick baking plates are visible, designed for making thick Brussels waffles. The power cord is visible at the back.
2. Important Safety Instructions
Please read all instructions carefully before using the appliance. Keep this manual for future reference.
- Always ensure the appliance is placed on a stable, heat-resistant surface.
- Do not touch hot surfaces. Use oven mitts or the handle.
- To protect against electrical hazards, do not immerse the cord, plugs, or the appliance in water or other liquids.
- Unplug from the outlet when not in use and before cleaning. Allow to cool completely before putting on or taking off parts, and before cleaning the appliance.
- Close supervision is necessary when any appliance is used by or near children.
- Do not operate any appliance with a damaged cord or plug, or after the appliance malfunctions or has been damaged in any manner.
- Do not use outdoors.
- Steam released during cooking is hot. Keep hands and face clear of the steam vents.
3. Setup
- Unpacking: Carefully remove the waffle maker from its packaging. Retain packaging for storage or disposal.
- First Use Cleaning: Before first use, wipe the baking plates with a damp cloth and then dry thoroughly. The exterior can be wiped with a soft, damp cloth. Do not use abrasive cleaners.
- Placement: Place the waffle maker on a clean, dry, stable, and heat-resistant surface. Ensure there is adequate space around the appliance for ventilation and to prevent heat damage to surrounding surfaces.
- Power Connection: Unwind the power cord from the integrated cable storage and plug it into a suitable 230 Volt AC electrical outlet.
4. Operating Instructions
- Preheating: Close the waffle maker lid. Turn the browning control knob to your desired setting (e.g., medium for a standard waffle). The indicator light will illuminate, signaling that the appliance is heating. Once the light turns off, the waffle maker has reached the set temperature and is ready for use.
- Preparing Batter: Prepare your favorite Brussels waffle batter. For best results, ensure the batter is not too thick or too thin.
- Pouring Batter: Open the lid. Carefully pour the waffle batter onto the lower baking plate, distributing it evenly. Do not overfill, as the batter will expand during cooking.
- Cooking: Gently close the lid. The handle lock will secure the lid. The indicator light may cycle on and off during cooking as the appliance maintains its temperature.
- Browning Level: The cooking time will vary depending on the batter consistency and your desired browning level. Refer to the browning control knob for guidance. For thicker, cake-like waffles, a longer cooking time may be required.
- Removing Waffles: Once the waffles are cooked to your preference, open the lid. Use a heat-resistant, non-metallic utensil (e.g., wooden or silicone spatula) to carefully remove the waffles from the baking plates. Avoid using metal utensils, as they can damage the non-stick coating.
- Subsequent Waffles: Close the lid to allow the waffle maker to reheat briefly before adding more batter.
5. Cleaning and Maintenance
Proper cleaning and maintenance will extend the life of your waffle maker.
- Cool Down: Always unplug the waffle maker from the power outlet and allow it to cool completely before cleaning.
- Baking Plates: Wipe the non-stick baking plates with a soft, damp cloth or sponge. For stubborn residue, a small amount of mild dish soap can be used, followed by wiping with a clean, damp cloth. Ensure all soap residue is removed.
- Exterior: Wipe the stainless steel exterior with a soft, damp cloth. Do not use abrasive cleaners or scouring pads, as these can scratch the surface.
- Do Not Immerse: Never immerse the waffle maker, its cord, or plug in water or any other liquid.
- Storage: Once clean and dry, store the waffle maker in a cool, dry place. The power cord can be neatly stored in the integrated cable depot.
6. Troubleshooting
If you encounter issues with your waffle maker, please refer to the following common problems and solutions:
- Waffle Maker Not Heating:
- Ensure the power cord is securely plugged into a working electrical outlet.
- Check if the browning control knob is set to an active position.
- Waffles Sticking to Plates:
- Ensure the plates were properly cleaned before use.
- Lightly brush the plates with cooking oil or butter before adding batter, especially for the first waffle.
- Avoid opening the lid too early during cooking.
- Waffles Not Browning Evenly:
- Ensure the waffle maker is fully preheated before adding batter.
- Distribute the batter evenly across the plates.
- Adjust the browning control to a higher setting if desired.
- Waffles Too Thin/Thick:
- Adjust the amount of batter poured onto the plates.
- Modify your waffle batter recipe for desired consistency.
If the problem persists, please contact Cloer customer support.
7. Specifications
| Brand | Cloer |
| Model | 144 |
| Material | Stainless Steel |
| Wattage | 930 watts |
| Voltage | 230 Volts |
| Style | Modern |
| Manufacturer | Cloer Elektrogeraete GmbH |
8. Warranty and Support
This Cloer appliance is covered by a manufacturer's warranty. Please refer to the warranty card included with your purchase for specific terms and conditions, including the warranty period and coverage details. Keep your proof of purchase for warranty claims.
For technical support, service, or spare parts, please contact Cloer customer service directly. Contact information can typically be found on the manufacturer's website or on the product packaging.