
Introduction
This manual provides detailed instructions for the proper setup, operation, maintenance, and troubleshooting of your Palm Treo 600 (Sprint) smartphone. Please read this manual thoroughly to ensure optimal performance and longevity of your device.
Device Overview
Familiarize yourself with the physical components of your Treo 600.

Figure 1: Top View of Palm Treo 600 (CDMA)
This diagram illustrates the top side of the Treo 600, highlighting key features including the Ringer Switch, Power Button, Antenna, Stylus, IR Port, and SD Slot.
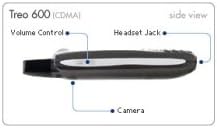
Figure 2: Side View of Palm Treo 600 (CDMA)
This diagram shows the side profile of the Treo 600, indicating the location of the Volume Control buttons, Headset Jack, and Camera lens.
Setup
1. Battery Installation
- Locate the battery compartment cover on the back of the device.
- Gently slide or lift the cover to remove it.
- Align the battery contacts with the terminals inside the compartment.
- Insert the battery firmly until it clicks into place.
- Replace the battery compartment cover.
2. Initial Power On and Activation
- Press and hold the Power Button (refer to Figure 1) until the screen illuminates.
- Follow the on-screen prompts to complete the initial setup, which may include setting the date, time, and language.
- For Sprint network activation, follow the specific instructions provided by your service provider or contact Sprint customer service if automatic activation does not occur.
Operating Instructions
1. Making and Receiving Calls
- To make a call: From the Phone application, dial the number using the keypad or select a contact, then press the green Call button.
- To answer a call: Press the green Call button when the phone rings.
- To end a call: Press the red End button.
- Adjusting volume: Use the Volume Control buttons on the side of the device (refer to Figure 2) during a call.
2. Using the QWERTY Keyboard
The integrated QWERTY keyboard allows for efficient text entry. Press the keys firmly. For special characters, use the Alt key in combination with other keys.
3. Palm OS Navigation and Applications
- Home Screen: Access applications and settings.
- Stylus: Use the Stylus (refer to Figure 1) for precise interaction with the touchscreen, especially for smaller icons or handwriting input.
- Navigation Button: The 5-way navigation button (usually located below the screen) allows for scrolling and selection without the stylus.
- Key Applications: Access Calendar, Contacts, Memos, Tasks, and other pre-installed applications.
4. Messaging (SMS and Email)
- SMS: Use the Messaging application to send and receive text messages.
- Email: Configure your email accounts in the VersaMail application to send and receive emails. Consult your email provider for server settings.
5. Camera Usage
The Treo 600 features a built-in camera (refer to Figure 2) for capturing photos.
- Open the Camera application.
- Frame your shot using the screen as a viewfinder.
- Press the designated camera button or an on-screen button to capture the image.
- Note: Image quality may vary, especially in low-light conditions. For best results, use in bright, outdoor environments.
6. SD Card Usage
The SD Slot (refer to Figure 1) allows for expandable storage and functionality.
- Insert a compatible SD (Secure Digital) card into the slot until it clicks.
- The device will recognize the card, allowing you to store photos, music, documents, and applications.
- To remove, gently press the card inward until it springs out.
7. Connectivity
- USB: Connect the Treo 600 to a computer using a USB cable for data synchronization and charging.
- IR Port: The IR Port (Infrared, refer to Figure 1) can be used for short-range wireless data transfer with other IR-enabled devices. Ensure a clear line of sight between devices.
Maintenance
1. Cleaning Your Device
- Use a soft, lint-free cloth to clean the screen and exterior.
- Avoid using harsh chemicals, abrasive cleaners, or excessive moisture.
- For stubborn smudges, slightly dampen the cloth with water or a screen-cleaning solution designed for electronics.
2. Battery Care
- Charge the battery regularly. Avoid completely draining the battery frequently.
- Do not expose the battery to extreme temperatures.
- If the battery performance significantly degrades, consider replacing it with an authorized Palm replacement battery.
3. Software Updates
Periodically check the Palm support website for any available software updates for your Treo 600. Updates can improve performance and add new features.
Troubleshooting
Common Issues and Solutions
- Device not powering on: Ensure the battery is charged and properly installed. Try connecting to the charger.
- Poor call quality/reception: Move to an area with better network coverage. Check the antenna for any damage.
- Screen unresponsive: Perform a soft reset (refer to the device's specific reset procedure, often involving a small reset button or battery removal).
- Applications freezing: Close and restart the application. If the issue persists, perform a soft reset.
- Camera images are poor: Ensure adequate lighting. Clean the camera lens (refer to Maintenance section).
- Data synchronization issues: Verify USB connection and ensure Palm Desktop software (or equivalent) is correctly installed on your computer.
Performing a Soft Reset
A soft reset can resolve many minor software issues without erasing data. Locate the small reset hole (often near the battery compartment or stylus slot) and gently press it with the tip of the stylus or a straightened paperclip. The device will restart.
Specifications
| Model | Palm Treo 600 |
| Connectivity Technologies | USB |
| Other Display Features | Wireless |
| Other Camera Features | Front, Rear (Note: Refers to general capability, Treo 600 has a single rear camera) |
| Item Weight | 1.95 pounds |
| Package Dimensions | 10.5 x 7.4 x 3.2 inches |
| Date First Available | August 5, 2014 |
Note: Specifications are subject to change without notice.
Warranty and Support
For information regarding your product's warranty, please refer to the warranty card included with your purchase or visit the official Palm support website. For technical assistance, contact Palm customer support or your service provider (Sprint).
- Online Support: www.palm.com/support (Note: Link is illustrative, actual link may vary or be defunct for older products)
- Service Provider Support: Contact Sprint customer service for network-related issues.