
1. Introduction
This manual provides essential information for the safe operation, assembly, maintenance, and troubleshooting of your Shop Fox W1676 6-Inch by 10-Inch Combination Sander. This machine features a 6-inch by 48-inch belt sander and a 10-inch disc sander, powered by a 1 HP motor. Its robust cast iron construction and cabinet stand are designed for stability and efficient sanding operations. Please read this manual thoroughly before operating the sander to ensure proper use and to prevent injury or damage.

Figure 1: Shop Fox W1676 6-Inch by 10-Inch Combination Sander. This image shows the complete sander unit with its belt and disc sanding components, mounted on a cabinet stand.
2. Safety Instructions
Always follow basic safety precautions to reduce the risk of fire, electric shock, and personal injury when using power tools. Keep this manual for future reference.
General Safety Warnings:
- Read all instructions: Familiarize yourself with the controls and proper use of the machine.
- Wear appropriate safety gear: Always wear safety glasses, hearing protection, and a dust mask.
- Keep work area clean: Cluttered areas invite accidents.
- Do not operate in damp or wet locations: Avoid exposure to rain.
- Keep children away: All visitors should be kept a safe distance from the work area.
- Secure workpiece: Always use clamps or a vise to hold the workpiece. Never hold it by hand.
- Avoid accidental starting: Ensure the switch is in the OFF position before plugging in the tool.
- Do not overreach: Maintain proper footing and balance at all times.
- Disconnect power: Always disconnect the power cord before making adjustments, changing accessories, or servicing the tool.
- Use the right tool: Do not force a small tool or attachment to do the job of a heavy-duty tool.
- Check for damaged parts: Before use, check for misalignment or binding of moving parts, breakage of parts, and any other condition that may affect the tool's operation.
- California Proposition 65 Warning: This product can expose you to chemicals including wood dust, which is known to the State of California to cause cancer. For more information go to www.P65Warnings.ca.gov.
3. Unpacking and Assembly
Your Shop Fox W1676 sander may arrive in more than one box. Carefully unpack all components and verify against the packing list. Inspect for any shipping damage. If any parts are missing or damaged, contact your dealer immediately.
Assembly Steps:
- Cabinet Stand Assembly: Assemble the cabinet stand according to the separate instructions provided with the stand. Ensure all fasteners are securely tightened. The stand is designed to provide a stable base and storage.
- Mounting the Sander Unit: Carefully lift the sander unit onto the assembled cabinet stand. Secure it using the provided bolts, washers, and nuts. Ensure the unit is level and stable.
- Attaching Tables and Guards: Attach the work tables for both the belt and disc sander. Install all safety guards as instructed. These guards are crucial for safe operation.
- Dust Port Connection: Connect dust collection hoses to the 2-1/2-inch dust port for the disc and the 2-inch dust port for the belt. Proper dust collection is essential for a clean and safe working environment.
4. Setup
Electrical Connection:
- The W1676 sander is prewired for 110V operation. Ensure your power supply matches the machine's requirements (110/220V, single-phase).
- Connect the sander to a dedicated circuit with appropriate overcurrent protection.
- Verify the power switch on the cabinet is easily accessible and functional.
Belt and Disc Installation/Adjustment:
- Belt Installation: Release the belt tension lever. Slide the new 6-inch by 48-inch sanding belt onto the rollers, ensuring the directional arrow on the belt matches the machine's rotation. Re-engage the tension lever.
- Belt Tracking Adjustment: Turn the belt tracking knob to center the belt on the rollers. The belt should run smoothly without rubbing against the machine frame.
- Disc Installation: Ensure the 10-inch sanding disc is securely attached to the disc plate. Use adhesive-backed discs or a suitable adhesive.
- Table Angle Adjustment: Adjust the work tables for both the belt and disc sander to the desired angle (typically 90 degrees to the sanding surface for most operations). Use the angle scale for precision.
5. Operating Instructions
Before starting, ensure all safety guards are in place, the workpiece is secure, and you are wearing appropriate personal protective equipment.
Using the Belt Sander:
- Turn on the sander using the main power switch.
- Apply light, even pressure to the workpiece against the moving belt. Sand with the grain of the wood for best results.
- Utilize the adjustable work table to support the workpiece and control the sanding angle.
- For sanding inside curves, the top guard of the belt can be removed to expose the upper roller.
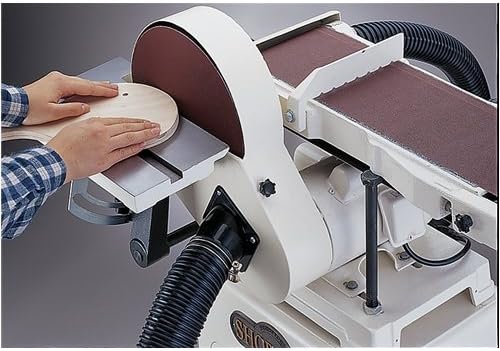
Figure 2: Operating the Disc Sander. This image illustrates a user sanding a wooden workpiece on the disc sanding component of the machine, with the adjustable table in use.
Using the Disc Sander:
- Turn on the sander.
- Present the workpiece to the disc on the side where the disc is moving downwards (left side when facing the disc). This helps to hold the workpiece against the table.
- Move the workpiece slowly and evenly across the disc to prevent burning and ensure uniform sanding.
- The disc sander is ideal for shaping and squaring edges.
Always ensure proper dust collection is active during operation to manage wood dust effectively.
6. Maintenance
Regular maintenance ensures the longevity and safe operation of your sander. Always disconnect power before performing any maintenance.
Routine Maintenance:
- Cleaning: Regularly clean the machine, especially the sanding surfaces, dust ports, and motor vents, to prevent dust buildup. Use compressed air or a vacuum.
- Belt/Disc Replacement: Replace worn sanding belts and discs promptly. Refer to the "Setup" section for installation guidance.
- Lubrication: Periodically check and lubricate moving parts as indicated in the machine's specific lubrication points (refer to diagrams if available).
- Belt Tracking: Monitor belt tracking and adjust as needed to prevent belt damage and ensure efficient sanding.
- Fastener Check: Periodically check all nuts, bolts, and screws for tightness. Vibration can cause fasteners to loosen over time.
7. Troubleshooting
This section addresses common issues you might encounter with your sander. For problems not listed here, contact customer support.
| Problem | Possible Cause | Solution |
|---|---|---|
| Sander does not start | No power; tripped circuit breaker; faulty switch | Check power cord, outlet, and circuit breaker. Test switch. |
| Belt runs off track | Improper belt tracking adjustment; worn belt; misaligned rollers | Adjust belt tracking knob. Replace worn belt. Inspect rollers for damage or misalignment. |
| Excessive vibration | Loose fasteners; unbalanced disc/belt; worn bearings | Tighten all fasteners. Replace unbalanced disc/belt. Inspect and replace worn bearings if necessary. |
| Poor sanding performance | Worn belt/disc; incorrect grit; excessive pressure | Replace worn abrasives. Use appropriate grit for the task. Apply light, even pressure. |
8. Specifications
| Feature | Specification |
|---|---|
| Model Number | W1676 |
| Motor Size | 1 HP, 110/220V (prewired to 110V), Single-phase, 3,450 RPM |
| Voltage | 120V |
| AC Adapter Current | 7 Amps |
| Power Source | Corded Electric |
| Belt Size | 6-Inch by 48-Inch |
| Belt Speed | 1,900 FPM |
| Disc Diameter | 10 inches |
| Disc Speed | 2,420 FPM |
| Grit Type (Included) | Aluminum Oxide |
| Grit Number (Included) | 80 |
| Stand | Cabinet style, powder coated paint |
| Dust Ports | 2-1/2-Inch for disc and 2-Inch for belt |
| Item Weight | 168 Pounds |
| Package Dimensions | 32.5 x 28 x 19.5 inches |
9. Warranty and Support
Warranty Information:
The Shop Fox W1676 Combination Sander comes with a Two-year warranty. Please retain your proof of purchase for warranty claims. This warranty covers defects in materials and workmanship under normal use.
Customer Support:
For technical assistance, parts, or warranty service, please contact Shop Fox customer support. Refer to the contact information provided with your purchase documentation or visit the official Shop Fox website.