1. Introduction
This manual provides essential instructions for the safe and efficient operation of your Grundig Scenos LCD 6000 HE Hi 8 Analog Camcorder, model GMI 7100. Please read this manual thoroughly before using the camcorder and retain it for future reference.
2. Safety Information
WARNING: To prevent fire or electric shock, do not expose this appliance to rain or moisture.
- Do not open the camcorder casing. Refer all servicing to qualified service personnel.
- Keep the camcorder away from direct sunlight, heat sources, and excessive dust.
- Use only the specified power adapter and battery pack.
- Avoid dropping or subjecting the camcorder to strong impacts.
- Do not use the camcorder near water or in wet conditions.
- Dispose of batteries properly according to local regulations.
3. Package Contents
Verify that all items are present in the package:
- Grundig Scenos LCD 6000 HE Hi 8 Camcorder (GMI 7100)
- Power Adapter/Charger
- Rechargeable Battery Pack
- Audio/Video Connection Cable
- Shoulder Strap
- User Manual (this document)
- (Actual contents may vary. Please check your product packaging.)
4. Product Overview
Familiarize yourself with the main components of your camcorder.
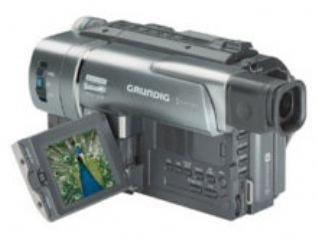
Figure 4.1: Front view of the Grundig Scenos LCD 6000 HE Hi 8 Analog Camcorder. This image shows the lens, microphone, and general body shape.
Note: Detailed diagrams of specific buttons and ports are not available in the provided data. Please refer to the physical camcorder for exact button locations.
Key Components:
- Lens: Captures video and images.
- Microphone: Records audio.
- LCD Screen: Displays live view, playback, and menu options.
- Viewfinder: Alternative display for recording.
- Tape Compartment: Holds the Hi8 video cassette.
- Battery Compartment: Houses the rechargeable battery.
- Control Buttons: Record, Play, Stop, Zoom, Menu, etc.
- Input/Output Ports: A/V Out, DC In, etc.
5. Setup
5.1. Charging and Installing the Battery
- Open the battery compartment cover.
- Insert the battery pack, ensuring it clicks into place.
- Close the battery compartment cover.
- Connect the power adapter to the camcorder's DC IN jack and then to a power outlet. The charging indicator will illuminate.
- Charge the battery fully before first use (typically 2-4 hours). The indicator will change or turn off when charging is complete.
5.2. Inserting a Hi8 Video Cassette
- Locate the tape compartment release button, usually on the top or side of the camcorder.
- Press the release button to open the tape compartment.
- Insert a Hi8 video cassette with the window facing outwards and the tape opening facing the camcorder's head mechanism.
- Gently push the cassette until it seats correctly.
- Close the tape compartment cover firmly until it latches.
6. Operating the Camcorder
6.1. Powering On/Off
Slide the POWER switch to the "ON" position to turn on the camcorder. To turn it off, slide the switch to "OFF".
6.2. Recording Video
- Open the LCD screen or use the viewfinder.
- Set the camcorder to "CAMERA" or "RECORD" mode.
- Point the lens at your subject. Use the zoom lever to adjust the focal length.
- Press the RECORD button (usually red) to start recording. A red indicator or "REC" will appear on the screen.
- Press the RECORD button again to stop recording.
6.3. Playback
- Set the camcorder to "VCR" or "PLAYBACK" mode.
- Press the PLAY button to start playback of the recorded tape.
- Use the FAST FORWARD and REWIND buttons to navigate the tape.
- Press the STOP button to halt playback.
6.4. Connecting to a Television
To view your recordings on a television:
- Ensure both the camcorder and TV are turned off.
- Connect the supplied A/V cable to the camcorder's A/V OUT port and the corresponding A/V INPUT ports on your television (typically yellow for video, white/red for audio).
- Turn on the TV and select the correct A/V input channel.
- Turn on the camcorder and switch to "VCR" or "PLAYBACK" mode.
- Start playback on the camcorder; the video should appear on your TV screen.
7. Maintenance
7.1. Cleaning the Camcorder
- Use a soft, dry cloth to clean the exterior of the camcorder.
- For the lens, use a specialized lens cleaning cloth and solution. Avoid touching the lens surface with your fingers.
- Do not use strong detergents or abrasive cleaners.
7.2. Tape Head Cleaning
Over time, tape heads can accumulate dirt, leading to poor picture quality. Use a dry head cleaning cassette periodically, following its instructions. Excessive use of cleaning cassettes can cause wear.
7.3. Storage
- Store the camcorder in a cool, dry place, away from direct sunlight and extreme temperatures.
- Remove the battery if the camcorder will not be used for an extended period.
- Store video cassettes in their cases to protect them from dust and damage.
8. Troubleshooting
If you encounter problems with your camcorder, refer to the following table for possible solutions.
| Problem | Possible Cause | Solution |
|---|---|---|
| Camcorder does not power on. | Battery is discharged or not installed correctly. | Charge the battery fully. Ensure the battery is inserted correctly. |
| No recording or poor picture quality. | Tape is full, write-protect tab is engaged, dirty tape heads, or incorrect mode. | Insert a new tape. Disengage the write-protect tab. Clean tape heads. Ensure camcorder is in "CAMERA" mode. |
| No sound during playback. | Volume is too low or A/V cables are not connected properly. | Increase volume on camcorder/TV. Check A/V cable connections. |
| LCD screen is blank. | Camcorder is off, battery is dead, or screen is switched off. | Turn on camcorder. Charge battery. Check display settings or switch. |
If the problem persists after trying these solutions, please contact Grundig customer support.
9. Specifications
| Feature | Detail |
|---|---|
| Model Number | GMI 7100 |
| Brand | Grundig |
| Recording Format | Hi8 Analog |
| Display | LCD Screen |
| ASIN | B0000D84LU |
| GTIN | 04013833445852 |
| Power Source | Rechargeable Battery Pack, AC Adapter |
| Connectivity | Audio/Video Output |
10. Warranty and Support
10.1. Warranty Information
Grundig products are manufactured to high quality standards and are covered by a manufacturer's warranty. Please refer to the warranty card included with your product or visit the official Grundig website for detailed warranty terms and conditions specific to your region.
10.2. Customer Support
For technical assistance, service, or further information, please contact Grundig customer support. Contact details can typically be found on the official Grundig website or in the documentation provided with your camcorder.
You may also find helpful resources, FAQs, and software updates (if applicable) on the Grundig Brand Store on Amazon.


