Introduction
This user manual provides comprehensive instructions for the setup, operation, and maintenance of your KinYo R-565 5.1 Surround Sound Home Theater System. Please read this manual thoroughly before using the product to ensure proper functionality and safety.
Important Safety Information
- Power Source: Ensure the system is connected to a power source that matches the voltage specified on the unit.
- Ventilation: Do not block any ventilation openings. Install in accordance with the manufacturer's instructions.
- Water and Moisture: Do not expose this apparatus to dripping or splashing and ensure that no objects filled with liquids, such as vases, are placed on the apparatus.
- Cleaning: Unplug this product from the wall outlet before cleaning. Do not use liquid cleaners or aerosol cleaners.
- Servicing: Do not attempt to service this product yourself as opening or removing covers may expose you to dangerous voltage or other hazards. Refer all servicing to qualified service personnel.
Package Contents
Verify that all items listed below are included in your package:
- 1 x Subwoofer (with integrated amplifier)
- 5 x Satellite Speakers
- 1 x Remote Control
- Speaker Cables
- Audio Input Cables
- User Manual (this document)
Product Overview
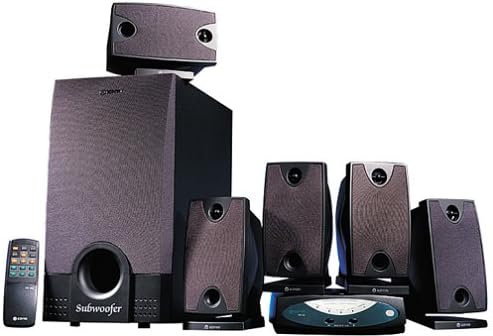
Figure 1: KinYo R-565 5.1 Surround Sound Home Theater System components. This image displays the main subwoofer unit, five satellite speakers, and the included remote control, illustrating the complete system setup.
Key Components:
- Subwoofer: The central unit, housing the main amplifier and providing deep bass frequencies. Features a wooden cabinet for enhanced bass performance.
- Satellite Speakers (5): Compact speakers designed for clear mid-range and high-frequency audio, providing surround sound effects.
- Remote Control: Allows convenient adjustment of volume, input selection, and other settings from a distance.
- Control Unit/Receiver: This unit manages audio inputs and outputs to the speakers.
Setup Instructions
1. Placement:
- Subwoofer: Place the subwoofer on the floor, ideally in a corner or near a wall for optimal bass response.
- Front Speakers (Left, Right): Position these speakers on either side of your TV or display, equidistant from the listening position.
- Center Speaker: Place the center speaker directly above or below your TV, ensuring dialogue is clear and centered.
- Rear Speakers (Left, Right): Position these speakers behind your main listening area, slightly to the sides, to create an immersive surround sound experience.
2. Connections:
- Connect Satellite Speakers to Subwoofer: Use the provided speaker cables to connect each satellite speaker to its corresponding output terminal on the back of the subwoofer unit. Ensure correct polarity (+ to + and - to -).
- Connect Audio Source: Connect your audio source (e.g., DVD player, TV, computer) to the audio input jacks on the subwoofer or control unit. The system supports 5.1 channel input for true surround sound.
- Power Connection: Plug the power cord from the subwoofer into a standard electrical outlet.
Note: The system is magnetically shielded to prevent interference with nearby electronic devices, such as televisions.
Operating Instructions
Power On/Off:
Press the POWER button on the front panel of the subwoofer or on the remote control to turn the system on or off.
Volume Control:
Adjust the master volume using the VOLUME + and VOLUME - buttons on the remote control or the main volume knob on the subwoofer/control unit.
Input Selection:
Use the INPUT button on the remote control or control unit to cycle through available audio inputs (e.g., PC, DVD, AUX).
Remote Control Usage:
The remote control allows for convenient operation of all primary functions. Ensure batteries are correctly inserted and point the remote towards the main unit's sensor.
Maintenance
- Cleaning: Use a soft, dry cloth to clean the surfaces of the speakers and subwoofer. Do not use abrasive cleaners, waxes, or solvents.
- Dust: Regularly dust the speaker grilles and vents to prevent accumulation that could affect performance.
- Storage: If storing the system for an extended period, disconnect it from power and store it in a cool, dry place away from direct sunlight and extreme temperatures.
Troubleshooting
| Problem | Possible Cause | Solution |
|---|---|---|
| No Power | Power cord not connected; Power outlet faulty; System is off. | Ensure power cord is securely plugged in; Try a different outlet; Press the POWER button. |
| No Sound | Volume too low; Incorrect input selected; Audio cables loose/disconnected; Mute function active. | Increase volume; Select correct input; Check all audio cable connections; Deactivate mute. |
| Distorted Sound | Volume too high; Poor audio source quality; Speaker cables not properly connected. | Reduce volume; Check audio source; Verify speaker cable connections and polarity. |
| Remote Control Not Working | Batteries drained/incorrectly inserted; Obstruction between remote and unit; Remote sensor blocked. | Replace batteries and check polarity; Remove obstructions; Ensure sensor is clear. |
Specifications
| Feature | Detail |
|---|---|
| Brand | KINYO |
| Model Number | R-565 |
| Surround Sound Channel Configuration | 5.1 |
| Number of Speakers | 6 (1 Subwoofer, 5 Satellites) |
| Subwoofer Cabinet Material | Wood (for enhanced bass performance) |
| Amplifier | Integrated |
| Control Type | Remote Control |
| Shielding | Magnetically Shielded |
| Power Source | Corded Electric |
| Product Weight | 12.25 kg (27 Pounds) |
| Speaker Type | Satellite |
| Mounting Type | Table Mount, Floor Standing |
| Special Feature | Tweeters |
Warranty and Support
For information regarding warranty coverage, technical support, or service inquiries, please refer to the warranty card included with your product or contact KINYO customer service through their official website or contact channels.
Note: This product has been discontinued by the manufacturer. Support availability may vary.