Product Overview
The JVC HR-XVC1U is a versatile home entertainment unit combining a DVD player and a hi-fi VHS video recorder. It supports a wide range of media formats and offers various connectivity options for integration into your existing audio-visual setup.
- Dual Functionality: Combines a DVD player and a hi-fi VHS video recorder in one unit.
- SQPB Support: Features S-VHS quasi playback (SQPB) for improved VHS picture quality.
- Audio/Video Quality: Equipped with a 10-bit/27 MHz video digital-to-analog converter and a 1-bit P.E.M. D.D. audio converter with 96 kHz/24-bit audio resolution.
- Media Compatibility: Plays DVD-Video, CD, CD-R/RW, VCD, MP3 (from CD-R/CD-RW), and VHS cassettes.
- Connectivity: Includes component-video, composite-video, S-video terminals, optical and coaxial digital audio outputs, and RF output for comprehensive connection options.
- Audio Enhancement: Features Spatializer virtual surround sound for an immersive audio experience.

Image: The JVC HR-XVC1U DVD-VCR Combo unit, shown with its remote control and included audio/video cables. The unit is silver-grey with a black central panel.
Setup and Connections
Proper connection of your JVC HR-XVC1U is crucial for optimal performance. Identify the available input ports on your television or audio receiver before connecting the unit.
Connecting to a Television
- Component Video (Best Quality): Connect the component video output (Y, Pb, Pr) from the HR-XVC1U to the corresponding component video input on your TV. Also connect the audio cables (red for right, white for left) to the TV's audio inputs.
- S-Video (Good Quality): Connect an S-video cable from the HR-XVC1U's S-video output to your TV's S-video input. Connect audio cables separately.
- Composite Video (Standard Quality): Connect a composite video cable (yellow) from the HR-XVC1U's video output to your TV's video input. Connect audio cables separately.
- RF Coaxial (Basic Quality): Connect an RF coaxial cable from the HR-XVC1U's RF output to your TV's antenna/cable input. Tune your TV to the appropriate channel (usually 3 or 4).
Connecting to an Audio System
- Digital Audio (Optical/Coaxial): For surround sound or higher quality audio, connect an optical or coaxial digital audio cable from the HR-XVC1U's digital audio output to your compatible audio receiver.
- Analog Audio: Connect the analog audio output (red/white RCA) from the HR-XVC1U to an available analog audio input on your audio receiver.
Power Connection
After all audio/video connections are made, plug the HR-XVC1U's power cord into a standard AC outlet.

Image: The rear panel of the JVC HR-XVC1U, displaying the various connection ports including digital audio (optical, coaxial), S-video, component video, composite video, and RF input/output.
Operating Instructions
This section provides general guidance on operating your JVC HR-XVC1U for both DVD and VCR functions.
Basic Operation
- Power On: Press the POWER button on the unit or the remote control.
- Select Source: Use the VCR/DVD button on the unit or remote to switch between VCR and DVD modes.
- Loading Media:
- For DVD: Press OPEN/CLOSE to open the disc tray, place a disc (label side up), and press OPEN/CLOSE again to close.
- For VHS: Insert a VHS cassette into the VCR slot. The unit will typically pull it in automatically.
- Playback: Press the PLAY button to begin playback.
- Stop/Pause: Use the STOP or PAUSE buttons for playback control.
- Fast Forward/Rewind: Use the FF (Fast Forward) and REW (Rewind) buttons.
- Eject: Press EJECT to remove a VHS tape or OPEN/CLOSE to eject a DVD.
Remote Control Functions
The included remote control provides full functionality for both DVD and VCR operations, including menu navigation, chapter/track skipping, volume control (if connected to a TV via RF), and timer programming.
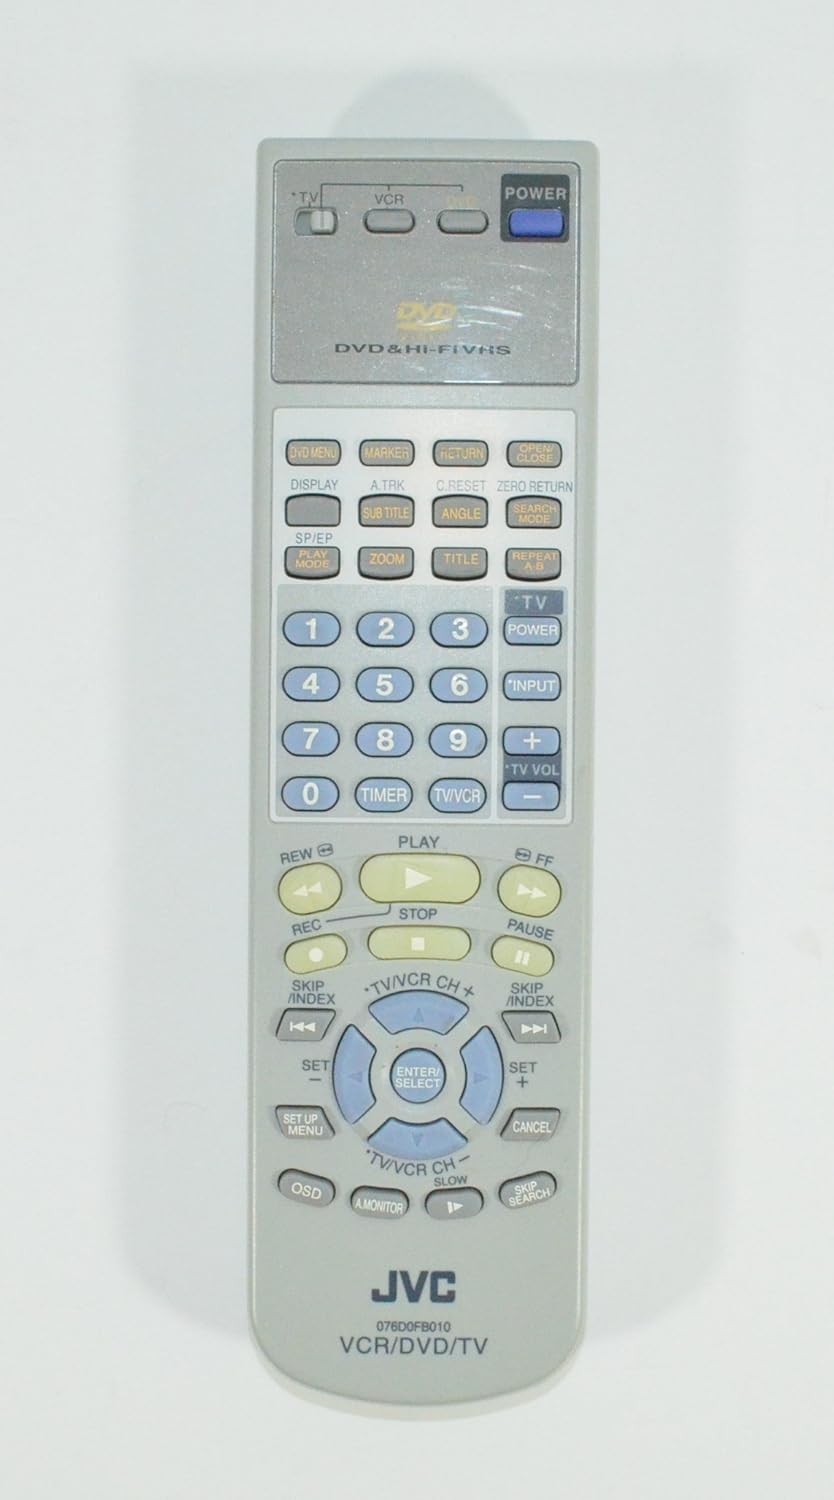
Image: The front of the JVC HR-XVC1U remote control, showing various buttons for DVD, VCR, and TV control, including playback, menu navigation, and channel/volume controls.
Maintenance
Regular maintenance helps ensure the longevity and optimal performance of your JVC HR-XVC1U.
Cleaning the Unit
- Exterior: Wipe the exterior surfaces with a soft, dry cloth. For stubborn dirt, use a slightly damp cloth and then dry thoroughly. Avoid abrasive cleaners or solvents.
- Disc Tray/VCR Slot: Keep these areas free of dust and debris. Do not insert foreign objects.
Care for Media
- DVDs/CDs: Handle discs by their edges. Clean discs with a soft, lint-free cloth wiping from the center outwards. Store discs in their cases away from direct sunlight and extreme temperatures.
- VHS Tapes: Store tapes vertically in their cases. Avoid exposing tapes to strong magnetic fields or extreme temperatures.
Troubleshooting
If you encounter issues with your JVC HR-XVC1U, refer to the following common problems and solutions before seeking professional service.
| Problem | Possible Cause / Solution |
|---|---|
| No power | Check if the power cord is securely plugged into the unit and the wall outlet. Ensure the outlet has power. |
| No picture or sound | Verify all audio and video cables are correctly connected to both the HR-XVC1U and your TV/audio system. Ensure your TV is set to the correct input source (e.g., AV1, Component, HDMI). |
| DVD does not play / "Incorrect Disc" error | Ensure the disc is clean and free of scratches. Verify the disc is inserted correctly (label side up). Try a different disc to confirm if the issue is with the player or the disc. The unit may not support certain burned disc formats or regional codes. |
| VHS tape does not play or record | Check if the tape is inserted correctly. Ensure the VCR mode is selected. For recording, ensure the tape's erase-protection tab is intact. |
| Remote control not working | Check and replace batteries if necessary. Ensure there are no obstructions between the remote and the unit's IR sensor. |
| Poor picture quality (VHS) | Clean the VCR heads using a dry-type head cleaner tape. Ensure the tape itself is in good condition. |
If the problem persists after trying these solutions, it may indicate a need for professional service.
Specifications
Key technical specifications for the JVC HR-XVC1U DVD-VCR Combo:
- Model Name: HR-XVC1U
- Brand: JVC
- Media Types Supported: CD, DVD, S-VHS, VCD, VHS
- Video D/A Converter: 10-bit/27 MHz
- Audio D/A Converter: 1-bit P.E.M. D.D. with 96 kHz/24-bit resolution
- Audio Output Mode: Stereo
- Special Features: Surround Sound (Spatializer virtual surround)
- Connector Types: RF, Component Video, Composite Video, S-Video, Optical Digital Audio, Coaxial Digital Audio
- Color: Grey
- Item Weight: Approximately 0.01 ounces (Note: This weight is likely a data entry error and does not reflect the actual physical weight of the unit.)
Warranty and Support
Warranty information for the JVC HR-XVC1U DVD-VCR Combo is typically provided at the time of purchase or within the product packaging. Please refer to any included warranty cards or documentation for details regarding coverage period and terms.
For technical support, service, or to inquire about replacement parts, please contact JVC customer service directly or visit the official JVC website. Contact information can usually be found on the manufacturer's website or in the original product documentation.
Important Consumer Information: This television receiver has an analog broadcast tuner. After February 17, 2009, a converter box is required to receive over-the-air broadcasts with an antenna due to the U.S.'s transition to digital broadcasting. Analog-only TVs should continue to work as before with cable and satellite TV services, gaming consoles, VCRs, DVD players, and similar products. For more information, contact the Federal Communications Commission (FCC) or visit their digital-television website.