Introduction
Thank you for purchasing the Sharp XL-70-H Compact Stereo System. This manual provides essential information for the safe and efficient operation of your audio system. Please read it thoroughly before use and keep it for future reference.
Safety Information
To ensure safe operation and prevent damage, please observe the following precautions:
- Do not expose the unit to rain or moisture to prevent fire or electric shock.
- Do not block ventilation openings. Ensure adequate space around the unit for proper airflow.
- Place the unit on a stable, level surface.
- Do not place objects filled with liquids, such as vases, on the unit.
- Unplug the unit from the wall outlet during lightning storms or when unused for long periods.
- Refer all servicing to qualified service personnel.
Package Contents
Verify that all items are present in the package:
- Sharp XL-70-H Main Unit (Tower)
- Two 2-way MDF Speakers
- Power Cord
- Remote Control (if included, not explicitly mentioned but common)
- Speaker Cables
Product Overview
The Sharp XL-70-H is a compact stereo system designed for versatile audio playback. It features a CD player with a glass lid, a full logic cassette deck, and an auxiliary input for connecting external devices. The system includes two 2-way MDF speakers for clear sound reproduction.
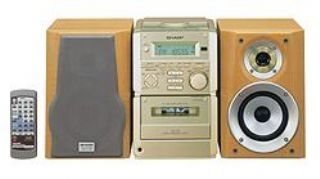
Figure 1: Front view of the Sharp XL-70-H Compact Stereo System, showing the main unit and two speakers. The main unit features a central display, control buttons, and the CD tray.
Setup
1. Speaker Connection
Connect the included 2-way MDF speakers to the main unit. Ensure that the positive (+) and negative (-) terminals on the speakers match the corresponding terminals on the main unit. Incorrect polarity can affect sound quality.
2. Power Connection
Plug the AC power cord into the power input on the rear of the main unit, then plug the other end into a standard wall outlet (AC 230V, 50Hz).
3. Initial Power On
Press the Power button on the main unit or remote control to turn on the system. The display will illuminate.
Operating Instructions
CD Player Operation
- Press the CD button to select the CD function.
- Press the OPEN/CLOSE button. The glass lid will open via motor assistance.
- Place a CD (CD-DA format) with the label side up on the disc tray.
- Press the OPEN/CLOSE button again to close the lid.
- Press the PLAY/PAUSE button to start playback.
- Use the SKIP buttons to navigate between tracks.
Cassette Player Operation
- Press the TAPE button to select the cassette function.
- Press the OPEN/EJECT button to open the cassette deck.
- Insert a cassette tape.
- Press the PLAY button to start playback.
- Use the REWIND and FAST FORWARD buttons for navigation.
- Press the STOP/EJECT button to stop playback and eject the tape.
AUX Input Operation
Connect an external audio device (e.g., smartphone, MP3 player) to the AUX input jack on the main unit using a 3.5mm audio cable. Press the AUX button to select the auxiliary input. Audio from the connected device will play through the system speakers.
Volume and Tone Control
- Volume: Rotate the motorized SERVO VOLUME knob or use the volume buttons on the remote control to adjust the sound level.
- Bass/Treble: Use the dedicated BASS and TREBLE controls to adjust the low and high frequency response of the audio.
Clock, Timer, and Sleep Functions
The system includes a clock display, a timer function for scheduled operations, and a sleep function to automatically turn off the system after a set period. Refer to the on-screen menu and Multi Jog Control for setting these features.
Maintenance
Cleaning the Unit
Wipe the exterior of the unit with a soft, dry cloth. Do not use abrasive cleaners, waxes, or solvents as they may damage the finish. For stubborn stains, lightly dampen the cloth with water and mild detergent, then wipe dry.
CD Player Care
Handle CDs by their edges to avoid fingerprints. If a CD is dirty, wipe it gently from the center outwards with a soft, lint-free cloth. Do not use solvents or abrasive cleaners on CDs.
Cassette Deck Care
Periodically clean the tape heads and pinch rollers using a specialized cassette head cleaning kit to ensure optimal sound quality and prevent tape damage.
Troubleshooting
| Problem | Possible Cause | Solution |
|---|---|---|
| No power | Power cord not connected; Power outlet not active. | Ensure power cord is securely plugged in; Check the wall outlet with another device. |
| No sound | Volume too low; Speakers not connected; Incorrect input selected. | Increase volume; Check speaker connections; Select the correct input source (CD, TAPE, AUX). |
| CD does not play | CD inserted incorrectly; CD is dirty or scratched; Disc format not supported. | Insert CD with label side up; Clean or replace CD; Ensure CD is CD-DA format. |
| Cassette tape not playing | Tape inserted incorrectly; Tape heads dirty. | Ensure tape is inserted correctly; Clean tape heads. |
If the problem persists after trying these solutions, please contact customer support.
Specifications
- Model: XL-70-H
- Brand: Sharp
- Output Power (DIN 45324):
- Peak Music Power: 120W (Total)
- Music Power: 60W (30W + 30W)
- Sine Wave Power: 40W (20W + 20W)
- Dimensions (W x H x D):
- Main Unit (Tower): 160mm x 241mm x 298mm
- Speakers: 160mm x 240mm x 189mm
- Item Weight: 8 kg
- Connectivity: Auxiliary
- Speaker Type: 2-way MDF speaker system
- Power Source: AC-adapter (connected to a standard wall outlet)
- Compatible Devices: Cassette player, AUX device
- Supported Audio Format: CD-DA
- Number of Speakers: 2
- Audio Output Mode: Stereo (2.0 channels)
- Color: Silver
- Bluetooth Support: Yes
Warranty and Support
This product comes with a standard manufacturer's warranty. For detailed warranty information, please refer to the warranty card included with your purchase or visit the official Sharp website. For technical support or service inquiries, please contact Sharp customer service.


