Introduction
The Vivitar 450PZ is a compact 35mm camera designed for ease of use, featuring fully automatic operation. This manual provides essential information for setting up, operating, maintaining, and troubleshooting your camera to ensure optimal performance.
The camera incorporates automatic focusing and exposure, a 38 to 70mm zoom lens, an automatic flash with red-eye reduction, and motorized film handling. An electronic self-timer is also included for convenience.
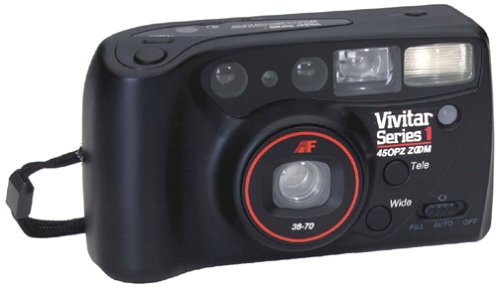
Image: Front view of the Vivitar 450PZ 35mm Camera, showcasing its compact design and lens.
Setup
1. Battery Installation
- Locate the battery compartment cover on the camera body.
- Open the cover by sliding or lifting it according to the indicator.
- Insert the required CR123A type batteries, ensuring correct polarity (+/-) as indicated inside the compartment.
- Close the battery compartment cover securely.
2. Film Loading
- Open the camera back by sliding the latch.
- Place a 35mm film cartridge into the film chamber.
- Pull the film leader across to the film take-up spool, aligning it with the start mark.
- Close the camera back. The camera will automatically advance the film to the first frame.
3. Wrist Strap Attachment
Attach the provided wrist strap to the designated loop on the camera body. This helps prevent accidental drops and provides a secure grip during use.
Operating the Camera
1. Power On/Off
Locate the power button or switch, typically near the shutter button. Press or slide it to turn the camera on or off.
2. Taking Pictures
- Look through the viewfinder to compose your shot.
- Press the shutter button halfway down to activate the autofocus and exposure systems. The camera will automatically set the focus and exposure.
- Press the shutter button fully down to take the picture. The film will automatically advance to the next frame.
3. Zoom Function
Use the zoom control (usually a lever or buttons near the shutter) to adjust the focal length between 38mm (wide-angle) and 70mm (telephoto). This allows you to bring subjects closer or capture a wider scene.
4. Flash Operation
- Automatic Flash: The flash will automatically fire in dimly lit conditions to ensure proper exposure.
- Red-Eye Reduction: When activated, the camera emits a series of pre-flashes before the main flash to reduce the red-eye effect in portraits.
- Flash Off Mode: For situations where flash is not desired (e.g., museums, theater), locate the flash mode button and select the 'flash off' setting.
5. Self-Timer
To use the self-timer, press the self-timer button. A flashing LED indicator will typically signal the countdown. After a set delay (e.g., 10 seconds), the camera will automatically take the picture, allowing the photographer to be included in the shot.
6. Film Rewind
When the film roll is complete, the camera will automatically rewind the film back into the cartridge. A mid-roll rewind function may also be available, allowing you to rewind the film before the roll is finished by pressing a specific button (refer to camera markings if available).
Maintenance
Cleaning the Camera
- Use a soft, lint-free cloth to gently wipe the camera body.
- For the lens, use a specialized lens cleaning cloth and lens cleaning solution. Avoid touching the lens surface with your fingers.
- Do not use abrasive cleaners or solvents, as these can damage the camera's finish and optical components.
Storage
- When not in use, store the camera in a cool, dry place away from direct sunlight and extreme temperatures.
- Remove batteries if the camera will not be used for an extended period to prevent leakage.
Troubleshooting
Camera Not Powering On
- Check if the batteries are correctly inserted with the proper polarity.
- Replace old or depleted batteries with fresh ones.
- Ensure the power switch is in the 'On' position.
Film Not Advancing
- Verify that the film is correctly loaded and the leader is engaged with the take-up spool.
- Check if the film door is securely closed.
- Ensure there is enough power from the batteries for the motor to operate.
Flash Not Firing
- Confirm that the flash is not set to 'Flash Off' mode.
- Allow sufficient time for the flash to charge (indicated by a flash ready lamp).
- Ensure ambient light conditions are dark enough for the automatic flash to activate.
Specifications
| Feature | Detail |
|---|---|
| Brand | Vivitar |
| Model Name | 450PZ |
| Film Format Type | 35mm |
| Lens | 38-70mm Zoom |
| Exposure Control | Automatic |
| Focus System | 14-zone Autofocus |
| Flash | Automatic with Red-Eye Reduction |
| Film Handling | Motorized Loading, Advance, and Rewind |
| Special Features | Built-In Flash, Compact Design, Electronic Self-Timer |
| Item Weight | 15.2 ounces |
| Included Components | Camera Body & Lens |
Warranty and Support
Warranty Information
The Vivitar 450PZ camera comes with a warranty covering one year on parts and 90 days on labor from the date of purchase. Please retain your proof of purchase for warranty claims.
Customer Support
For technical assistance, service, or further inquiries regarding your Vivitar 450PZ camera, please refer to the contact information provided with your product packaging or visit the official Vivitar website for support resources.