
1. Product Overview
The Konica Z-Up 140 Super Zoom is a compact 35mm point-and-shoot camera designed for ease of use. It features a versatile 38-140mm zoom lens, active autofocus, and an integrated multi-mode flash with red-eye reduction. This camera is ideal for capturing everyday moments with automatic film handling and a self-timer function.
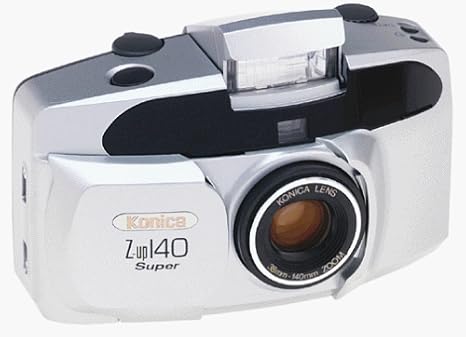
Figure 1: Front view of the Konica Z-Up 140 Super Zoom 35mm Camera, showing the lens and flash unit.
2. Setup
2.1 Unpacking
Carefully remove all items from the packaging. The box should contain:
- Konica Z-Up 140 Super Zoom Camera Body
- Camera Lens (integrated)
- (Optional) Wrist strap or neck strap
- (Optional) Instruction manual (this document)
2.2 Battery Installation
The Konica Z-Up 140 Super Zoom typically uses a CR123A lithium battery (not included). Ensure correct polarity when inserting.
- Locate the battery compartment cover on the bottom or side of the camera.
- Slide or unlatch the cover to open it.
- Insert a fresh CR123A battery, aligning the positive (+) and negative (-) terminals as indicated inside the compartment.
- Close the battery compartment cover securely until it clicks into place.
2.3 Film Loading
This camera uses standard 35mm film rolls. Automatic film loading simplifies the process.
- Open the camera back cover by sliding the latch on the side of the camera downwards.
- Place a new 35mm film cartridge into the film chamber on the left side, ensuring the film leader points towards the take-up spool on the right.
- Pull the film leader across to the film take-up spool, aligning it with the orange mark or insertion slot.
- Close the camera back cover firmly until it latches. The camera will automatically advance the film to the first frame. The frame counter will display '1'.
- If the film does not advance, open and re-close the back cover, ensuring the film leader is properly engaged.
3. Operating Instructions
3.1 Power On/Off
- To turn on the camera, slide the power switch (usually located near the shutter button) to the 'ON' position. The lens will extend.
- To turn off the camera, slide the power switch to the 'OFF' position. The lens will retract.
3.2 Taking Pictures
- Framing: Look through the viewfinder to compose your shot.
- Zoom: Use the 'W' (Wide) and 'T' (Telephoto) buttons, typically located near the shutter button, to adjust the 38-140mm zoom lens.
- Focusing: Gently press the shutter button halfway down. The camera's active autofocus system will focus on your subject, and a focus indicator (often a green light) will illuminate in the viewfinder.
- Shutter Release: Once focus is confirmed, press the shutter button fully down to take the picture. The camera will automatically advance the film to the next frame.
3.3 Flash Modes
The built-in flash offers several modes for different lighting conditions. Press the flash mode button (often marked with a lightning bolt icon) to cycle through the available modes:
- Auto Flash: The camera automatically fires the flash when lighting is insufficient.
- Fill-in Flash: Forces the flash to fire, useful for brightening shadows in bright conditions.
- Flash Off: Prevents the flash from firing, useful in situations where flash is prohibited or undesirable.
- Red-Eye Reduction: Fires a pre-flash before the main flash to reduce the red-eye effect in portraits.
3.4 Self-Timer
To use the 10-second self-timer:
- Press the self-timer button (often marked with a clock icon).
- Compose your shot and press the shutter button. The self-timer lamp will blink, indicating the countdown has begun.
- After approximately 10 seconds, the camera will automatically take the picture.
3.5 Automatic Film Rewinding
Once all frames on the film roll have been exposed, the camera will automatically rewind the film back into its cartridge. The frame counter will reset. You can then open the camera back and remove the film for processing.
4. Maintenance
4.1 Cleaning the Camera
- Camera Body: Use a soft, dry cloth to wipe the camera body. For stubborn dirt, slightly dampen the cloth with water. Avoid harsh chemicals.
- Lens: Use a lens brush or a blower to remove dust. For smudges, use a specialized lens cleaning cloth and lens cleaning fluid. Do not touch the lens surface with your fingers.
- Viewfinder: Gently wipe with a soft, dry cloth.
4.2 Storage
When not in use, store the camera in a cool, dry place, away from direct sunlight and extreme temperatures. If storing for an extended period, remove the battery to prevent leakage.
4.3 Battery Replacement
Replace the battery when the battery indicator (if present) shows low power, or if the camera fails to power on or operate correctly. Refer to section 2.2 for battery installation instructions.
5. Troubleshooting
| Problem | Possible Cause | Solution |
|---|---|---|
| Camera does not power on. | Dead or incorrectly installed battery. | Check battery polarity; replace with a fresh CR123A battery. |
| Film does not advance. | Film not loaded correctly; film leader not engaged. | Open and re-load film, ensuring the leader is properly inserted into the take-up spool. |
| Flash does not fire. | Flash mode set to 'Flash Off'; insufficient battery power. | Change flash mode; replace battery. |
| Photos are blurry. | Camera shake; subject too close; autofocus not engaged. | Hold camera steady; ensure subject is within minimum focus distance; press shutter halfway to confirm focus before shooting. |
| Lens does not extend/retract. | Low battery; obstruction. | Replace battery; check for any obstructions around the lens barrel. |
6. Specifications
| Model Name | Z-Up 140 Super Zoom |
| Model Number | ZUP140SUPER |
| Film Format | 35mm |
| Lens | 38-140mm Zoom Lens |
| Focusing System | Active Autofocus |
| Flash | Built-in Multi-mode Flash with Red-Eye Reduction |
| Self-Timer | 10-second delay |
| Film Handling | Automatic loading, winding, and rewinding |
| Power Source | CR123A Lithium Battery (not included) |
| Dimensions | Approximately 6.6 x 3.7 x 3.6 inches |
| Weight | Approximately 1 pound (without battery) |
7. Warranty & Support
7.1 Warranty Information
This product may be covered by a limited manufacturer's warranty. For detailed warranty terms and conditions, including duration and coverage, please refer to the warranty card included with your original purchase or visit the official Konica website. Keep your proof of purchase for warranty claims.
7.2 Customer Support
If you encounter any issues not covered in this manual or require further assistance, please contact Konica customer support. Contact information can typically be found on the manufacturer's official website or in the product packaging.


