ASUS PRIME B560M-A
دليل مستخدم اللوحة الأم ASUS Prime B560M-A
Model: PRIME B560M-A
العلامة التجارية: ASUS
مقدمة
This manual provides comprehensive instructions for the installation, configuration, and maintenance of your ASUS Prime B560M-A motherboard. Designed to support 10th and 11th Gen Intel Core processors, this micro ATX motherboard offers advanced features for PC builders and enthusiasts.
1. الإعداد والتثبيت
Follow these steps for proper installation of your motherboard and its components.
1.1 فك الصندوق والفحص
Carefully remove the motherboard from its packaging. Inspect for any visible damage. Ensure all accessories are present, including SATA cables, M.2 screws, and the I/O shield.

Figure 1: ASUS Prime B560M-A Motherboard with its retail box and included accessories, such as SATA cables, M.2 screws, and documentation.
1.2 تصميم اللوحة الأم ومكوناتها
Familiarize yourself with the key components and connectors on the motherboard.

الشكل 2: من أعلى إلى أسفل view of the ASUS Prime B560M-A motherboard, highlighting the LGA 1200 CPU socket, four DDR4 DIMM slots, and various PCIe slots, including the primary PCIe 4.0 x16 slot.

Figure 3: An angled perspective of the ASUS Prime B560M-A motherboard, providing a clearer view of the rear I/O ports, M.2 slots, and SATA ports.
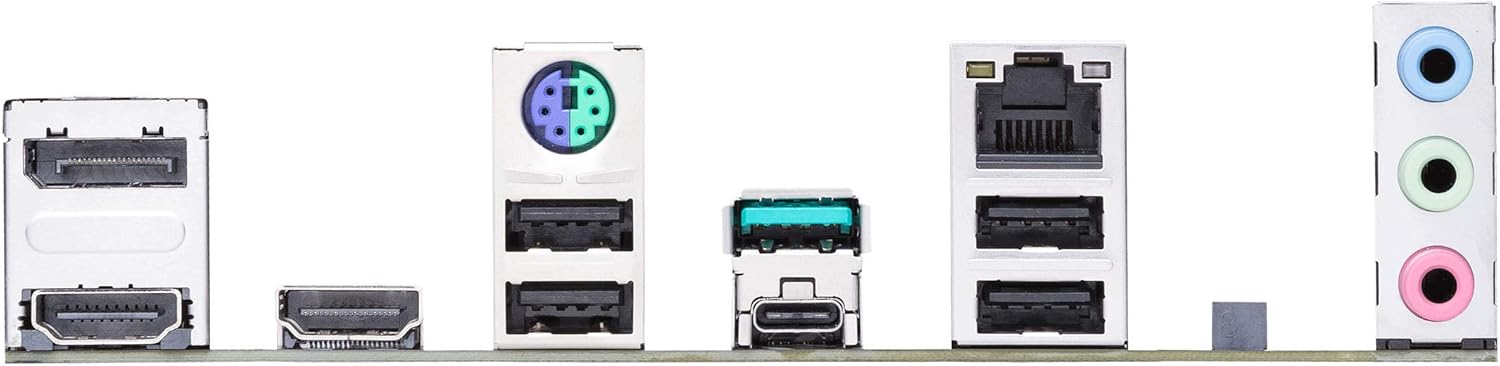
Figure 4: Close-up of the rear I/O panel of the ASUS Prime B560M-A motherboard, displaying its array of ports including DisplayPort, HDMI, USB 3.2 Gen 2 Type-C, USB 3.2 Gen 1, USB 2.0, Ethernet, and audio jacks.
1.3 ترتيب تركيب المكونات
- تثبيت وحدة المعالجة المركزية: Carefully align the CPU with the socket and gently place it. Secure the retention arm.
- تركيب مبرد وحدة المعالجة المركزية: قم بتركيب مبرد وحدة المعالجة المركزية وفقًا لتعليمات الشركة المصنعة.
- تثبيت ذاكرة الوصول العشوائي (RAM): Open the DIMM slot clips, align the memory modules, and press firmly until they click into place.
- تركيب SSD M.2: Insert the M.2 SSD into the appropriate slot and secure it with the provided screw.
- تركيب اللوحة الأم: Install the I/O shield into your PC case. Carefully place the motherboard into the case, aligning it with the standoffs. Secure with screws.
- تركيب بطاقة الرسومات (GPU): Insert the graphics card into the primary PCIe x16 slot and secure it.
- توصيلات مصدر الطاقة: Connect the 24-pin ATX power connector and the 8-pin CPU power connector from your power supply to the motherboard. Connect PCIe power cables to your GPU if required.
- وصلات اللوحة الأمامية: Connect the power button, reset button, HDD LED, power LED, and front panel USB/audio headers to the corresponding pins on the motherboard. Refer to the motherboard's silkscreen labels for correct orientation.
- توصيلات أجهزة التخزين: Connect SATA data cables from your storage drives (HDDs/SSDs) to the SATA ports on the motherboard. Connect power cables from your power supply to these drives.
2. تشغيل اللوحة الأم
Once your system is assembled, you can proceed with initial boot-up and software configuration.
2.1 Initial Boot and BIOS/UEFI Setup
Upon first power-on, the system will typically enter the BIOS/UEFI utility. Here you can configure system settings, boot order, and enable/disable various features.
- يضعط ديل or F2 during POST (Power-On Self-Test) to enter the BIOS/UEFI setup.
- Navigate using keyboard arrows or mouse.
- تتضمن الأقسام الرئيسية ما يلي:
- رئيسي: معلومات النظام.
- Ai Tweaker: Overclocking and performance tuning (memory frequency, CPU ratios).
- متقدم: CPU configuration, PCH configuration, onboard device configuration.
- شاشة: درجات حرارة النظام، وسرعات المروحة، والحجمtagإِسْ
- التمهيد: Boot device priority, CSM settings.
- أداة: ASUS EZ Flash 3 Utility for BIOS updates.
- مخرج: Save and exit, discard changes.
2.2 تثبيت برامج التشغيل والبرمجيات
For optimal performance and stability, install the latest drivers and utilities from the ASUS support website or the provided support DVD/USB.
- برامج تشغيل مجموعة الشرائح: Essential for proper communication between components.
- برامج تشغيل الشبكة المحلية: للاتصال بالشبكة.
- برامج تشغيل الصوت: For sound functionality.
- برامج تشغيل الرسومات: For integrated graphics (if used) or dedicated GPU.
- ASUS Utilities:
- صندوق الأسلحة: Centralized software for system monitoring, driver updates, and Aura Sync RGB control.
- Fan Xpert 2+: For advanced fan control and cooling optimization.
- مجموعة الذكاء الاصطناعي 3: A suite of utilities for system tuning and monitoring.
3. الصيانة
تساعد الصيانة المنتظمة على ضمان طول عمر اللوحة الأم وتشغيلها المستقر.
- إزالة الغبار: قم بتنظيف الغبار من اللوحة الأم والمكونات بشكل دوري باستخدام الهواء المضغوط. تأكد من إيقاف تشغيل النظام وفصله عن مصدر الطاقة.
- تحديثات BIOS: تحقق من دعم ASUS website for the latest BIOS versions. BIOS updates can improve compatibility, stability, and performance. Use the ASUS EZ Flash 3 utility for safe updates.
- تحديثات برنامج التشغيل: Keep your drivers updated to the latest versions from the ASUS website or component manufacturers (e.g., Intel, Realtek).
- إدارة الكابلات: تأكد من توجيه الكابلات الداخلية بشكل منظم لتحسين تدفق الهواء ومنع التداخل.
4. استكشاف الأخطاء وإصلاحها
يوفر هذا القسم حلولاً للمشكلات الشائعة التي قد تواجهها.
4.1 لا يوجد طاقة / لا يوجد تمهيد
- التحقق من توصيلات الطاقة: Ensure the 24-pin ATX and 8-pin CPU power cables are securely connected to the motherboard and power supply.
- رؤوس اللوحة الأمامية: Verify that the power button header is correctly connected.
- مزود الطاقة: Test the power supply with another system or a PSU tester.
- CMOS Clear: Try clearing the CMOS by removing the CMOS battery for 5-10 minutes or using the CLRTC jumper (refer to the full manual for jumper location).
4.2 لا يوجد مخرج عرض
- اتصال الشاشة: Ensure the monitor cable is securely connected to the graphics card (or motherboard if using integrated graphics) and the monitor.
- بطاقة الرسوميات: Reseat the graphics card in its PCIe slot. Ensure any required PCIe power cables are connected.
- كبش: أعد تركيب وحدات ذاكرة الوصول العشوائي (RAM). حاول تشغيل الجهاز باستخدام شريحة ذاكرة واحدة فقط.
4.3 Component Not Detected (e.g., SSD, HDD, RAM)
- Reseat Component: Power off the system and reseat the problematic component (M.2 SSD, SATA drive, RAM).
- فحص الكابلات: Ensure SATA data and power cables are securely connected. Try different cables or ports.
- إعدادات BIOS/UEFI: Check if the component is detected in the BIOS/UEFI. Ensure SATA mode (AHCI/RAID) is correctly configured.
5. المواصفات
Key technical specifications for the ASUS Prime B560M-A motherboard.
| ميزة | مواصفة |
|---|---|
| مقبس وحدة المعالجة المركزية | إل جي إيه 1200 |
| المعالجات المتوافقة | معالجات Intel Core من الجيلين الثامن والتاسع |
| مجموعة الشرائح | إنتل B560 |
| تقنية ذاكرة الوصول العشوائي (RAM) | دي دي ار 4 |
| Memory Speed (Max) | 5000 ميجاهرتز (OC) |
| سعة تخزين الذاكرة (الحد الأقصى) | 128 جيجا بايت |
| فتحات PCIe | منفذ PCIe 4.0 x16 واحد، منفذ PCIe 3.0 x1 واحد |
| فتحات M.2 | 2 (1x PCIe 4.0 x4، 1x PCIe 3.0 x4) |
| منافذ ساتا | 6 منافذ ساتا 6 جيجابت/ثانية |
| منافذ USB (الخلفية) | USB 3.2 Gen 2 Type-C, USB 3.2 Gen 2 Type-A, USB 3.2 Gen 1 Type-A, USB 2.0 |
| شبكة محلية | إيثرنت إنتل بسرعة 1 جيجابت |
| مخرج الفيديو | DisplayPort, Dual HDMI |
| عامل الشكل | مايكرو ATX |
| الأبعاد (LxW) | 9.6 × 9.2 بوصة (تقريبًا) |
6. الضمان والدعم
For detailed warranty information, technical support, and additional resources, please visit the official ASUS support webموقع.
- الدعم الرسمي من ASUS: https://www.asus.com/support/
- صفحة دعم المنتج: بحث عن "PRIME B560M-A" on the ASUS support site for drivers, utilities, and FAQs.
- دليل المستخدم الكامل (PDF): For a more detailed guide, you can download the complete user manual. تنزيل دليل PDF
ASUS provides a limited warranty for its motherboards. Please retain your proof of purchase for warranty claims.
Ask a question about this manual
Ask about setup, troubleshooting, compatibility, parts, safety, or missing instructions. Manuals+ will review the question and use this page’s manual context to help answer it.