AFINIA LABEL L701 Color Label Printer

Specifications
- Model: L701
- Manufacturer: AfiniaLabel
- Support: https://afinialabel.com/product-support/l701-support/
- Contact Information: support@afinialabel.com | Phone: 952-556-1608
Product Usage Instructions
Unpacking
- Remove tape and packing materials:
- Remove tapes.
- Open the top cover and remove the tapes and foam.
- Remove cardboard. Save the packing foam and cardboard!
Power Connection:
- Connect power and turn on the switch at the back of the printer.
- Do not connect the printer to a PC until prompted during Printer Driver Installation.
Ink Cartridge and Printhead Installation
- Install ink cartridges.
- Install printhead after following the specified steps in the manual.
Media Loading
- Load sample media by following the instructions provided:
- Place the flat side against the media roll.
- Tighten the knob fully.
- Insert media until it stops.
- Wait for the printer to load the media.
Printing:
- Print a test label using appropriate media (inter-label gap or continuous).
Driver Installation
- Before installing the printer driver, ensure your computer meets the minimum system requirements as per the User Manual Appendix.
- To connect the printer to a computer via USB:
- Download the installer from the AfiniaLabel website.
- Connect the USB cable when prompted during installation.
- To connect the printer to a network:
- Connect the printer to the network using Ethernet.
- If setting a Static IP address, refer to the User Manual for instructions before proceeding.
Please visit our website for videos detailing setup, installation, and product overview. https://afinialabel.com/product-support/l701-support/
 Unpack:

For more detailed information, click the User Guide button on the Setup Launcher main page.
Technical Support Contact Information:
- Email: support@afinialabel.com
- Phone: 952-556-1608
Accessories

Remove tape and packing materials
- a Remove tapes.

- Open the top cover and remove the tapes and foam.


Connect the power, turn on the switch in the back
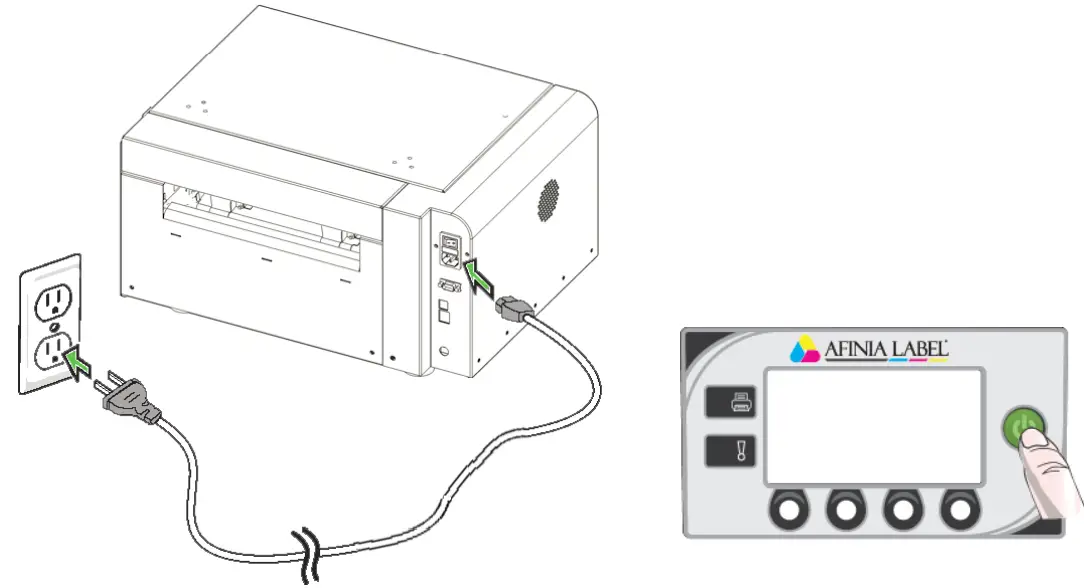 Do not connect the printer to a PC until prompted to do so during the Printer Driver Installation!
Choose display language

Install ink cartridges


Install printhead

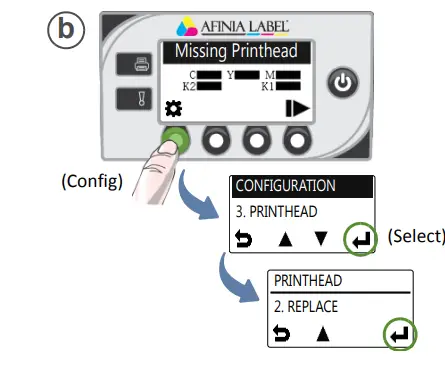 Wait for the print head latch to be released.
 Slowly remove tape from electrical contacts and nozzles

Load sample media


Print test label
Requires inter‐label gap or continuous media
 Sample PQ Plot
 Top Section:
- Line is defined with no missing nozzles
- LLinesare printed in order: Yellow, Black, Cyan, Black, Magenta
- Vertica dashed lines are straight
Middle Section:
- A yellowback, cyan, black, and magenta lines are printed
- N color mixing on the color bars
- Numbers 1, 3, 5 are visible
Bottom Section:
- Line aisdefined with no missing nozzles
- LinLineareprinted in order: Yellow, Black, Cyan, Black, Magenta
Overall:
- No streaking or smearing
Install printer driver
Before installing the printer driver, ensure the computer meets minimum system requirements (see System Requirements in the User Manual Appendix).
To connect the inter to the computer using a USB
- Download installer from the AfiniaLabel website: https://afinialabel.com/product-support/l701-support/
Drivers & Installers
![]() Extract the file and run check.exe
Extract the file and run check.exe


To connect the printer to the network
- Connect the printer to the network using Ethernet
 If you will be using DHCP to set the IP Address, skip to step c. To assign the printer a Static IP address, please see Selecting the Security Level in Chapter One of the User Manual before proceeding to Step C.

FAQs
Q: What should I do if the language option is not displayed during setup?
A: If Language is not displayed, press Select. For other languages, use the corresponding button. If the Language option is not available, refer to Chapter One of the User’s Manual for selecting the Security Level.
Q: How can I ensure proper ink flow through the printhead?
A: Check that ink is flowing through the tubes on both sides of the printhead. The Control Panel will display Online when ready.
Documents / Resources
 | AFINIA LABEL L701 Color Label Printer [pdf] Installation Guide L701 Color Label Printer, L701, Color Label Printer, Label Printer, Printer |