SENXINGYAN SXY-US-JSM1
SENXINGYAN Automatic Chicken Coop Door Instruction Manual
Model: SXY-US-JSM1
1. Inleiding
This manual provides detailed instructions for the installation, operation, and maintenance of your SENXINGYAN Automatic Chicken Coop Door. This solar-powered door opener features a timer, light sensor, multiple operating modes, IP65 weather resistance, and an anti-pinch function to ensure the safety of your poultry.

Image: The automatic chicken coop door with its solar panel and remote control, demonstrating a chicken entering the coop.
2. Veiligheidsinligting
- Ensure all components are securely installed before operation.
- Keep children and pets away from the moving door during operation.
- The door features an Anti-Pinch Function: If an obstacle is detected during closing, the door will automatically reopen to prevent injury. After reopening, it will attempt to close again.
- Regularly inspect the door for any obstructions in its path.

Image: Illustration of the intelligent anti-clip function, showing how the door reopens if a chicken is detected during closing.
3. Pakketinhoud
Verifieer dat alle items in die pakket teenwoordig is:
- Outomatiese Hoenderhokdeur-eenheid
- Solar Panel with Ground Stake
- Afstandbeheer
- Tipe C kragkabel
- Monteringskroewe en hardeware
- Instructiehandleiding (hierdie dokument)

Image: All included components of the chicken coop door system, laid out for inspection.
4. Opstelling en installering
The installation process is designed to be quick and straightforward.
- Meet en merk: Determine the desired location for the door on your coop. Mark the opening dimensions: approximately 14.3 inches high and 10.6 inches wide.
- Sny opening: Carefully cut the marked opening in your chicken coop.
- Monteer Eenheid: Position the automatic door unit over the opening. Ensure the sensor faces outwards and the motor faces inwards. Secure the unit firmly with the provided screws.
- Installeer sonpaneel: Place the solar panel in a location that receives ample direct sunlight throughout the day. Use the ground stake or mount it securely to the coop. Connect the solar panel cable to the main door unit.
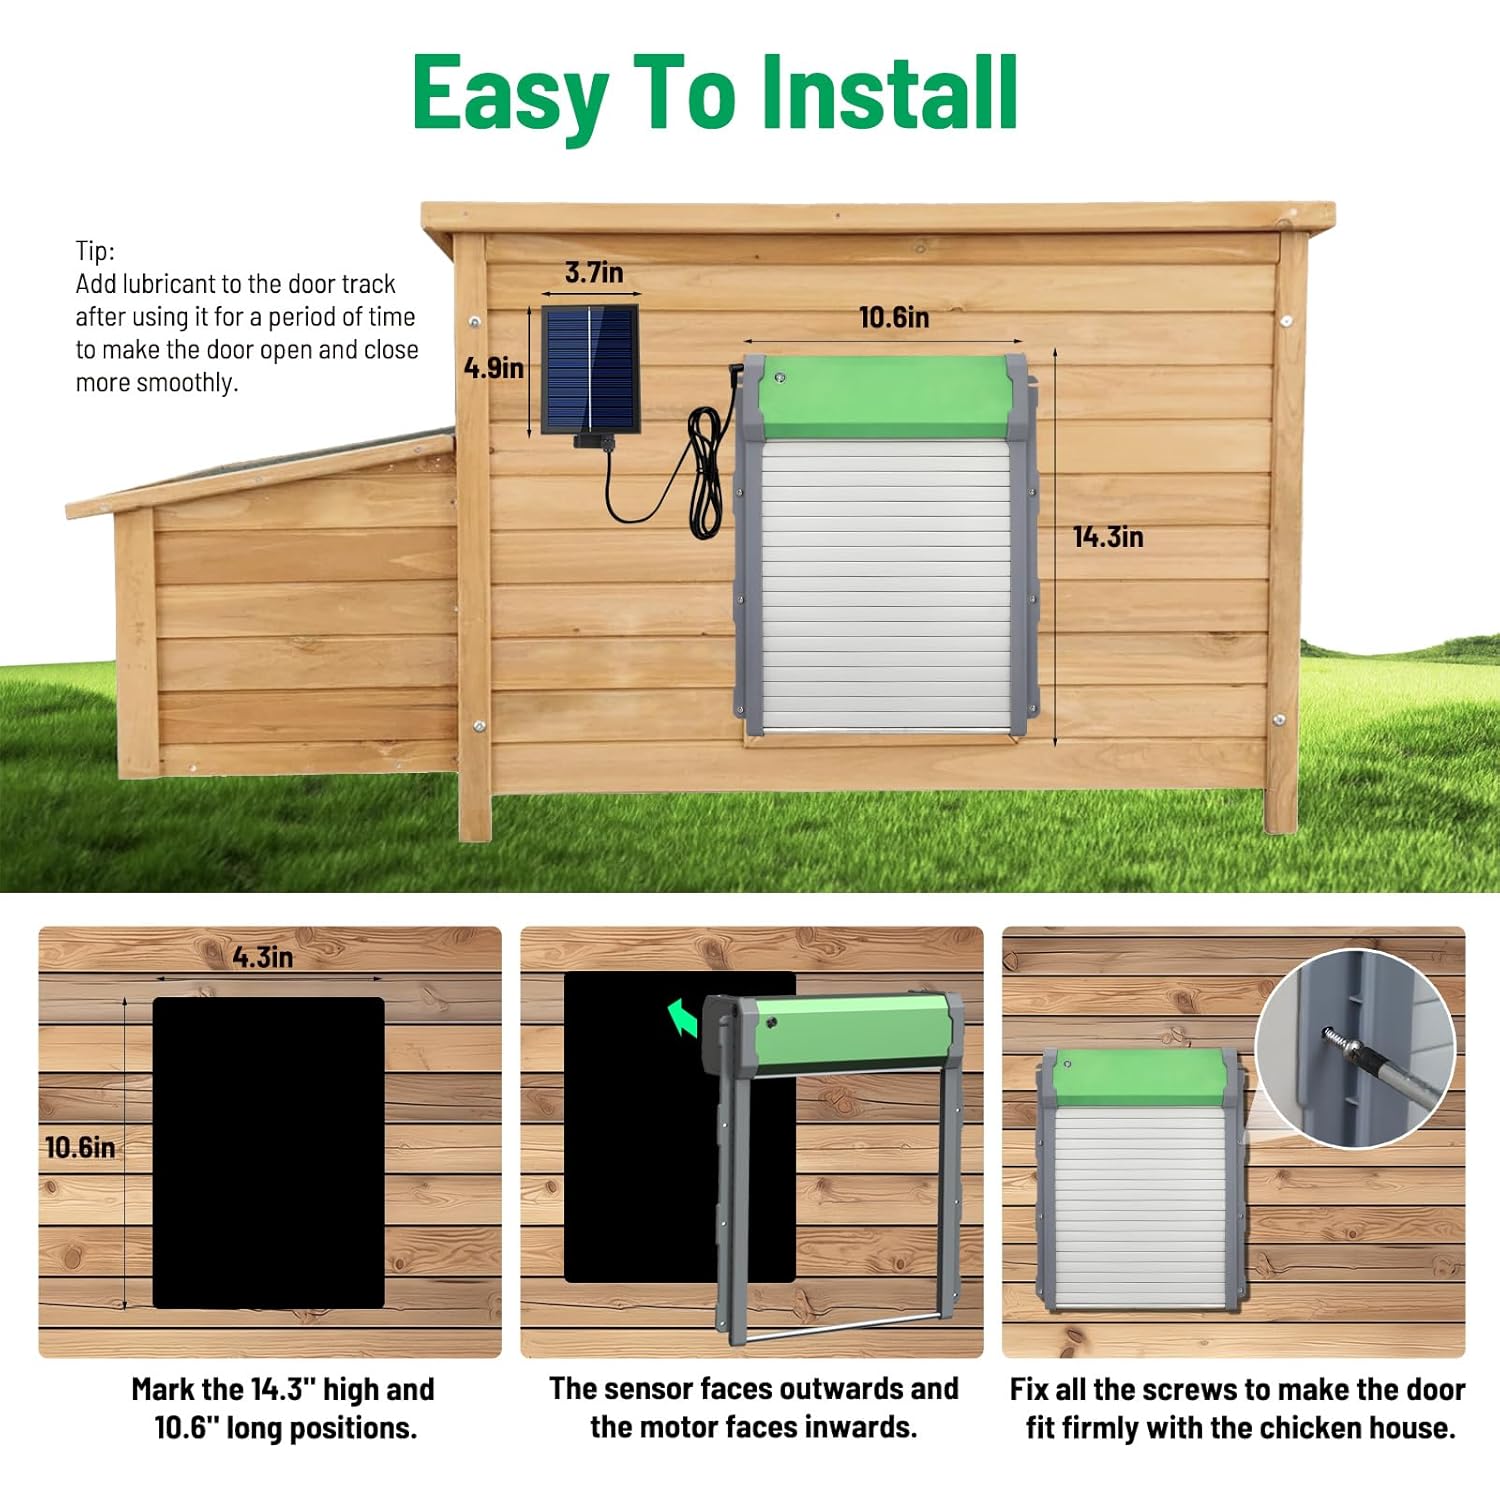
Image: Step-by-step guide for installing the automatic chicken coop door, showing measurements and mounting details.
5. Kragtoevoer
Your chicken coop door offers three power supply options for reliable operation:
- Sonenergie: The integrated solar panel charges the built-in 2000mAh lithium-ion battery during daylight hours. This is the primary and most environmentally friendly power source.
- Ingeboude battery: The 2000mAh battery provides power for continuous operation, especially during periods of low sunlight or at night.
- Type-C Power Cord: For extended cloudy periods or emergencies, the door can be powered directly via the Type-C power cord (adapter not included).

Image: Visual representation of the three power options (solar, battery, Type-C) and the door's IP65 weather resistance in cold conditions.
6. Bedryfswyses
The door offers flexible control options to suit your needs:
- Light Sensing Mode (Default): The door automatically opens at sunrise and closes at dusk based on ambient light levels.
- Timermodus: Set specific opening and closing times. The door will operate according to your programmed schedule daily.
- Afstandbeheermodus: Use the included remote control to manually open or close the door from a distance.
- Handmatige modus: Directly operate the door using the buttons on the control panel.

Beeld: Oorview of the four available operating modes for the chicken coop door.
7. Onderhoud
- Skoonmaak: Periodically clean the solar panel to ensure optimal charging efficiency. Wipe the door tracks to remove dirt or debris.
- Smering: After a period of use, apply a suitable lubricant to the door tracks to ensure smooth opening and closing.
- Batterykontrole: While the battery is designed for longevity, monitor its performance, especially during prolonged cloudy weather.
- Weerbeskerming: The door is IP65 rated for outdoor use, tolerating temperatures from -20°F to 140°F (-28°C to 60°C). Ensure proper installation to maximize its weather resistance.
8. Probleemoplossing
| Probleem | Moontlike oorsaak | Oplossing |
|---|---|---|
| Deur maak nie oop/toe nie | Low battery, obstruction in track, incorrect mode setting. | Check solar panel for dirt, charge via Type-C, clear track, verify operating mode. |
| Door reopens after closing | Anti-pinch sensor activated by an obstacle (chicken, debris). | Ensure the path is clear. The door will attempt to close again after a short delay. |
| Afstandbeheer werk nie | Remote battery low, out of range, interference. | Replace remote battery, move closer to the unit, check for obstructions. |
9. Spesifikasies
| Kenmerk | Detail |
|---|---|
| Handelsmerk | SENXINGYAN |
| Model Naam | SXY-US-JSM |
| Item Modelnommer | SXY-US-JSM1 |
| Produk afmetings | 26.9L x 5.1B x 36.3H Sentimeter |
| Item gewig | 1 kg 770 g |
| Kragtoevoer | Solar, 2000mAh Built-in Lithium-ion Battery, Type-C Port |
| Spesiale kenmerke | Durable, Secure, IP65 Weatherproof, Anti-Pinch Function, Timer, Light Sensor, Remote Control |
| Bedryfstemperatuur | -20°F tot 140°F (-28°C tot 60°C) |
| Rasaanbeveling | Chicken (also suitable for ducks, geese, etc.) |
10. Waarborg en Ondersteuning
SENXINGYAN is committed to providing high-quality products and customer satisfaction.
- Waarborg: Hierdie produk kom met 'n 36-maande waarborg.
- Returns & Exchange: Enjoy a 90-day return and exchange policy from the date of purchase.
- Tegniese Bystand: For any technical assistance or inquiries, please contact our customer support team. We offer 24/7 responsive support.
Ask a question about this manual
Ask about setup, troubleshooting, compatibility, parts, safety, or missing instructions. Manuals+ will review the question and use this page’s manual context to help answer it.