1. Introduction
This manual provides detailed instructions for the installation, operation, and maintenance of your LIVIAE Electric Scooter Brushless Motor Controller and LCD Display Panel with Thumb Accelerator. Designed for electric bicycles and scooters, this system offers efficient speed regulation and clear data display. The components are crafted from fine quality materials, ensuring a lightweight, rainproof, sturdy, and practical solution for your electric vehicle.
The brushless controller operates quickly, silently, and is highly responsive to the electric bike's state, while the LCD display provides clear information with a backlight for visibility in various lighting conditions. Easy installation is a key feature, with a dedicated mount included for the LCD display.

2. Safety Information
- Always ensure the power is OFF before installing or performing maintenance on the controller or display.
- Incorrect wiring can damage the components or cause electrical hazards. Follow the wiring instructions carefully.
- Do not attempt to open or modify the controller or display unit, as this may void the warranty and pose safety risks.
- Ensure all connections are secure and waterproof (where applicable) to prevent short circuits or damage from moisture.
- This product is designed for electric bicycles and scooters. Do not use it for unintended applications.
3. Package Contents
Depending on the specific option purchased, your package may include:
- 1 x LIVIAE LCD Display Panel with Thumb Accelerator
- 1 x Brushless Motor Controller (36V or 48V, depending on selection)
- 1 x 6-pin Instrument Cable (for connecting LCD display)
- Mounting hardware for LCD display
4. Specifications
| Feature | Specification |
|---|---|
| Product Type | Electric Scooter Brushless Motor Controller & LCD Display |
| Brand | LIVIAE |
| Material | Plastics + LCD + Metal |
| Controller Voltage | DC 36V / 48V (selectable) |
| Current Limiting | 20A |
| Undervoltage Protection | 30.5V (for 36V) / 41.5V (for 48V) |
| Motor Angle | 120° |
| Wave Function | Sine wave |
| Controller Model | DYT2-018(8S) / DYT2-018(6S) |
| Waterproof Rating | IP65 |
| Power | 350W |
| LCD Display Dimensions (approx.) | Length: 110mm, Width: 126mm, Height: 40mm |
| Handlebar Clamp Diameter | 22mm |

5. Installation and Setup
Before beginning installation, ensure your electric scooter's power is completely off and the battery is disconnected.
5.1 Mounting the LCD Display and Thumb Accelerator
- Identify a suitable position on your scooter's handlebar for the LCD display and thumb accelerator unit. The clamp is designed for a 22mm diameter handlebar.
- Loosen the screws on the clamp of the display unit.
- Position the display unit on the handlebar and tighten the screws securely. Ensure it is oriented for comfortable thumb operation and clear visibility of the screen.

5.2 Controller and Wiring Connections
The controller is the central unit for managing your scooter's motor and accessories. Carefully connect all wires as described below and illustrated in the wiring diagram. Pay close attention to wire colors and connector types.
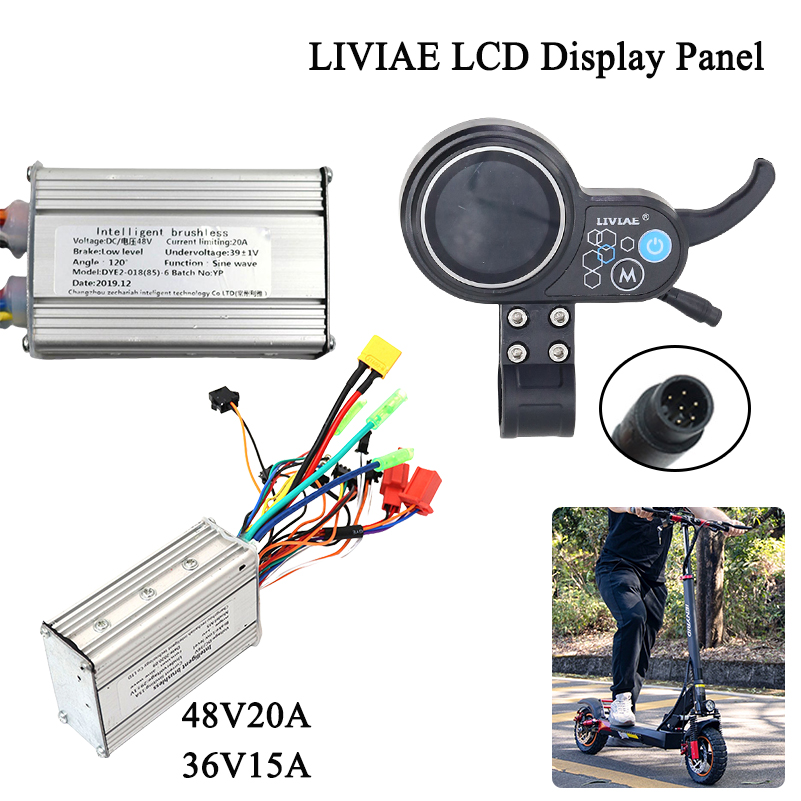
- Motor Wires: Connect the three thick motor phase wires (typically Yellow, Green, Blue) from the controller to the corresponding motor wires.
- Hall Sensor Wires: Connect the smaller Hall sensor wires (typically a 5-wire connector) from the controller to the motor's Hall sensor connector. Ensure correct polarity.
- Battery Power: Connect the thick Red wire from the controller to the positive (+) terminal of your scooter's battery, and the thick Black wire to the negative (-) terminal.
- LCD Display (Instrument Cable): Connect the 6-pin instrument cable (provided) from the LCD display unit to the corresponding port on the controller. This cable typically carries power, communication, and control signals.
- Throttle (Thumb Accelerator): The thumb accelerator is integrated with the LCD display and connects via the instrument cable.
- Brake Levers: Connect the brake lever wires (if applicable) to the designated brake input on the controller. These typically cut motor power when brakes are applied.
- Other Accessories: Connect any other accessories (e.g., lights, horn) to their respective ports on the controller, if available and compatible.
After making all connections, double-check for security and correct pairing. Ensure no bare wires are exposed. Secure the controller in a safe, dry location on your scooter.
6. Operation
6.1 Powering On/Off
- To power on the system, press and hold the power button (usually marked with a power symbol) on the LCD display unit.
- To power off, press and hold the power button again until the display turns off.
6.2 LCD Display Functions
The LIVIAE LCD display provides real-time information about your scooter's status. Common functions include:
- Speed Display: Shows current speed (km/h or mph).
- Battery Level: Indicates remaining battery charge.
- Mode/Gear: Displays the current power assist level or riding mode. Use the 'M' button to cycle through modes.
- Odometer/Trip Meter: Shows total distance traveled or current trip distance.
- Backlight: The display features a backlight for clear visibility in low-light conditions.

6.3 Thumb Accelerator
The integrated thumb accelerator controls the speed of your electric scooter. Gently press the lever with your thumb to increase speed. Release the lever to decrease speed or coast.
7. Maintenance
- Cleaning: Wipe the display and controller with a soft, damp cloth. Do not use abrasive cleaners or solvents.
- Inspection: Regularly check all wiring connections for tightness and signs of wear or damage. Ensure the display unit is securely mounted.
- Water Exposure: While the product is IP65 waterproof, avoid prolonged exposure to heavy rain or submersion in water. Ensure all caps and covers are properly sealed.
- Storage: When not in use for extended periods, store the scooter and its components in a dry, cool place.
8. Troubleshooting
| Problem | Possible Cause | Solution |
|---|---|---|
| Display does not power on. | No power from battery, loose connection, faulty display. | Check battery charge. Ensure all power connections (especially the instrument cable) are secure. |
| Motor not responding to throttle. | Loose throttle connection, faulty controller, brake sensor engaged. | Check instrument cable connection. Ensure brake levers are not engaged. Inspect motor and Hall sensor connections. |
| Inconsistent speed or jerky operation. | Loose motor phase wires or Hall sensor wires, motor issues. | Verify all motor and Hall sensor connections are tight. |
| Display shows error code. | Specific system fault. | Refer to the scooter's main user manual for specific error code meanings, or contact support. |
9. User Tips
- Always confirm the correct voltage (36V or 48V) of your scooter's battery and motor before selecting the corresponding controller model to ensure compatibility.
- When connecting wires, match colors carefully. If unsure, consult a professional or the scooter's original wiring diagram.
- Periodically check the tightness of the handlebar clamp for the display unit to prevent rotation during use.
10. Warranty and Support
For technical assistance, warranty claims, or further inquiries, please contact the seller or manufacturer through the platform where the product was purchased. Provide your order details and a clear description of the issue for prompt support.


