

OVS Mid Height Rack
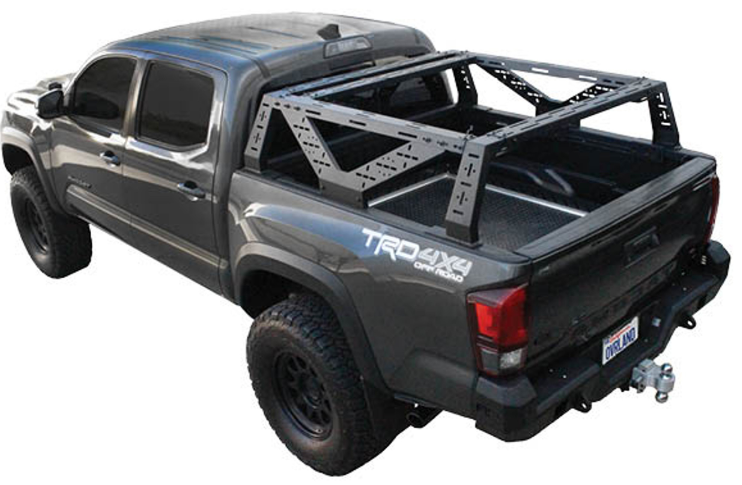
Parts List
- 1x Driver/Left Front Support Plate
- 1x Passenger/Right Front Support Plate
- 1x Driver/Left Rear Support Plate
- 1x Passenger/Right Rear Support Plate
- 2x Side Plates
- 2x Side Rails
- 3x Crossbars
- 2x Crossbar Mounting Brackets
- 2x Side Plate Mounting Brackets
- 2x 258mm x 56mm x 3mm Foam Strips
- 2x 246mm x 72mm x 3mm Foam Strips
- 4x 240mm x 60mm x 3mm Foam Strips
- 2x 186mm x 72mm x 3mm Foam Strips
- 56x8mm x 25mm Torx Bolts
- 24x8mm x 25mm Hex Bolts
- 80x 8mm Lock Washers
- 80x 8mm x 24mm OD x 2mm Flat Washers
- 56x 8mm Flange Nuts
- 12x Block Nuts
- 12x Clamping Blocks
- 12x Nut Plates
- 1x 8mm Torx Wrench
REMOVE CONTENTS FROM BOX. VERIFY ALL PARTS ARE PRESENT. READ INSTRUCTIONS CAREFULLY BEFORE STARTING INSTALLATION. ASSISTANCE IS RECOMMENDED. DRILLING IS OPTIONAL.
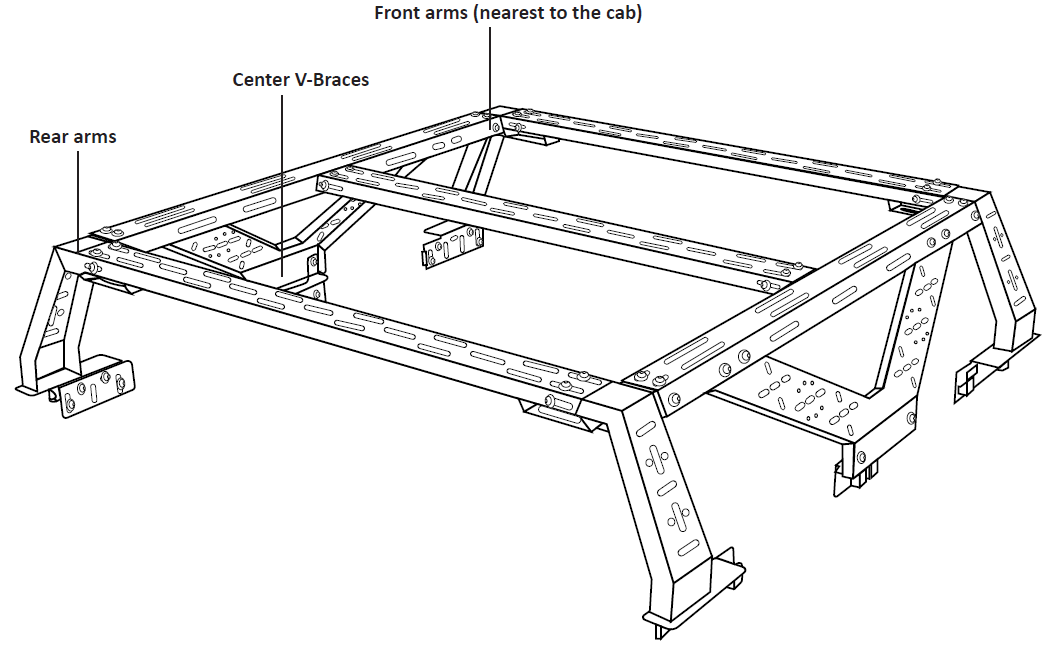
BEFORE YOU START (MID-SIZE TRUCKS)
This is a Universal Bed Rack and the bolt orientation will be determined by your truck.
Typically,
Front Arms will require 2 Bolts and have 4 Holes on the respective arm (Each Side) Center V-Braces will require 2 Bolts and have 2 Holes on its sections. (Each Side) Rear Arms will require 2 Bolts and 3 Holes on their respective arms (Each Side)
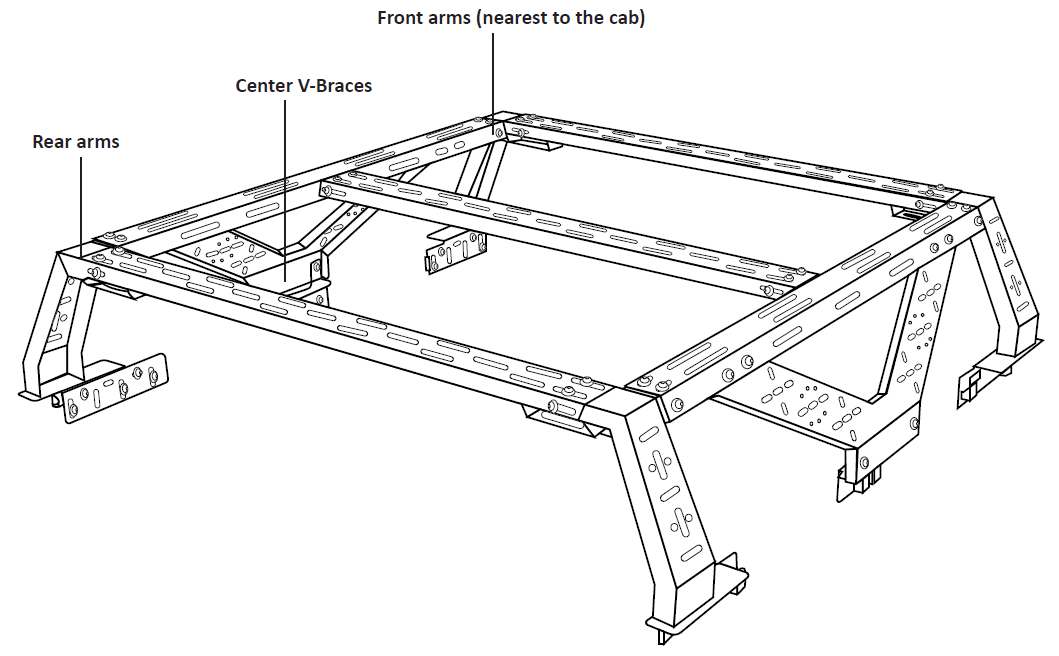
BEFORE YOU START (FULL-SIZE TRUCKS)
This is a Universal Bed Rack and the bolt orientation will be determined by your truck.
Typically,
Front Arms will require 2 Bolts and have 4 Holes on the respective arm (Each Side). Center V-Braces will require 2 Bolts and have 2 Holes on its sections. (Each Side) Rear Arms will require 2 Bolts and 4 Holes on their respective arms (Each Side)
SET-UP INSTRUCTIONS
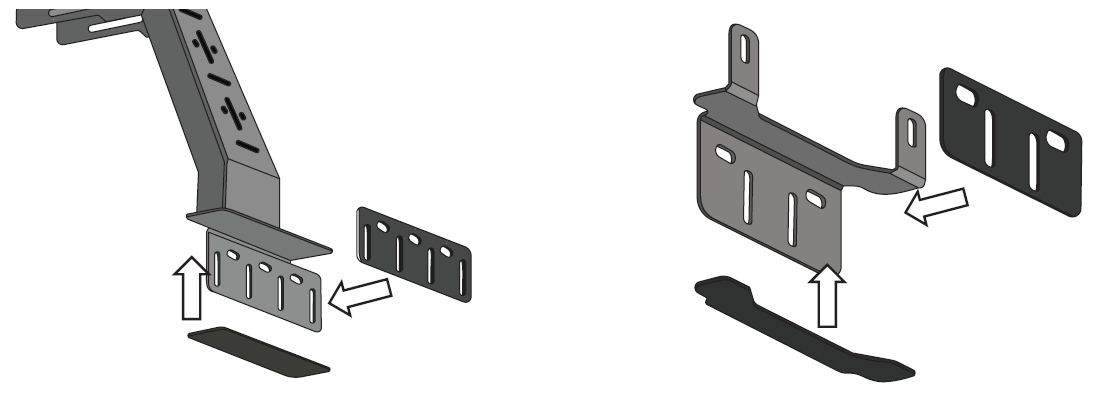
- Select the Foam strips. Apply the appropriate foam strips to the inner corners of the front and rear support plates and side plate mounting brackets.
- Remove tonneau cover if equipped. Select the Front Support Plates and Crossbar. Attach the crossbar to the front plates with 8mm Torx Bolts, 8mm Lock Washers, 8mm Flat Washers and 8mm Flange Nuts, Do not tighten hardware.
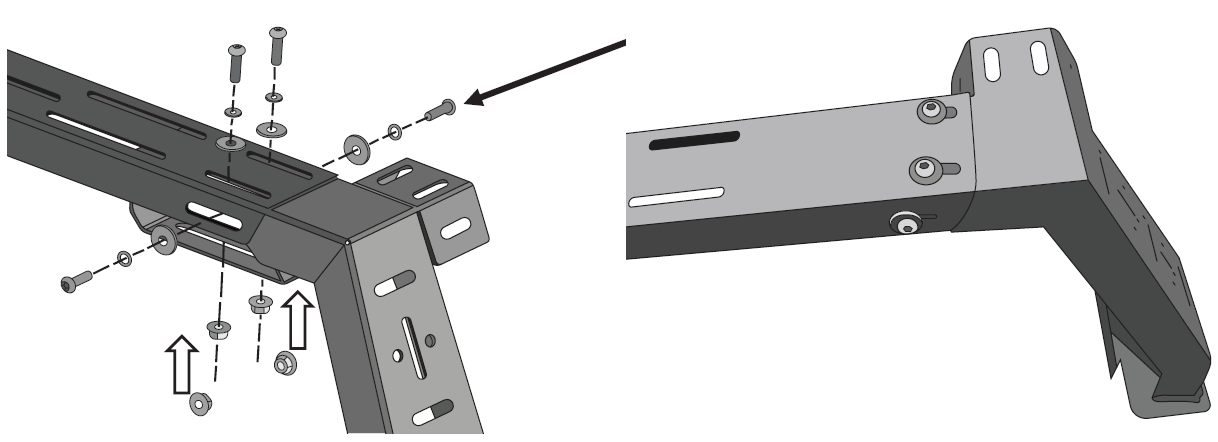
- Select side rail and the Driver/Left rear support bracket. Attach the side rail to the front and rear support plates with 8mm Torx Bolts, 8mm Lock Washers, 8mm Flat Washers and 8mm Flange Nuts. Do not tighten hardware. Repeat this Step to attach the remaining side rail and the Passenger/Right support plate to the passenger/right side of the bed rack.
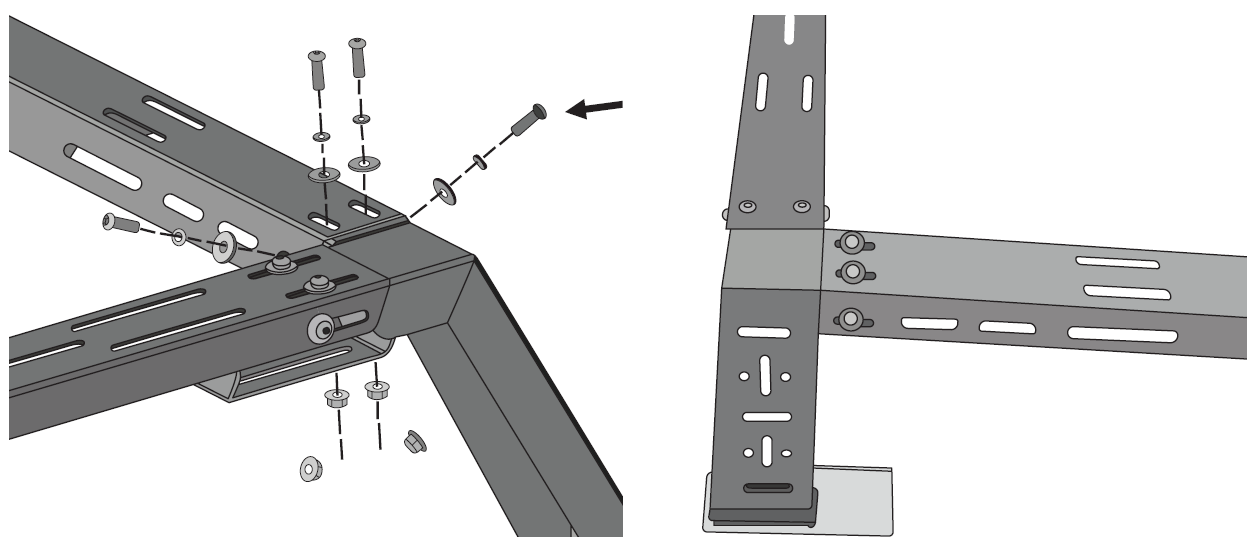
- Repeat Step 2 to attach Crossbar to the Rear Support Plates.
- Select the remaining Crossbar and Crossbar mounting brackets. Attach crossbar mounting bracket to each side of the crossbar with 8mm Torx Bolts, 8mm Lock washers, 8mm Flat Washers and 8mm Flange Nuts. Do not tighten hardware.
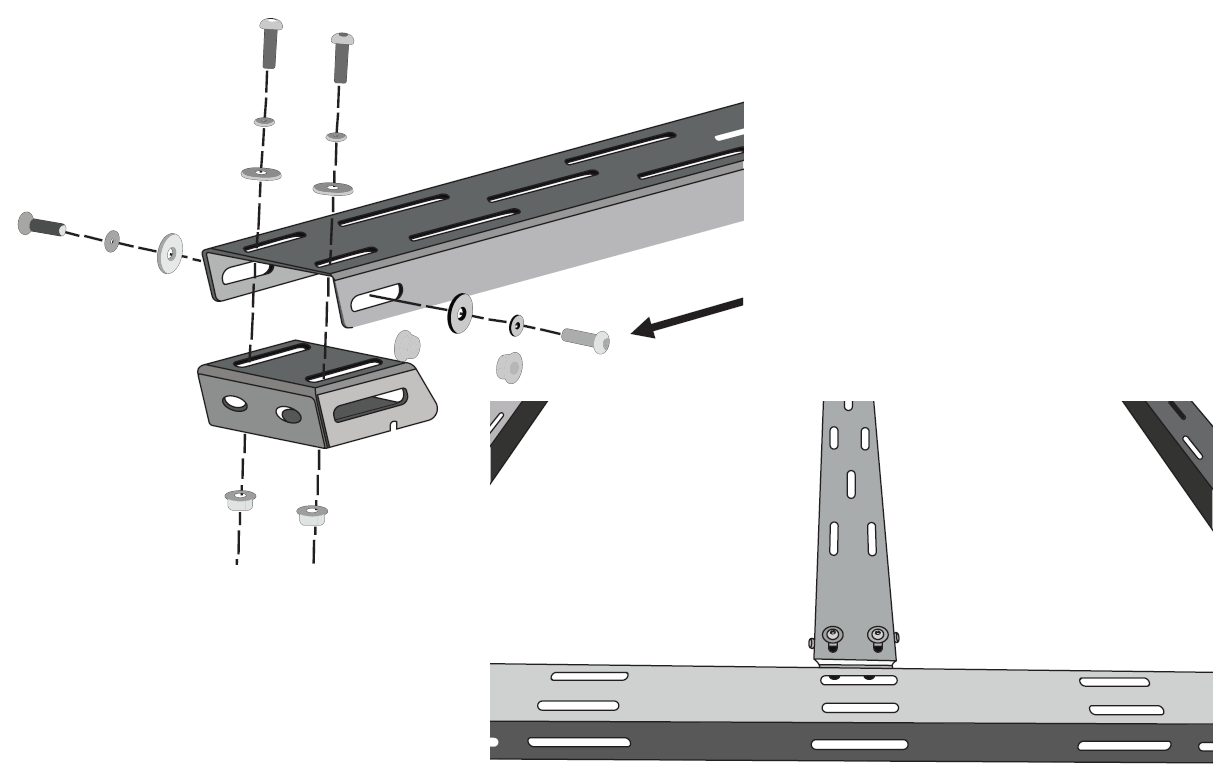
- Locate the center slot in the Side rails. Attach the crossbar mounting brackets to the center slot in the side rails with 8mm Torx Bolts, 8mm Lock washers, 8mm Flat washers and 8mm Flat Nuts. Do not tighten hardware.
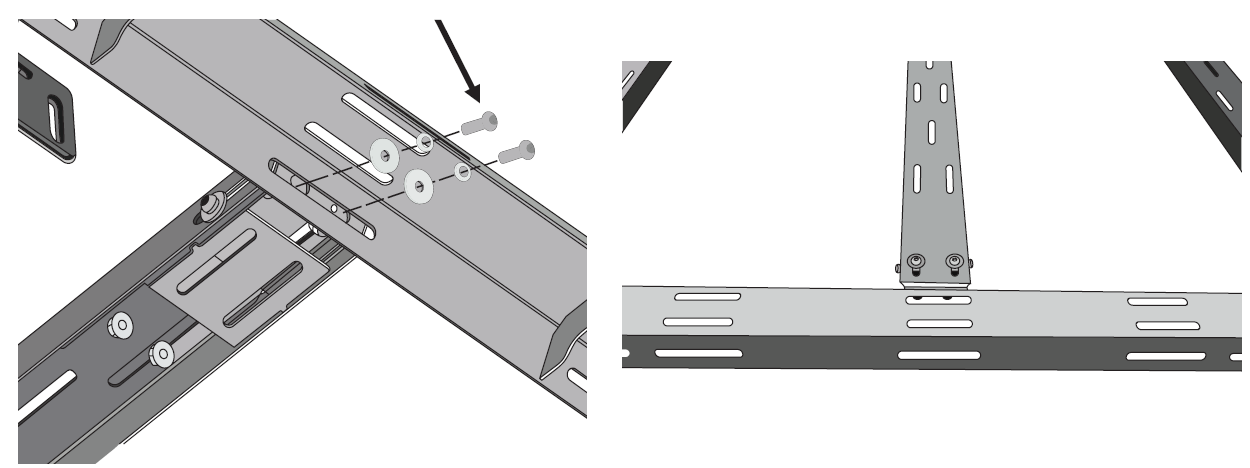
- Select side plate. Attach the side plate onto the underside of the side rail with 8mm Torx bolts, 8mm Lock washers, 8mm flat washers and 8mm Flange nuts. Do not tighten hardware. Repeat this Step to attach the remaining side plate to the underside of the side rails.
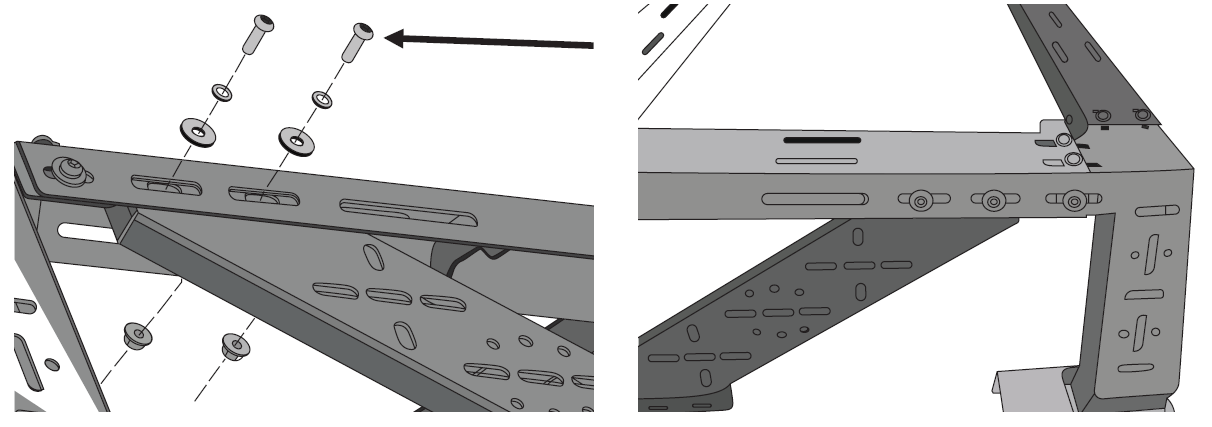
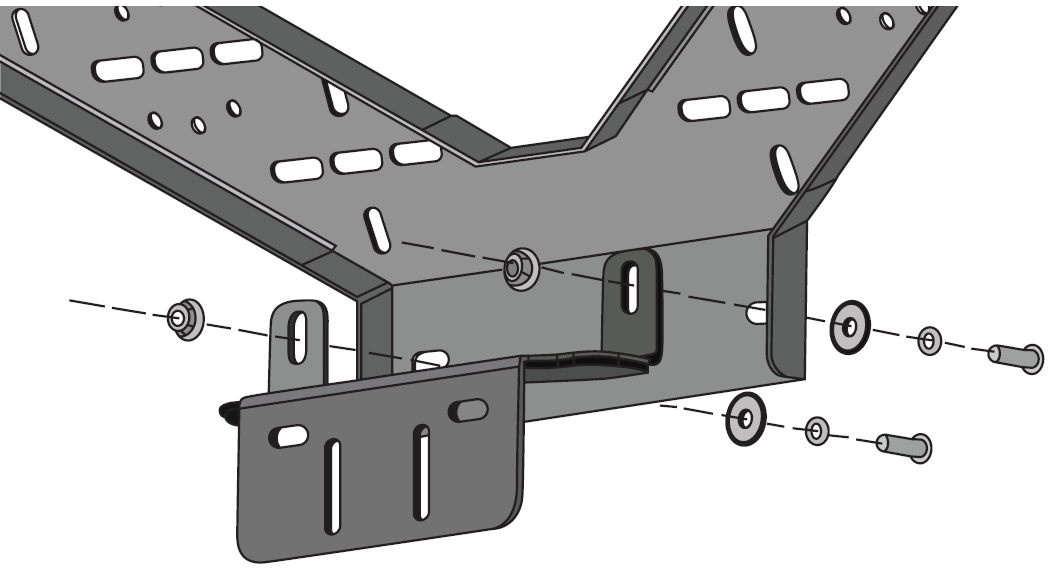
- Select Side plate mounting bracket. Attach the mounting bracket to the bottom inside of the side plate with 8mm Torx bolts, 8mm Lock Washers, 8mm Flat Washers and 8mm Flange Nuts. Do not tighten hardware. Repeat this Step to attach the remaining Mounting Bracket to the Side Plate.
- FOR VEHICLES EQUIPPED WITH BED RAILS:
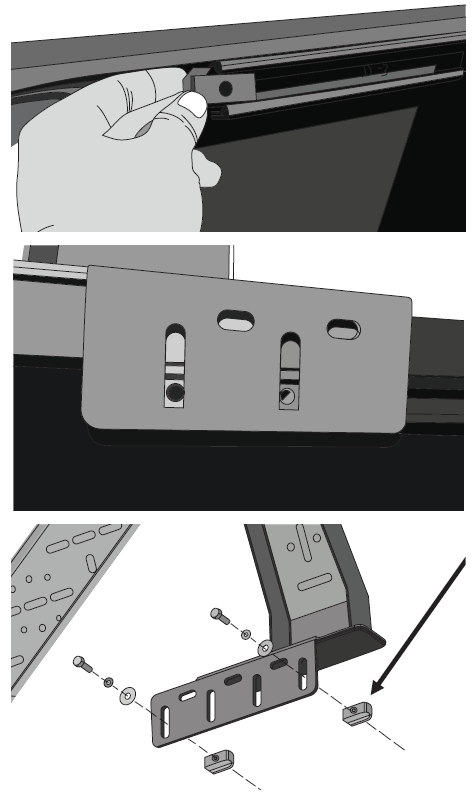
Select the Block Nuts. Insert Block Nuts into each channel on each side of the bed of the vehicle- With assistance, lift the Overland Bed Rack assembly onto the walls of the bed.
- Line up the Block Nuts to the desired slot in each mounting plate, Block Nuts per mounting plate.
- Attach the Bed Rack to the Nut Blocks with 8mm Hex Bolts, 8mm Lock Washers and 8mm Flat Washers, Do not tighten hardware.
- FOR VEHICLES NOT EQUIPPED WITH BED RAILS:
With assistance, lift the Overland Bed Rack assembly onto the walls of the bed.
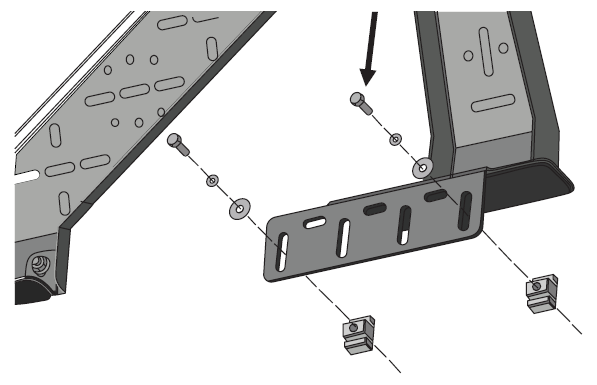
Select the Clamping Blocks- Line up each Clamping Block behind a slot in the mounting plates and place the lip of the Clamping Block behind the lip of the bed.
- Attach the Bed Rack to the clamping brackets with 8mm Hex bolts, 8mm Lock Washers and 8mm Flat Washers. Do not tighten hardware.
- OPTIONAL DRILLING
Mark upper slots in each mounting plate, Temporarily remove the Bed Rack from the vehicle.- With a 5/16″ Drill bit, (not included) drill through the bed. Replace the bed rack onto the bed.
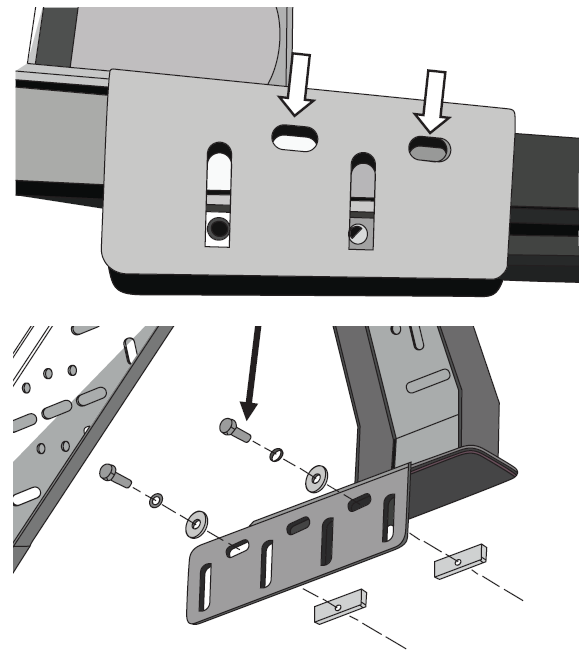
- Attach the bed rack to the drilled holes with 8mm Hex Bolts, 8mm Lock Washers, 8mm Flat Washers and Nut Bolts.
- Replace the appropriate hardware. Do not tighten hardware.
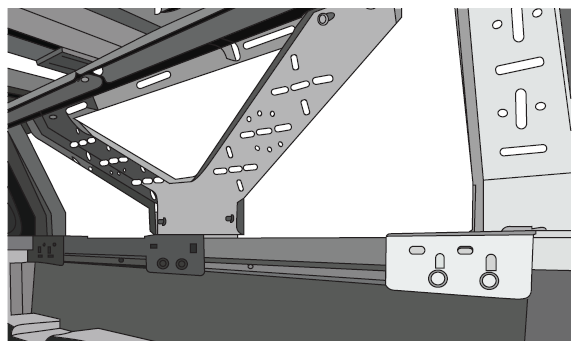
- With a 5/16″ Drill bit, (not included) drill through the bed. Replace the bed rack onto the bed.
- Level and adjust the Overland bed Rack and tighten all hardware.
- Do periodic inspections to the installation to make sure that all hardware is secure and tight.
CLEANING
Do not use any type of polish or wax that may contain abrasives that could damage the finish. Mild soap may be used to clean the Universal Mid Height Rack
STORING
Store in a cool and dry area, when not in use.
LOAD CAPACITY
150-400 lbs Dynamic Weight
700 lbs Static Weight
INTENDED USE
This unique truck rack transports anything from construction materials and ladders to kayaks and more!
INSTALLATION PRECAUTIONS
- Follow DOT regulations regarding installation and use.
- Park truck on a flat, level, hard surface well away from traffic. Place transmission in park.
- Verify that installation surface has no hidden wires before drilling or driving screws.
- Install only according to these instructions. Improper installation can create hazards.
- Wear ANSI-approved safety goggles and heavy-duty work gloves during assembly and installation.
- Mount Truck Rack securely to vehicle.
- Keep installation area clean and well lit.
- Keep bystanders out of the area during installation.
- Do not install when tired or when under the influence of drugs or medication.
- Weight capacity and other product capabilities apply to properly and completely installed product only
WARNINGS
- READ AND UNDERSTAND ALL INSTRUCTIONS. FAILURE TO FOLLOW ALL INSTRUCTIONS LISTED, FAIL TO READ MAY RESULT SERIOUS INJURY.
- DO NOT CUT OR MODIFY THE BED RACK OR MOUNTING ACCESSORIES.
- DO NOT EXCEED THE VEHICLE MANUFACTURER’S WEIGHT LIMITS.
- DO NOT USE DAMAGED OR EXCESSIVELY WORN PRODUCTS. CONTACT US IF YOU ARE UNSURE.
- THE WARNINGS, CAUTIONS, AND INSTRUCTIONS DISCUSSED IN THIS INSTRUCTION MANUAL CANNOT COVER ALL POSSIBLE CONDITIONS OR SITUATIONS THAT COULD OCCUR. IT MUST BE UNDERSTOOD BY THE OPERATOR THAT COMMON SENSE AND CAUTION ARE FACTORS WHICH CANNOT BE BUILT INTO THIS PRODUCT, BUT MUST BE SUPPLIED BY THE OPERATOR.
- DO NOT EXCEED RATED WEIGHT CAPACITY OF TRUCK RACK, DISTRIBUTED EVENLY. BE AWARE OF DYNAMIC LOADING! SUDDEN LOAD MOVEMENT MAY BRIEFLY CREATE EXCESS LOAD CAUSING PRODUCT FAILURE.
- DO NOT EXCEED RATED WEIGHT CAPACITY OF TRUCK. REFER TO TRUCK’S GROSS VEHICLE WEIGHT RATING.
- STRAP LOAD SECURELY TO MID HEIGHT RACK.
- USE AS INTENDED ONLY.
- INSPECT BEFORE EVERY USE; DO NOT USE IF PARTS LOOSE OR DAMAGED.
- THIS PRODUCT IS NOT A TOY. DO NOT ALLOW CHILDREN TO PLAY WITH OR NEAR THIS ITEM.
- MAINTAIN PRODUCT LABELS AND NAMEPLATES. THESE CARRY IMPORTANT SAFETY INFORMATION.
- THE WARNINGS, PRECAUTIONS, AND INSTRUCTIONS DISCUSSED IN THIS INSTRUCTION MANUAL CANNOT COVER ALL POSSIBLE CONDITIONS AND SITUATIONS THAT MAY OCCUR. IT MUST BE UNDERSTOOD BY THE OPERATOR THAT COMMON SENSE AND CAUTION ARE FACTORS WHICH CANNOT BE BUILT INTO THIS PRODUCT, BUT MUST BE SUPPLIED BY THE OPERATOR
DO YOU NEED OUR HELP?
CUSTOMER SUPPORT 833-226-4863
SALES@OVERLANDVEHICLESYSTEMS.COM
WANT TO SHOW US YOUR RIG?CHECK OUT OUR SOCIAL!
@overlandvehiclesystems
Documents / Resources
 | Mid Height Rack |
References
- User Manualmanual.tools